System
User Maintenance
System Location: Settings > System > User Maintenance
User Accounts determine who can log in to JobBOSS2 and the amount of access available when they do based on the number of seat licenses purchased and the amount of security provided.
Seat Licenses
The number of seat licenses purchased determines the number of User Accounts that can be created that allow the user to enter information. For example, purchasing 2 seat licenses means 2 User Accounts can be created that allow read/write access to the system.
- Leave the View Only User field blank (located in the Credentials section) to provide the User Account with read/write access.
Create additional User Accounts as desired; however any users beyond the number of seat licenses (2 in the previous example) would have to be marked as View Only.
Note that seat licenses are not concurrent. This means that only User Accounts that have the 'View Only User' field left blank can enter information in the system.
Security
The level of security provided determines what information is available for editing or viewing once a user logs in regardless of whether they are a View Only User or not.
Users To Create
Create a User Account for each of the following:
- Every person that needs to log in to JobBOSS2, whether they need to enter information or not
- Grant read/write access to users based on available seat licenses; other users can still view information as noted previously.
- An ADMIN user
- Every system comes with a SUPERVISOR user by default that has access to every area of JobBOSS2.
- If you keep the existing SUPERVISOR account, make sure to change the password.
- If you delete the SUPERVISOR account, make sure that at least one user has ADMIN privileges.
- Every PC data collection terminal
- A user can only log in on one system at a time, and since data collection requires a login, each terminal needs to have a User Account.
- These users should be View Only and have no security access granted.
- Every employee who would need to provide a signature on an electronic document.
- A single user for the Touchscreen User ID in Company Maintenance (OPTIONAL)
- This User Account determines whether stock to job transfers can be performed and which, if any, Hot Spots are available on PC data collection terminals.
- Select this user in Company Maintenance under the Data Collection section.
- Template accounts (OPTIONAL)
- Create a "dummy" user with information appropriate for a certain function, such as accounting, and then use the Copy utility to create new users that need that level of access.
- This option is useful in situations where multiple users share the same or similar responsibilities.
The following reports / forms / labels are available under the Print dropdown menu located in the User Maintenance Navigator:
The following report is available in the User Maintenance Header:
- Security Report
- The Security Report will only display security for the company you are currently logged into.

The Copy Utility creates a new User Account and populates it with every detail of the selected user with the exception of the User ID, Name, and Password.
- Verify the level of security is appropriate for the new user since those details are carried over from the selected user.

The Record Header located at the top of the page indicates which specific record has been selected and for what purpose (new, edit, quick view), provides access to shortcuts to the various Sections of the record (located in the Anchor Bar), and displays record specific Action Buttons (discussed below.)
For more information see User Interface.
Action Buttons
Security Report
Use this option to generate a report that lists which areas of JobBOSS2 the user selected in the report filter screen has access to.
- You can generate the report for any user, not just the one that was selected when the Security Report button was clicked.
Hot Spots
Click this button to assign Hot Spots to the selected user or to edit the list of Hot Spots already assigned.
For more information see Hot Spots.
OK
Save Button Details
This button is used to close the record and save any changes that have been made while it was open. In addition, the dropdown button allows you to Save and:
- Close - close the open record.
- New - open a new blank record.
- Print - print any of the reports related to the open record.
Cancel
Cancel Button Details
This button is used to close the record without saving any changes that may have been made while it was open. If this button is used after a change has been made to the record, the system prompts to verify whether the record should be closed without saving the changes.
Answering "Yes" to the prompt closes the record without saving the changes.
Answering "No" to the prompt leaves the record open.
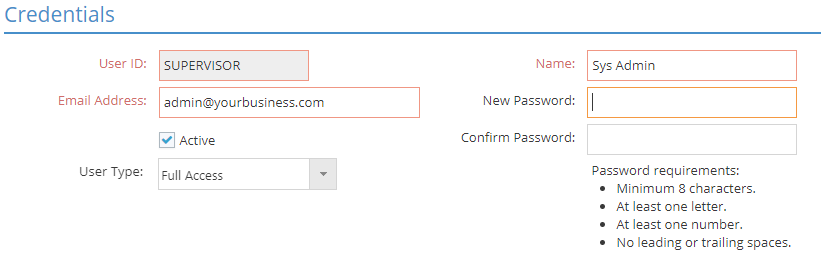
Use this section to uniquely identify, set a password, and determine the read / write ability of the user.
An asterisk [*] indicates a required field.
*User ID
This value uniquely identifies the User Account and indicates who is logging in.
- Can be up to 12 alpha-numeric characters
- Must be unique
*Email Address
Enter the Email address associated with the User ID.
*Auto Generate Login Email Address
If SSO is enabled, this button only displays when the User Type selected is Data Collection Only. This button auto generates a unique Login Email Address based on the User ID and URL. As an example, if the User ID is PCDC1 and the URL is AcmePlating.mye2shop.com the unique email generated and populated in the Login Address Field will be PCDC1@AcmePlating.myd2shop.com.
*Name
Enter the full name of the user.
- Name order does not matter (i.e. Last Name, First or First Name Last Name is fine)
- Can be up to 30 alpha-numeric characters
*New Password
The password field is not required unless a new User Account is being created.
Enter a password when first creating the User Account or when a new password is required; otherwise this field does not need to be filled in. When a password is entered, it must meet the following requirements:
- Minimum of 8 characters
- At least one letter
- At least one number
- No leading or trailing spaces
Confirm Password
Re-enter the value provided in the New Password field when entering or changing a password.
Active
This checkbox indicates whether the User Account is considered active or not.
User Type
This dropdown determines whether the user is able to enter and edit information in JobBOSS2 or not.
- Full Access
- Select this option for users that need to be able to enter and edit information in JobBOSS2.
- Providing the user with read / write access uses an available seat license.
- The number of users with read / write access cannot exceed the number of seat license available.
- View Only
- Select this option if the user needs to log in to JobBOSS2 but does not need to have read/write access.
- View Only users do not require a seat license.
- Data Collection Only
- Select this option if the user only needs to log into data collection.
- Data Collection Only users do not require a seat license.
- Public API View Only
- Select this option if the user needs to log in to JobBOSS2 but does not need to have read/write access.
- Public API View Only users do not require a seat license.
Use this grid to determine which companies the user can access and the level of security provided within each one.
Company List Action Buttons

Click this button to determine which areas of the system the user can access.
Security settings determine which records a user can access; the View Only User checkbox (in the General Section) determines whether the user can enter information in them.
For more information see User Maintenance - Security.
Company List Grid
Allow Access
Place a check next to each Company the user should be able to log in to.
- Selected companies appear in the Company dropdown menu available when logging in.
Company / Description
These fields identify the company databases the user can potentially access.
Connect String
This field provides the connection details for each data source available.
Configure information in this section to allow Emails to be sent from within JobBOSS2 for the Email Address entered in the General Section of the User Account.
For more information see Configuring User Email Settings.
If you are required to maintain a Whitelist for Email, see
Email Server IP Addresses for Whitelisting
Outgoing Email Box
Use these options to allow reports and other forms to be emailed directly from JobBOSS2.
Email Type
Choose GCC, SMTP, Google, Microsoft 365, or GoDaddy.
SMTP Email Type
-
Encryption Protocol- Select the appropriate encryption protocol option from the dropdown menu provided. Select None if your Email server / host does not require encrypted connections; otherwise select SSL/TLS.
- SMTP User ID - Enter the user ID associated with the Email address provided in the General Section.
-
SMTP Password - Enter the password associated with the Email address provided in the General Section.
Gmail OAuth2 Email Type
Note: This feature is only available for hosted JobBOSS2customers. Users must have a Gmail account listed in the Credentials section to use this feature.
-
Click the Sign in with Google button.
-
Enter the Gmail address and then password in the Sign in boxes and then click Next.
-
Another sign-in window opens, prompting consent for JobBOSS2 to access the Google account. Click on the Learn More link showing the number of services to which JobBOSS2 has access. Click Done and then click Continue.
-
Click the Save button to confirm the changes.
Microsoft 365 OAuth2 Email Type
-
Click the Sign in with Microsoft button.
-
Enter the Microsoft email address, phone number or Skype ID.
- Enter the password and then click Sign in.
-
Another sign-in window opens, prompting consent for JobBOSS2 to access the Microsoft account.
- Click Yes to allow JobBOSS2 to access data, read your profile and send email as you.
-
The email address is then automatically populated in JobBOSS2.
-
Click the Save button to confirm the changes.
GoDaddy OAuth2 Email Type
-
Click the Sign in with Microsoft button. The GoDaddy page with the Microsoft credentials login box opens.
-
Enter the Microsoft email address.
- Enter the password and then click Sign in.
-
Another sign-in window opens, prompting consent for JobBOSS2 to access the Microsoft account.
- Click Yes to allow JobBOSS2 to access data, read your profile and send email as you.
-
The email address is then automatically populated in JobBOSS2.
-
Click the Save button to confirm the changes.
Microsoft 365 OAuth2 does not include support for Microsoft 365 GCC or GCC High. On-premise customers need to follow these additional steps to initialize OAuth2. On-premise customers who want to use GoDaddy need to follow these additional steps for OAuth2.
Contact your IT staff or Email provider if you are not sure what values to enter for the server settings.
Enter the credentials used to access the Email account, not JobBOSS2.
If you apply a change to your signature, queued reports and triggers will not pull the updated signature. If you change your signature, you must remake your queued reports and triggers or manually update them to see the new signature.
Use these settings to determine whether the user is able to perform the associated miscellaneous functions within JobBOSS2.
Allow user to add/modify standard triggers
Select this option to allow the user to access triggers.
- Users with this option can run, add, and edit triggers.
- Users without this option cannot access triggers.
For more information see Triggers.
Allow user to create custom reports
Select this option to provide the user with access to the Report Designer tool available throughout JobBOSS2.
For more information see Using the Report Designer.
Allow user to design dashboards
Select this option to provide the user with access to edit dashboards.
For more information see Dashboards - Reference.
Allow user to edit grid navigators
Select this option to provide the user access to add, remove or edit columns. Admins control which users can edit columns.
For more information see User Interface.
Document Control Settings
Allow user to edit documents
Select this setting to allow the user to attach, remove, and view files to records using the Documents screen located throughout JobBOSS2.
- This setting requires the Allow user to view documents setting to be selected as well.
Allow user to view documents
Select this setting to allow the user to view files attached to records using the Documents screen located throughout JobBOSS2.
- This setting provides access to the Get File dropdown menu which allows the user to view or download the attachment.
User-Defined Field Settings
For more information see User Defined Fields.
Allow user to design fields
Select this setting to allow the user to design user-defined fields as well as edit and view the values they display.
- This setting requires the Allow user to edit values and Allow user to view values settings to be selected as well.
Allow user to edit values
Select this setting to allow the user to edit and view values displayed in user-defined fields throughout JobBOSS2.
- This setting requires the Allow user to view values setting to be selected as well.
Allow user to view values
Select this setting to allow the user to view values displayed in user-defined fields throughout JobBOSS2.
 Associated Reports