Using JobBOSS2; Using the System; Navigating; Navigation
User Interface
Logging into JobBOSS2 brings up the User Interface (UI) within your PC's default web browser where all work is done. By default the system displays the JobBOSS2 Dashboard screen.
This Topic covers the following:
- Fixed Interface Options - Options available at all times regardless of location
- Area Specific Interface Options - Options that vary based on the Area and Record selected
Fixed Interface Options
The following interface options are visible and available for use regardless of what Area is opened or the Action being taken.

 Session Information
This line provides information about the current session, including:
- The company that is open (ABC Manufacturing Company)
- The data being accessed (E2_ABC_MFG)
- The ECI Software Solutions, Inc. icon is not an active link.
- Quick Access Toolbar
This toolbar provides easy access to the following options:
-
 Hot Spots
- Click this icon to open the Hot Spots Navigator.
-
 Triggers
- Click this icon to open the list of triggers available for the area of JobBOSS2 that is currently open.
- For more information see Triggers.
-
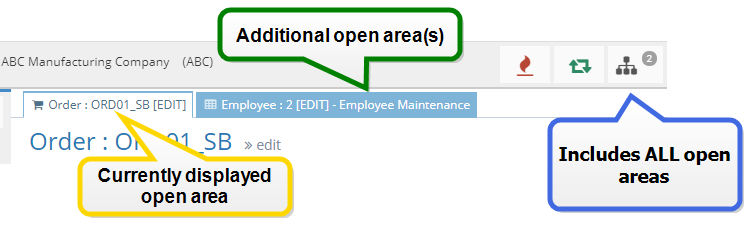
 Open Areas
- This icon indicates how many records the user currently has open.
- Simply navigating to an area of JobBOSS2 does not count as an "Open Area" - the user must actually access a specific record or be in the act of creating a new one.
- Clicking the icon when multiple areas are open provides a dropdown list of active records for quick navigation.
- The dropdown list also provides an option to 'Close All Open Areas' at one time.
- Each open area also displays as a tab at the top of the Content Display Area and can be accessed by clicking the tab.
- This icon indicates how many records the user currently has open.
 Chat / Messaging
- Click this icon to open the Chat window to create a message for one or more JobBOSS2 Users.
-
 Multi-Tab
- Click this icon to open another page of JobBOSS2 in a separate browser tab.
-
 Help
Help
- Click this icon to access the Help File.
- For more information see Using JobBOSS2 Help.
 User Options (Welcome Drop Down Menu)
- Open this drop down menu to access the following options available to the user currently logged in to JobBOSS2:
- Contact Calendar - Used to track events and calls associated with JobBOSS2 records
- NOT linked to external calendars such as Outlook
- For more information see Contact Calendar.
- Contact Summary - Can generate a summary report of Contact Management entries
- Repository Manager - Used to control external files associated with JobBOSS2 records
- Change Password - Current user can change their password for JobBOSS2, incoming Emails, and / or outgoing Emails
- The JobBOSS2 Password must meet the following requirements:
- Minimum of 8 characters
- At least one letter
- At least one number
- No leading or trailing spaces
- The JobBOSS2 Password must meet the following requirements:
- Change Company or Product - Current user can change the product (Shop, Quick View, or Data Collection) or which company they are logged into if more than one is available.
- The selection screen that appears during the login process opens, allowing the user to select a product and/or a company without having to log out and log back into the software.
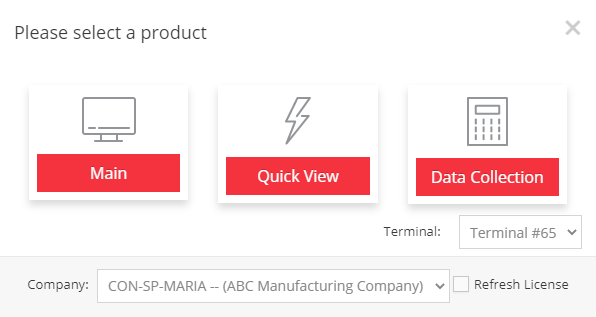
- If you are using the multiple tabs feature, changing the product or company on one tab will not affect the other tabs.
- The selection screen that appears during the login process opens, allowing the user to select a product and/or a company without having to log out and log back into the software.
- Logout - Logs the current user out of JobBOSS2
- The system will automatically log users out after 8 inactive hours. A prompt will appear warning the user 60 seconds in advance, and then a prompt will remain on the screen telling the user they have been logged out.
- Contact Calendar - Used to track events and calls associated with JobBOSS2 records
- Open this drop down menu to access the following options available to the user currently logged in to JobBOSS2:
-
- Sidebar Headers
Provides access to different functional areas of JobBOSS2 and determines what information displays in the Sidebar. Sidebar Header Options include:
-
 Settings
- Settings is used primarily for configuring and maintaining information in JobBOSS2. Options include:
- Tables
- Base Tables
- System
- Misc Utilities
- Hot Spots
- Settings is used primarily for configuring and maintaining information in JobBOSS2. Options include:
-
 Reports
- Reports provides access to the majority of summary reports found in JobBOSS2. Options include:
- Quoting
- Orders
- Purchasing
- Inventory
- Shop Floor Control
- Cost Analysis
- Quality
- AR
- AP
- G/L
- Tables
- Reports provides access to the majority of summary reports found in JobBOSS2. Options include:
-
 Data Entry
- Data Entry is used to create and edit records that are used in the daily operation of a business. Options include:
- Dashboard
- Quoting
- Orders
- Purchasing
- Inventory
- Shop Floor Control
- Quality
- AR
- AP
- G/L
- Data Entry is used to create and edit records that are used in the daily operation of a business. Options include:
-
 QuickView
- The QuickView Sidebar Header provides access to read only information related to many areas of JobBOSS2, most of which can also be access by clicking the appropriate Quick Jump (Lightning Bolt) icon associated with records throughout JobBOSS2. Options here include:
- Customer Inquiry
- Data Collection
- Employee Inquiry
- Executive Overview
- Job Status
- Material Forecast
- Part Inquiry
- P.O. Status
- Schedule
- Vendor Inquiry
- Work Center Inquiry
- The QuickView Sidebar Header provides access to read only information related to many areas of JobBOSS2, most of which can also be access by clicking the appropriate Quick Jump (Lightning Bolt) icon associated with records throughout JobBOSS2. Options here include:
-
- Navigation Sidebar
Provides access to specific options associated with the selected Sidebar Header (see previous list.)
- The options available in the Sidebar will vary based on the Sidebar Header selected.
- Clicking an option in the Sidebar typically opens a list of associated sub-options.
- A "down arrow" in a Sidebar Option indicates there are sub-options present. Click the arrow to expands the list.
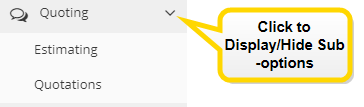
- Click the arrow again to collapse the list.
- Clicking a lower level option (such as Estimating in the image above) opens the appropriate screen in the Content Display Area.
Sidebar Display Options
When Shop is opened in a PC browser window of sufficient width, the Sidebar displays in the expanded format seen above; however it can be collapsed.
Manually Collapse the Sidebar
- Clicking the Collapse Button
 located at the bottom of the Sidebar will reduce the width of the Sidebar so that it displays only icons in order to free up space within the Content Display Area.
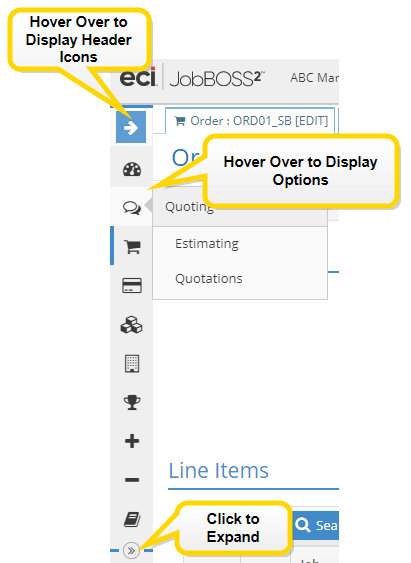
- When collapsed, Sidebar Options - including the Sidebar Headers - are accessed by hovering the mouse over the icon for the desired Area and selecting them from the popup menu that is displayed.
- Click the Expand Button located at the bottom of the Sidebar to return it to its full width.
Auto-collapsing the Sidebar
- When the browser window is displayed on a tablet or is manually reduced to less than 992px in width, the Sidebar will automatically be removed from the side of the browser and replaced with the Display Sidebar Button at the top of the window.
- This icon is often referred to as a "hamburger menu" given its shape of three horizontal lines.
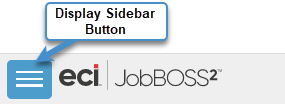
- When clicked, the Sidebar displays in its normal position and can be used as described previously.
- Once an option is selected, the Sidebar will "disappear" in order to free up space for the Content Display Area until the Display Sidebar Button is clicked again.
- Content Display Area
This is the area where information is displayed or data entered into JobBOSS2. The type of screen that appears and the functionality associated with it depends on the option selected, but the most common possibilities include the following:
Dashboard
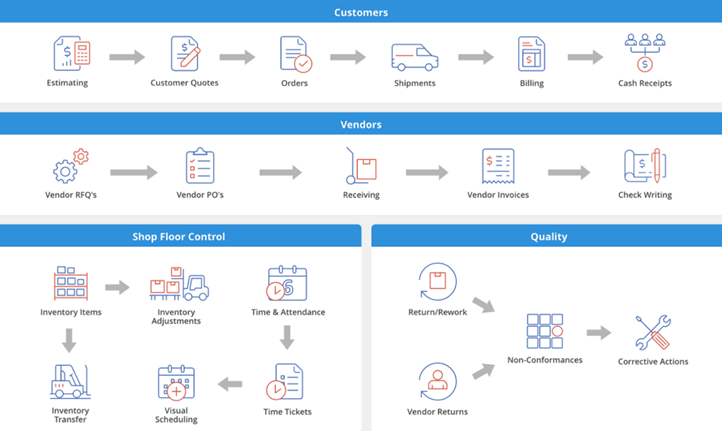
The Dashboard screen provides a visual overview of workflow patterns of transactions associated with customers, vendors, shop floor activity (Shop Control), and quality.
- This screen appears by default when a user logs in and when no specific area of the system is open.
- The dashboard can be accessed from Navigation Sidebar by clicking the Home option.
- Clicking an icon opens the listed area.
Record Navigator
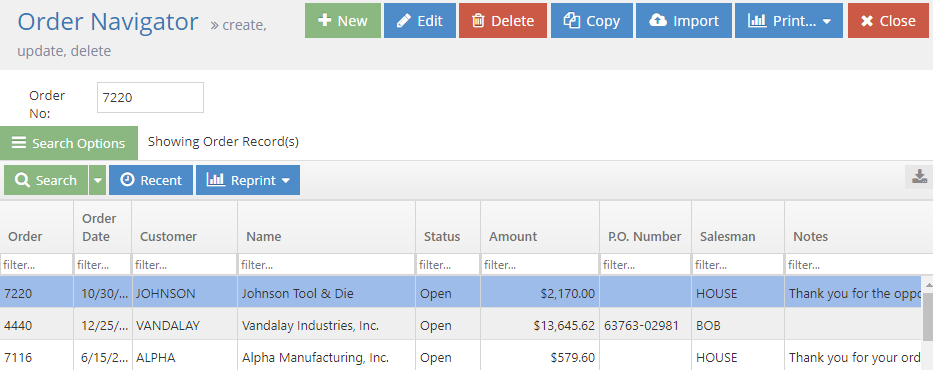
Navigator screens display when the user selects an option from the Sidebar that can have multiple records associated with it. Common examples of options that display a Navigator include:
- Almost all Data Entry items (Quoting, Orders, Purchasing, etc.)
- Tables
- Base Tables
- Most QuickView items
Common features associated with Navigators include:
- The ability to create new records
- The ability to search for existing records
- The ability to edit / view existing records
- The ability to delete existing records
- Grids in all forms remember the user's position within the grid after the item is viewed and/or edited
- QuickView Navigators do not provide the ability to create, edit, or delete records since it is read only by design.
Some area Navigators will include additional functionality such as the ability to print record specific reports / forms or to use area specific utilities. Those features will be covered in the appropriate Help Topic.
For more information see Record Management.
Record Details
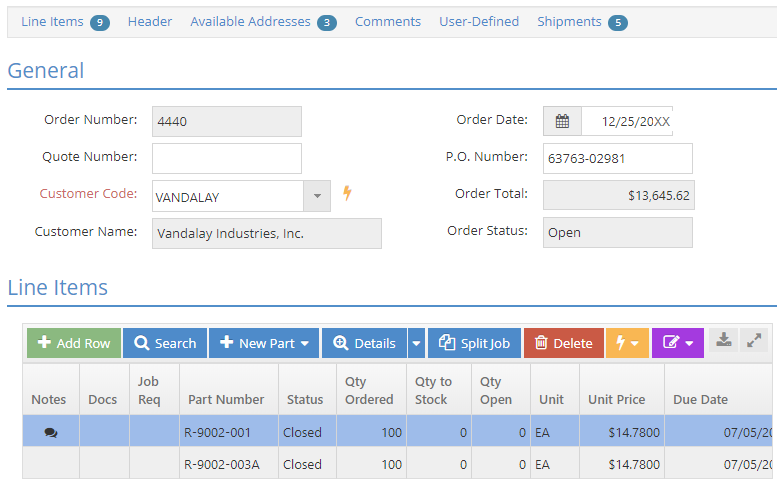
Record details display when the user opts to create, edit, or (in QuickView) view a record. Common examples of records created in JobBOSS2 include:
- Tables and Base Tables (Customers, Vendors, Inventory Items, Work Codes, etc.)
- Pre-production items such as Quotes and Estimates
- Production related items such as Orders, Purchase Orders, Time Tickets, Receivers, etc.
- Accounting related items such as AR and AP Invoices, Checks, Cash Receipts, and Journal Entries
Though the details will vary by area of JobBOSS2 and by record, common details tracked include (where appropriate):
- Record Number (Unique identifier for use by JobBOSS2)
- Description
- Addresses
- Quantities
- Cost and / or sales values
- G/L Codes (often for costing reports)
Viewing details of multiple Line Items:
- Highlight the item you wish to view and click Details.
- From here, there are two options to view the details of the next line item:
- Use the blue VCR buttons located in the upper right corner of the page to navigate forward and backward between line items.
- Click the green OK button located in the upper right corner of the page to exit the current line item and select a new line item.

- VCR buttons do not display in Quick View, Data Collection, Triggers, or Hot Spots.
Information about individual records is provided in the corresponding portion of the Help File.
- The importance of record details cannot be overstated as they provide the information used throughout all of JobBOSS2 for costing purposes, contact information, scheduling, and accounting related functions. With this in mind, it is extremely important that sufficient care is taken in creating and maintaining record details to ensure accurate output.
Report Filters
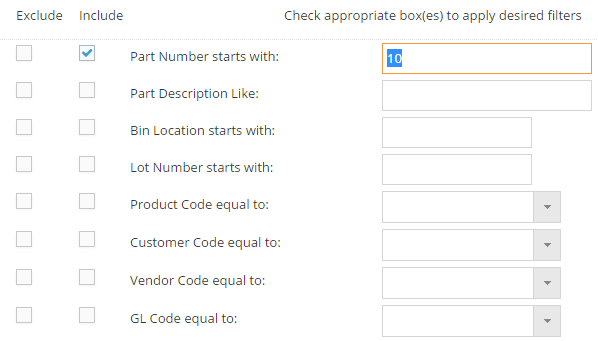
Report filters display when the user selects a summary or record list to generate and provide the ability to limit the amount of information displayed on the selected report.
For more information see Working With Reports.
Utilities
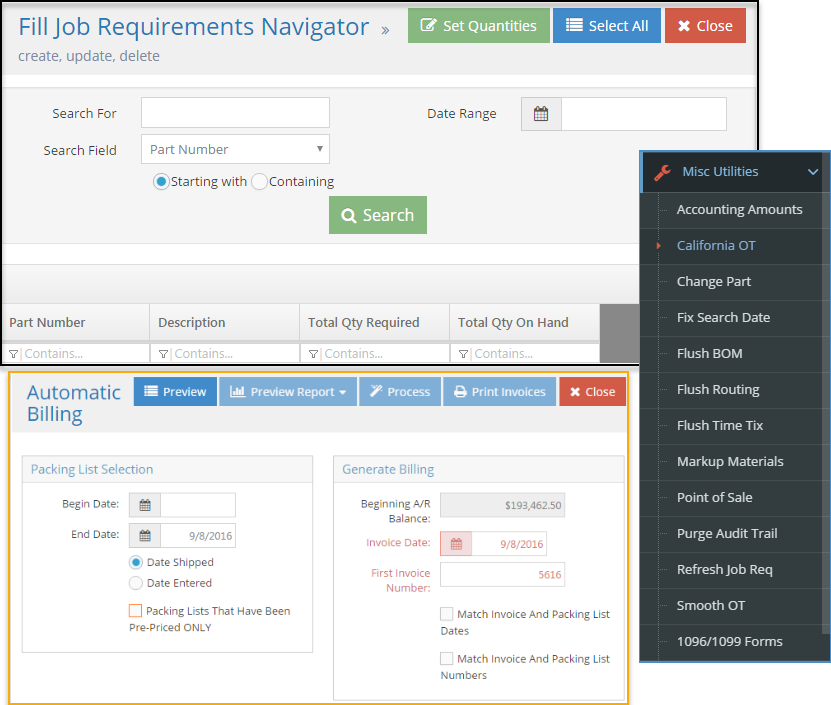
Utilities are available in multiple areas of JobBOSS2, but some of the more common ones include:
- Various "miscellaneous" utilities located under Settings
- Auto record creation utilities for areas such as checks, customer invoices, and packing lists
- Fill Job Requirements (used to post parts from stock to jobs that have a need for available material)
- Though some utilities, such as Fill Job Requirements, technically display a "navigator" screen, their purpose is to allow for the creation or editing of multiple records at one time with regards to some common feature.
For more information see Utilities, Interfaces, & Other Features.
- Version Information
This displays the version of JobBOSS2 being used.
- It is recommended to keep JobBOSS2 updated to the most current version to take advantage of fixes and enhancements.
Area Specific Interface Options
As the user selects options from the Sidebar, the system will display various information in the Content Display Area. Though the information and options provided may change, the functionality and purpose of those area specific options remain consistent.
Navigator Header
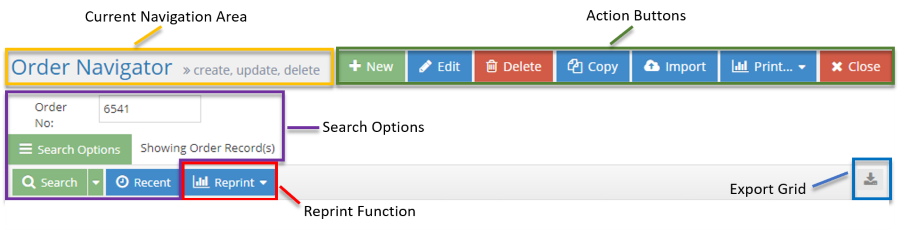
Current Navigation Area
This portion of the navigator identifies what area of the software is currently displaying records for.
Action Buttons
Action Buttons represent the various options available to the user with regards to working with records in the selected area and will typically include the following options:
- New
- Edit
- Delete
- Copy
- Close
In some instances Action Buttons will also include utilities designed to help with the creation or management of records associated with the selected area.
For more information see Utilities, Interfaces, & Other Features.
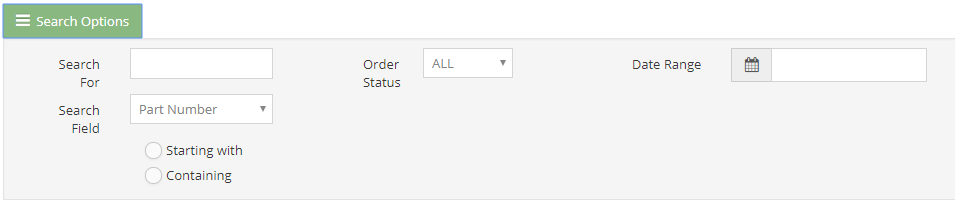
Search Options
When present, Search Options provide a way for the user to select the records to display in the Navigator based on available filters.
- Click the Search Options menu button to see the list of filters available for the selected area.
- To apply the selected filter(s), open the Search dropdown menu immediately above the grid and click Default Search.
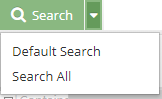
- Click Search All to populate the grid with all records, regardless of the filters selected.
- Click Recent (located immediately above the navigator grid) to see the 10 most recently access records.

- It doesn't matter whether the records were closed by clicking OK or Cancel; they will still display as a result of clicking Recent.
In addition to options similar to the ones displayed here, record grids contain their own filters at the top of each column that can be used to narrow the list of results.
Some Tables and all Base Tables simply display all available records by default and do not provide Search Options as displayed here.
For more information see Record Management.
Reprint Function
The Reprint button allows you to add records back into the print spool. Only the records you highlight are added to the print spool, and the dropdown feature of the Reprint button allows you to select the report you need to reprint.
For more information see Working With Forms and Labels.
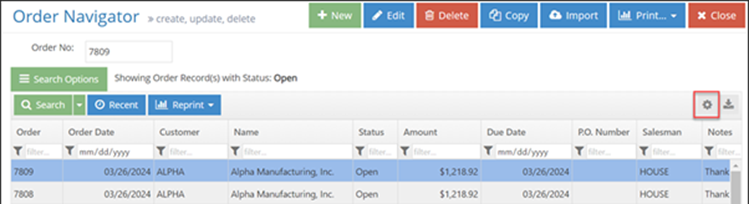
Edit Grid Navigator
Click this button to add, remove or edit columns in the grid.
Export Grid
Click this button to export the current contents of the navigator grid to an Excel spreadsheet.
Grid Column Customization
To allow users to edit grid navigators, view more information on the User Maintenance page.
Grid Column Customization in JobBOSS2 allows users to edit the columns that are displayed in the navigator screens. The functionality works the same through the different Navigator Grids.
On the Navigator screen, click the Gear icon in the top right corner to edit the columns displayed below:
The Grid Column Editor screen opens. On this screen, users can select to add or hide columns:
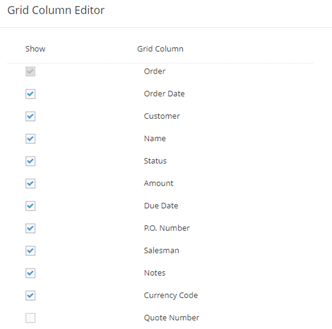
After selecting items, click Reset Defaults to reset the columns to original settings, Save to keep changes made in the editor, or Close to exit the editor without saving any changes.
Record Header
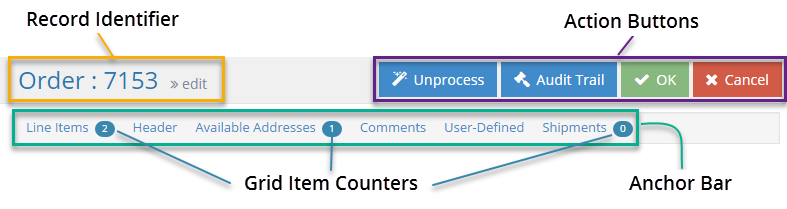
Record Identifier
This displays the unique identifying value for the selected record.
- Also indicates whether the record is being edited (edit), created (new), or viewed (quick view)
- No specific value is listed when the record is being created
Action Buttons
Action Buttons represent the various options available to the user with regards to the selected Record. Given the options available will vary from Area to Area, the functionality of these buttons will be covered within each Record Topic.
Action Buttons can also be found in Area Navigators and some grids within Records.
Anchor Bar
The Anchor Bar displays the various Sections included in the selected Record. Clicking a Section Title will take the user directly to that portion of the Record.
Grid Item Counters
Sections that contain grids will also display Grid Item Counters that indicate the number of line items that are present in that grid.
- Displays zero (0) if no line items are present in the grid
The Anchor Bar and Grid Item Counters are not present in all Record Headers.