Using JobBOSS2; Using the System; Printing
Working With Reports
Reports are located throughout JobBOSS2 and typically fall into one of three categories, two of which are covered in this topic:
- Summary Reports
- Table Lists
- Forms and Labels
- Given the distinctions between forms and labels and other types of reports, they are covered in a separate topic.
For more information see Working With Forms and Labels.
Refer to the topic Reports and Forms Used in JobBOSS2 for a list of all reports and forms included in the system by default.
Summary Reports
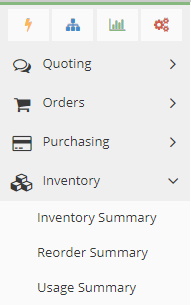
Summary reports are generated in order to get information about multiple records from a specific area of JobBOSS2 at one time. Common examples of summary reports include the Order Entry Summary, Job Schedule, Quotation Summary, and Inventory Summary.
Reports of this nature are located under the Reports Sidebar within the matching software area. For example, to generate an Inventory Summary:
- Click the Reports button.

- Open the Inventory drop-down menu within the Reports Sidebar.
- Select Inventory Summary.
Table Lists
As the name implies, these reports are simply a listing of the multiple entries located under tables and base tables that can be created within JobBOSS2. Accessing these lists depends on whether it is a table or base table.
Tables
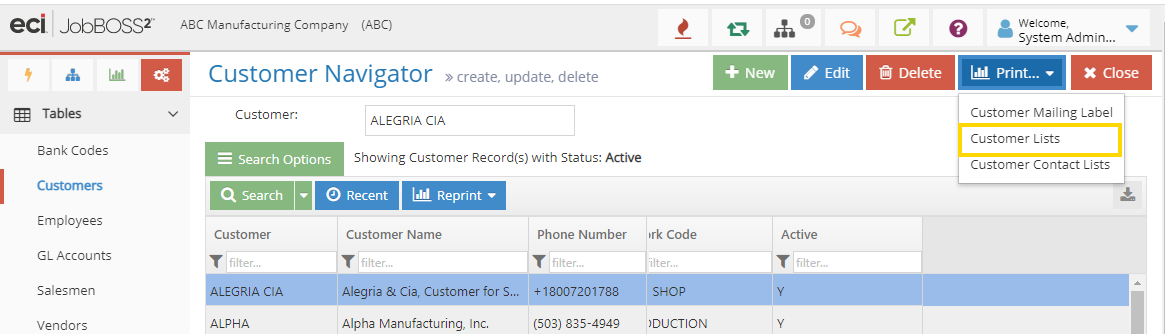
Printing a list of table entries is accomplished from within the specific table. For example, to print a Customer List:
- Click the System button.

- Open the Tables drop-down menu.
- Select Customers.
- From there, click the Print button located in the Customer Navigator.
- Select Customer Lists from the drop-down menu.
Base Tables
Similar to summaries, base table lists are accessed from within the Records Sidebar. To get to a list of base tables:
- Click the Reports button.
- Open the Tables drop-down menu.
- Select Print Tables.
- The system displays the Print Tables List.
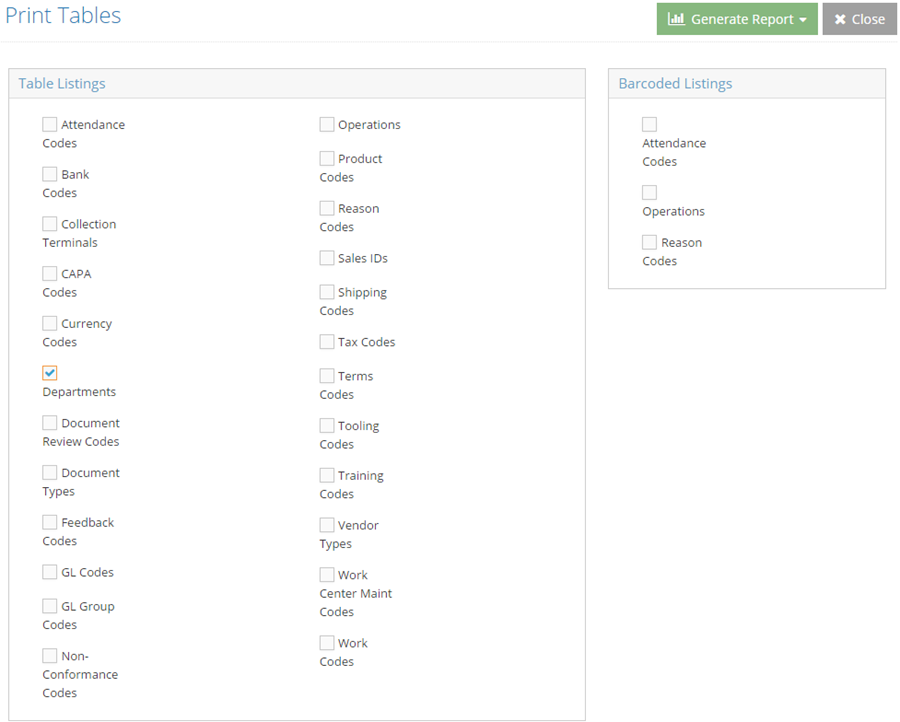
- From here, select one or more tables.
- Click the Generate Report button. (See Generating the Report in this topic for available output options.)
In addition to the standard list of entries available under the Table Listings area, some base tables can also have a bar coded version generated by selecting the appropriate option under Barcoded Listings.
Bank Codes, GL Codes, and Sales IDs can be accessed from the appropriate Table or by going directly to the Print Tables List.
Depending on the report being generated, one or more of the following will be available as a means of specifying how the requested information will display and / or limiting which records are included. The examples below are pulled from the Inventory Summary; however not all reports will include all these features.
Report Filters
When present, filters can be used to narrow the list of records to include on the report.
- Most filters can be used in one of two ways - to include the selected item or to exclude the selected item.
- To include the selected item, place a check in the "Include" check box.
- The report will display all the records that meet the selected criterion.
- To exclude the selected item, place a check in BOTH the "Exclude" and "Include" check boxes.
- The report will display all the records EXCEPT any that meet the selected criterion.
- Examples
- This filter would display a list of all Part Numbers that begin with 10:
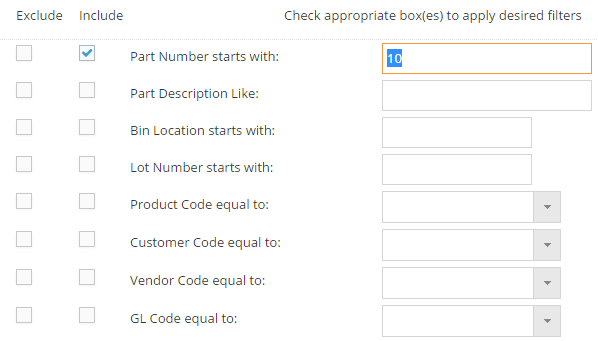
- This filter would display a list of all Part Numbers EXCEPT the ones that begin with 10:
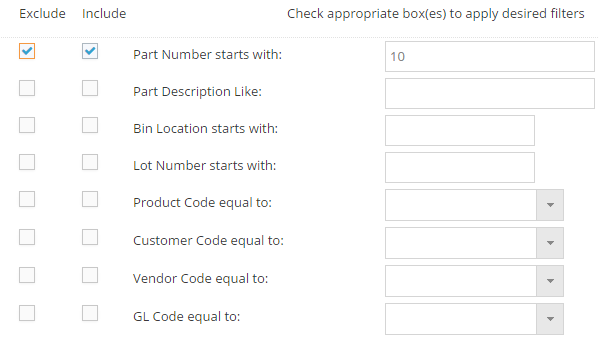
- Multiple filters can be used at the same time.
- If no filters are selected, the report will return a list of all active records (assuming the Status filter has not been changed.)
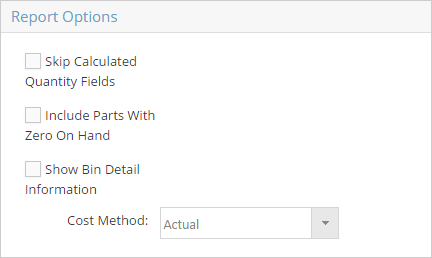
Report Options
When available, report options can be used to determine what and / or how details are displayed for the records included in the report. In this example the options could determine how much detail to show and even impact whether certain records should be included (e.g. Include Parts With Zero On Hand.)
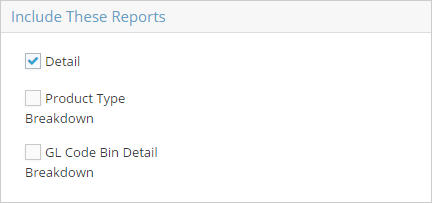
Include These Reports
When this option is present, it provides the ability to print specialized versions of the report in addition to the standard Detail report. In order for the system to generate a report, at least one version option must be selected.
Once the appropriate filters have been applied, the report can be sent to multiple output options.
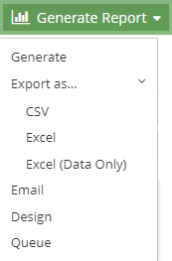
- Open the drop-down menu.
- The Single report dropdown options perform the desired output on the selected report only.
- The All reports dropdown options perform the desired output on all the reports in the list.
- Select the desired output:
- Generate: A pop-up message opens, showing the report is processing. When generated, the report automatically opens in a new tab as a PDF when finished. To the left, there is a list showing the full breakdown of items within the report. Clicking on any items opens it in a new tab for viewing. From there, it can be sent to a printer or downloaded (as a PDF.)
- Users may print by selecting by selecting Print this report at the bottom of the PDF. The PDF window remains open after the report prints.
- To email the report as well, select Email This Report at the bottom of the screen.
- If you close the PDF before you send it as an email, you will have to re-spool the report.
- To print a document with both portrait and landscape pages, click Print this report at the bottom of the page and print the downloaded PDF with the proper formatting.
- Export as: Select to export the report as a CSV, Excel, or Excel (Data Only) file. Select an option, the report automatically generates and downloads. From there it can be sent to a printer or saved.
- Options for saving will depend on the programs present on the computer being used to generate the report.
- Email: The report is generated and an Email Report dialog box opens, Users can enter a designated email recipient and send the report as a PDF attachment.
- This option requires that outgoing email options are configured properly for the user generating the report.
- For more information, see:
- Design: This opens the Report Designer where the user can edit the report format.
- Existing reports can be modified and saved as custom reports, but the original report is not deleted from the system.
- Users that do not have the ability to create custom reports will not see the Design option
- For more information on the Report Designer, see Using the Report Designer and / or Report Designer Reference Information.
- Queue : This opens the Queue Report form where the user can schedule when the report should be generated and how frequently.
Pop-ups must be allowed from JobBOSS2 in order for a report / form to be successfully generated.
On-Premises Configuration Requirements
On-premises installations are required to install and configure RabbitMQ software as part of this enhancement. For more information, see documentation for on-premises upgrades.