On-Premise Upgrade Utility
System Location: Help > About JobBOSS2
The Upgrade Utility is only used by customers who have the software installed on their premises to provide their JobBOSS2 product with the most recent upgrades. In order to properly run the Upgrade utility, you must be on the web server, locally, where JobBOSS2 is installed. If you wish to view the release notes before upgrading yourJobBOSS2 site, you can view them by viewing the New Stuff page.
On-premises installations are required to install and configure RabbitMQ software as part of this upgrade to support the Asynchronous Reporting feature. Follow this checklist before upgrading this utility or watch this video to learn more about Asynchronous Reporting.
The JobBOSS2 Upgrade Utility does make changes to the system. As with any system change, Support highly recommends creating full backups of your JobBOSS2 SQL Server databases, including the JobBOSS2 Master database, before running the utility.
During the upgrade time, your JobBOSS2 site will be unavailable. Schedule this maintenance with your end-users, and plan for the downtime.
 On-Premises Asynchronous Update Checklist
These instructions are designed to verify the components of your local JobBOSS2 installation. Use the information below to successfully update your JobBOSS2 software to the most current version.
Please follow each step below and write down the relevant information in a Notepad file or application of your choice. This information will be useful not only for updating the software now, but also for future updates.
Note: We do have consultants in our Professional Services group that can update the software for you. These resources are billable and scheduled in advance, but their familiarity with the process steps generally results in less downtime for you and your business. For pricing, contact your Account Manager.
Local Website Name
-
The local website name can be found on your JobBoss² server by navigating to the IIS Server Manager. This can be accessed by clicking the Start Menu (Windows icon) and typing ‘INETMGR’. Select the Internet Information Services (IIS) Manager option.
-
With the Internet Information Services (IIS) Manager open, expand your Server Name, expand Sites, and expand Default Web Site.
-
Your website name for the software will be listed below the ‘Default Web Site’. This should either be E2Shop or ‘JobBOSS2. Note: Website name may depend on when your initial installation of the software occurred.
-
Highlight your website name by clicking on it once. In the far right of the IIS Manager select the ‘Browse: *:80 (http)’. This opens the web site locally in your web browser.
-
Please ensure that the website name is accessible and resolves correctly, meaning that http://localhost/E2Shop or http://localhost/JobBoss2 open to the software’s login page.
Is your local JobBOSS2 website accessible via a web browser on yourJobBOSS2 server?
-
If your website is accessible and resolves correctly as mentioned in step 1e, then you can move to step 3. If your JobBOSS2 website does not resolve using http://localhost/E2Shop or http://localhost/JobBoss2 please contact our ECI Support Department at: 1-800-677-9640 before proceeding with the update.
JobBOSS2 SQL Server and Master Database Name
-
Navigate to the following directory in a File Explorer window. Note: This directory may be named JobBOSS2 or E2Shop. Adjust as needed.
-
Locate the E2Shop.config file. In this folder, you can sort by the Type header in File Explorer to group all configuration files together. Note: File extensions may be hidden, so look for files labeled as CONFIG File.
-
Open the E2Shop.config file by double clicking on it and opening it with Notepad. Make notes of the server (SQL instance) and database values, either E2ShopMaster or JobBoss2Master.
-
Close the E2Shop.config file.
Document Repository Manager Directory
-
From a File Explorer window navigate to: C:\inetpub\wwwroot\JobBOSS2 (keep in mind that this location may instead be: C:\inetpub\wwwroot\E2Shop). Locate the configuration file named: E2Shop.Web.dll.config. Double click the file to open it in Notepad.
-
With the E2Shop.Web.dll.config file open select Edit > Find. In the search box enter FileUploadPath and then tap enter on your keyboard to locate the key by this name. Make note of the value, i.e. C:\JobBoss2 Repo.
-
Close the E2Shop.Web.dll.config file.
Report Storage Directory
-
The JobBOSS2Asynchronous Service requires a location in which to temporarily store report files that are generated by the software. The default storage policy is 7 days.
-
From File Explorer, locate or create a folder on your server’s local drive that you would like to use for report storage. It is recommended that you use the same folder location as the Document Repository Manager Directory in step 2 above (FileUploadPath). However, you may choose a different folder if you prefer.
Is the IIS WebSocket Protocol Installed?
-
The WebSocket Protocol allows for your generated reports to pop up on screen after report generation has completed. Without this IIS feature enabled users will need to click on the Report Manager within JobBOSS2 to view their reports. This is an important component for the best software experience.
-
Locate Server Manager by clicking on the Start Menu (Windows icon) and typing Server Manager. Select the option for Server Manager.
-
In the upper right corner of Server Manager select Manage > Add Roles and Features. The Add Roles and Features Wizard displays. Select Next, Next (Role-based or feature-based installation), followed by Next one more time (select a server).
-
From the list of available Roles scroll down until you find Web Server (IIS). Expand this role.
-
Expand Web Server, followed by Application Development.
-
Locate the checkbox for Websocket Protocol. If it is installed, you will see a gray check mark already in its place. If not installed, select the box and proceed through the installation by selecting Next or OK.
-
Windows Update will locate the installation package and install it for you automatically. You will receive a prompt stating that the installation has been completed.
Once you have compiled a list of each component you are ready to proceed with installing the JobBOSS2update.
Information Needed for On-Premises Upgrade Utility Process
Below is an example list of values (in bold) and how they relate to the installation steps found on our On-Premises Upgrade Utility page. The values that you enter may be different than those provided in the example below.
-
Local Website Name: http://localhost/jobboss2. This relates to step 7 Rabbit MQ Configuration ReportNotifyURL. You will also need this value after step 13 if you are installing the asynchronous service for the first time.
-
Is your localJobBOSS2 website accessible via a web browser on your JobBOSS2 server? Yes.
If your JobBOSS2 website does not resolve using http://localhost/E2Shop or http://localhost/JobBoss2, please contact our ECI Support Department at 1-800-677-9640 before proceeding with the update.
-
SQL Server: ServerName/SQL2019 Master Database: JobBoss2Master
This information is used during the asynchronous service installation when prompted for your SQL server and master database name at step 13.
-
Document Repository Manager Directory: C:\JobBoss2 Repo
This Document Repository Manager Directory will be used during the RabbitMQ and JobBOSS2 Asynchronous Service Installation.
-
Report Storage Directory: C:\JobBoss2 Repo
The Report Storage Directory is used during the RabbitMQ installation on step 8. You will also be asked this value during the installation of the JobBOSS2 Asynchronous Service in step 16.
-
Is the IIS Websocket Protocol Installed: Yes.
To finalize JobBOSS2, confirm that the IIS component, Websocket Protocol is installed.
Steps for the On-Premises Upgrade Utility
From the web server, login to JobBOSS2 and complete the following steps:
- Go to the purple Help button in the top right of the screen, and select About JobBOSS2 from the dropdown menu.
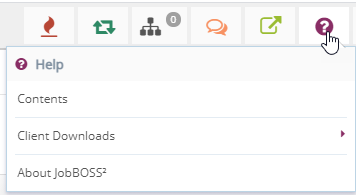
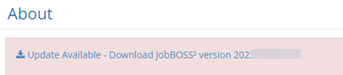
- Click on Update Available - Download JobBOSS2 version 20XX.X-X-Rel.X above the General Information section.
- If there is no available update, you will not see the Update Available hyperlink.
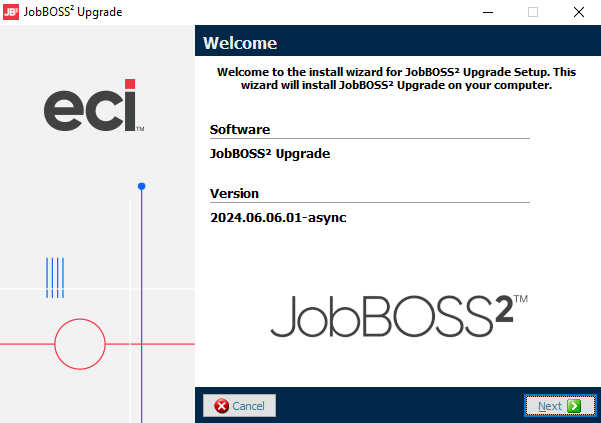
- Once the download has completed, click the downloaded file to open the JobBOSS2 Upgrade.
- Click Next on the Upgrade Welcome screen.
-
An upgrade warning box opens. If you are upgrading from JobBOSS2 version 2022.8.5+361 or earlier, read the information about the upgrade and click Yes to continue. Contact Customer Support for additional information and with any questions.

-
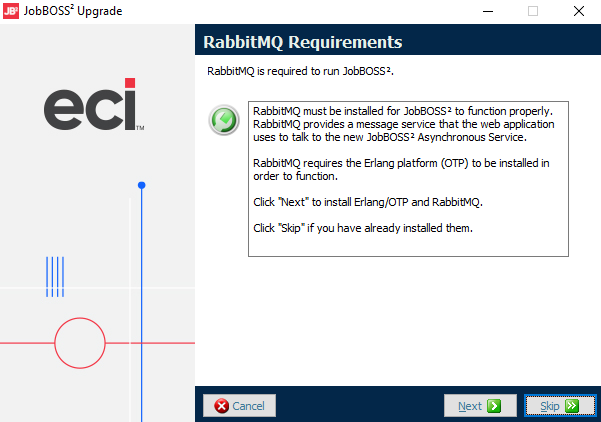
A RabbitMQ Requirements information box opens. Click Next to install or Skip if already installed.
-
Enter in the report notification settings for your environment in the RabbitMQ Configuration box:
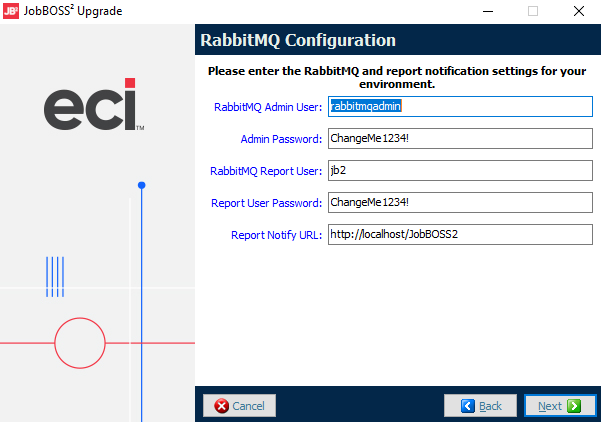
Note: The information in this box is auto populated. ECI does not recommend editing this info. If you must change the password, please log any changes in your password manager or in a file to retrieve later.
-
Select a folder to store all of the JobBOSS2 upgrade report files:
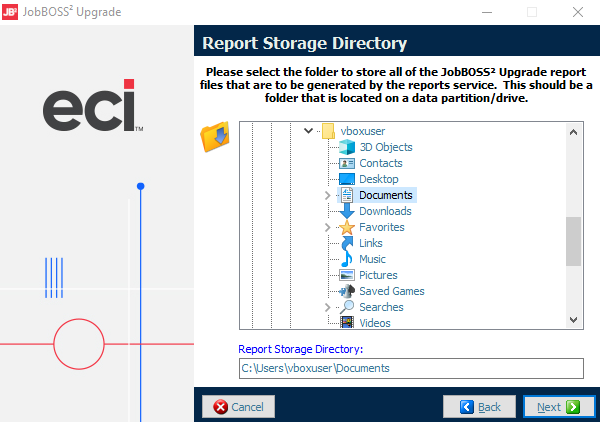
Note:ECI recommends selecting a folder in your document repository location.
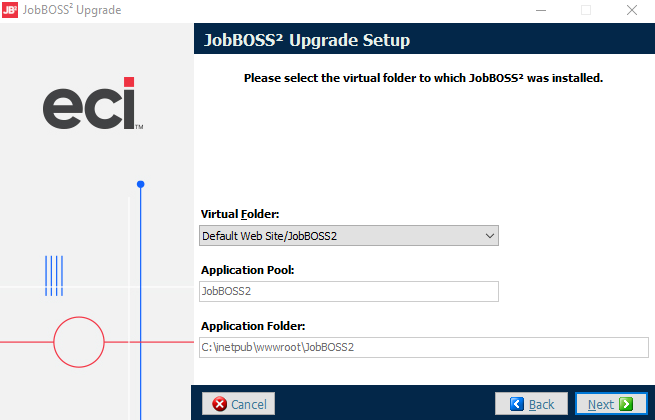
- Select the Virtual Folder where JobBOSS2 was installed and click Next.
-
The Processing screen opens, showing the progress of the upgrade installation.
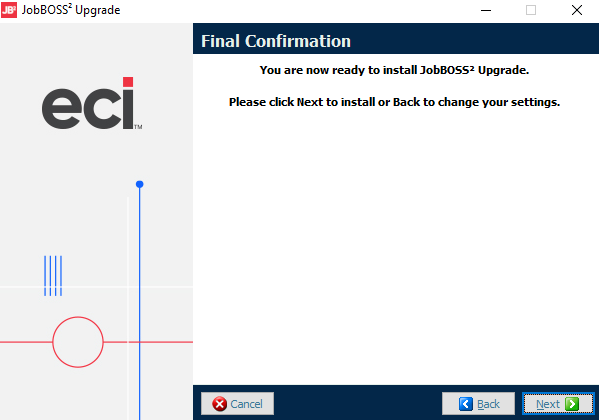
- Click Next on the Final Confirmation screen.
- Click Finish to complete the update.
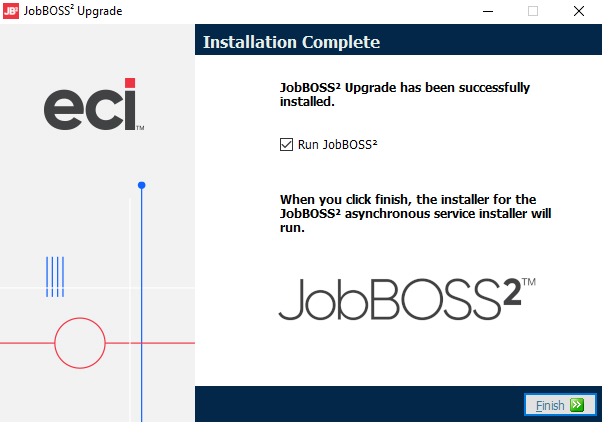
Asynchronous Service Installation -
The install Wizard for the JobBOSS2 Asynchronous Service Setup automatically opens. Click Next to continue:
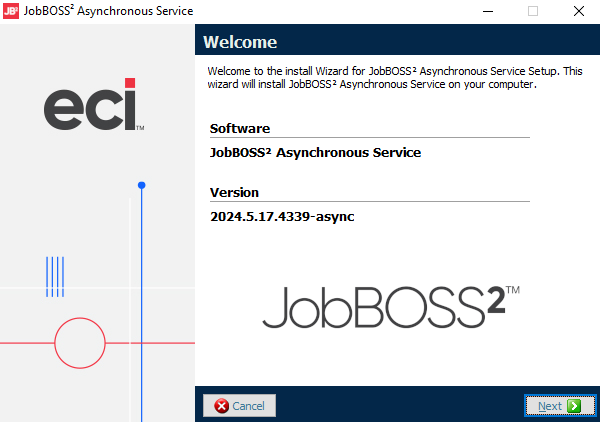
Note: If Asynchronous Service is already installed, the upgrade automatically starts. If not, complete the next steps for installation.
-
The License Agreement opens. Check the agreement box to accept the terms and then click Next.
-
Select a Destination Folder for the installation:
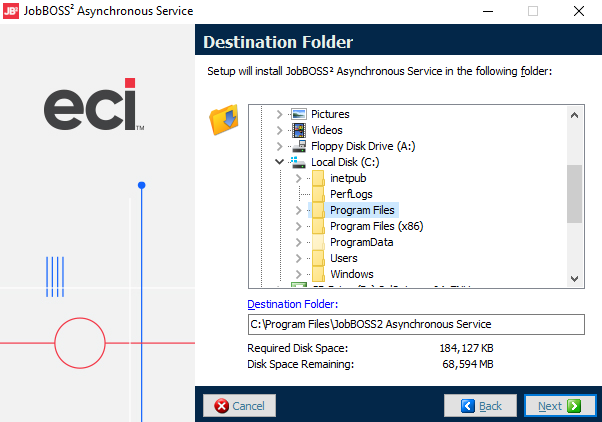
Note: A message box opens asking if you want to copy the web app configuration files already installed. Click Yes if the Asynchronous Service is being installed on the same server as JobBOSS2. Click No if you want to manually configure the service.
-
Select the folder to store all of the report files generated by the asynchronous service:
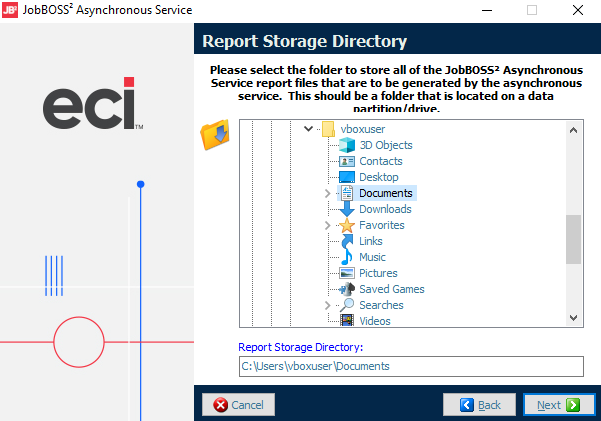
Note:ECI recommends selecting a folder in your document repository location.
-
The Final Confirmation screen opens. Click Next to start the installation.
-
Once finished, the Installation Complete box opens when the JobBOSS2 Asynchronous Service has been successfully installed. Click Finish to end the process.
If you have any questions throughout the upgrade process, please contact our Customer Support team at 800-677-9640 or visit the Customer Portal to chat with a member of the customer support team or to create a case.