Using JobBOSS2; Using the System; Printing
Working With Forms and Labels
Forms and labels represent specially designed reports associated with selected areas of JobBOSS2 . Unlike summary reports that are used to display consolidated information related to multiple records, forms and labels are used to display information for a single, unique record.
It may be possible to print multiple forms or labels at one time; however, each form or label will contain information for a unique record.
 Forms
Forms
Forms are typically designed to print on a standard size sheet of paper for the purpose of providing information to employees or another business.
Common examples of forms include:
- Job Traveler (Order Entry)
- Purchase Order (Purchase Orders)
- Packing List (Shipments)
- Customer Invoice (Customer Billing)
Some forms, such as a Bill of Lading, are designed so that they could print on a specifically designed form, but do not have to.
Checks
Checks are the most significant exception with regards to printing on a standard / non-formatted sheet of paper. The assumption is that checks generated out of JobBOSS2 will be printed on a laser printer using one of the following formats:
- Stub/Check/Stub
- Check/Stub/Stub
- Stub/Check
- Check/Stub
If a check using one of these formats does not print correctly, contact support to determine the best course of action to get the check form modified appropriately.
Contact support for information about certain forms and checks formatted specifically for JobBOSS2.
Labels
Labels are designed to print on a variety of commercial labels of different sizes based on the amount of information they contain.
Click this link to Label Sizes in JobBOSS2 to see a list of labels used in JobBOSS2, their sizes, and suggested label options for each in a new tab / window.
Refer to the Reports and Forms Used in JobBOSS2 topic for a list of all reports and forms included in the system by default.
Common examples of labels include:
- Job Label (Order Entry)
- Part Label (Reports > Inventory)
- Employee Badges (Employees)
For the purposes of the remainder of this topic, the term "form" or "forms" will be used to refer to both forms and labels with regards to available search and print options. Where appropriate, a designation will be made with regards to a feature being available for only one of the two.
Accessing Forms
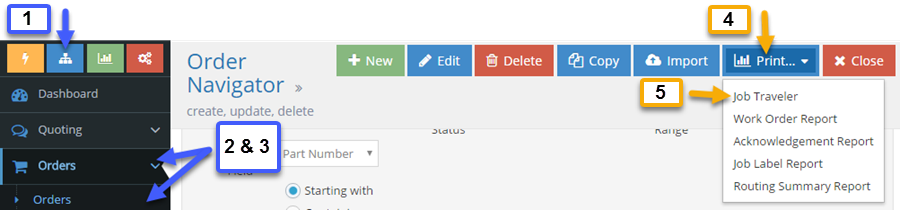
Since forms are designed to get information about a single record, they are accessed and generated from within the appropriate record navigator, such as the Order Navigator illustrated below.
For example, to generate a Job Traveler:
- Click the Data Entry button.
- Open the Orders drop-down menu within the Data Entry Sidebar.
- Click Orders.
- Click the Print button within the Order Navigator.
- From that drop-down menu, select Job Traveler.
Form Options and Search Criteria
Depending on the form being generated, one or more of the following will be available as a means of specifying how the requested information will display and / or limiting which records are included in the generated output. The examples below are pulled from various forms for illustration purposes; however not all forms will include all the listed features.
Filters
Some forms, such as Employee Badges (image below), include filters to allow the user to narrow the list of records to be included in the generated output.
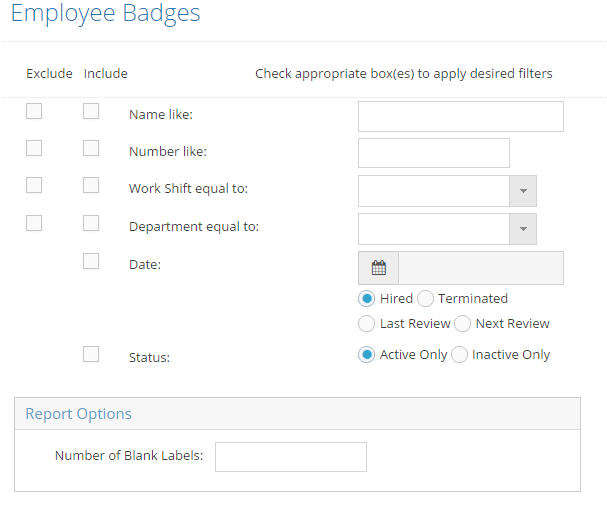
Click the link above to view various ways to refine report results in a new tab / window.
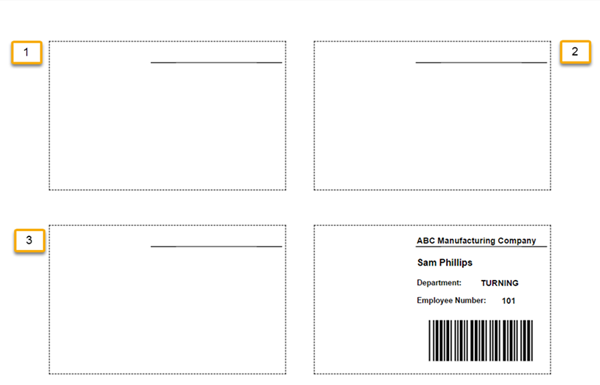
Report Options - Blank Labels
When generating labels that can print more than one per page, the system will also provide the option to designate the number of blank labels to take into account. This allows for the use of a single sheet of labels for more than one instance of generating output if they were not all used at one time. When a value greater than zero (0) is present, the system counts the blanks from left to right and works down the page accordingly. For example:
- Employee Badges can be printed 8 to a page - 2 across by 4 down
- If the Number of Blank Labels is entered as three (3), the system skips both labels in the first row and the left hand label in the second row and begins printing with the right hand label in the second row. (Image below)
Other Options
Depending on the form being generated, there may be other options available as well. Common examples include:
- Designating certain fields to be visible on the printed form or not
- Indicating different versions of the form to generate (such as on the Job Traveler)
- Including additional text to print on the form
- Text entered in this way will continue to print on EVERY form generated unless / until it is removed or edited
- Designating a company location and related address information to include on the form
As indicated, the options will vary from form to form; additional information can be found for every report and form in JobBOSS2 by looking under the Reports section of the Help File.
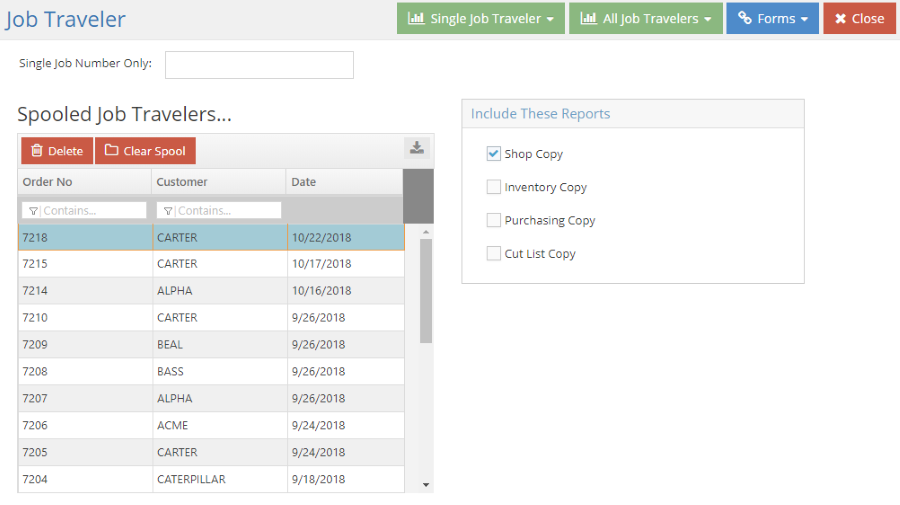
Print Spools
If a form does not use filters to help narrow the list of items to include in the output, it will use a print spool instead.
Populating the Spool
Print spools are automatically populated with values every time a new related record is created.
- Selecting a record in the associated record navigator and selecting the "Print" option for the form will NOT add the selected record to the spool.
Print spools will display up to 10 records at a time. When there are more than 10 records in the spool, the scroll bar can be used to view all of them included in the list.
Reprint Additions to the Spool
Records can also be added back to the spool any number of times by selecting them in the associated record navigator and then selecting the "Reprint" option for the form; every record in the record navigator that was selected at that time is now included in the spool.
- The Reprint button is found above the record navigator grid with the search action buttons.
- When you use the Reprint button to send a record to the print spool, it will appear in the same print spool as all new records.
Clearing the Spool
Records can be removed from a print spool in one of three ways:
- Generating / printing the form
- Records are automatically removed from the spool once they are included in generated output
- Deleting a single record from the spool
- Clicking the Delete button in the spool will remove the record that was selected at the time
- Only one record can be deleted at a time
- This simply removes the record from the spool - nothing is actually deleted from the system
- Clearing the entire spool at one time
- Clicking the Clear Spool button automatically and immediately removes ALL records from the spool
- As noted above, nothing is actually deleted from the system
Generating the Form
Generating the form can be accomplished in different ways, depending on the options available.
Determining What to Include
- Forms

- This option allows you to change the type of form in the spool without going back to the navigator
- For example, if you originally selected to print Job Travelers, the Forms dropdown button allows you to change the spool to Work Orders, Acknowledgments, or Job Labels instead of Job Travelers.
- This option allows you to change the type of form in the spool without going back to the navigator
- Single (Item) Only

- This option is sometimes available when a print spool is used with a form
- When present, it is typically located above the print spool and is used to include a single Line Item from the form
- This feature is useful when generating a form for a record that can contain multiple line items, such as customer orders and packing lists
- To use this option, enter a specific record value (such as a specific Job Number) and then click the green "Single (Form)" drop-down list
- In this example it would be the "Single Job Traveler" drop-down list
- From there, select the appropriate output (discussed below)
- Single (Record Form)

- This option is often available when a print spool is used with a form
- If selected WITHOUT designating a Single Item (see above), then a form will be generated for EVERY item present on the record selected in the spool
- For example, if an Order that has 20 Jobs (Line Items) on it is selected in the spool when the Single Job Traveler option is selected, 20 different Travelers will be generated - not just one
- All (Record Forms)

- This option is often available when a print spool is used with a form
- When selected, a form will be generated for EVERY item on EVERY record present in the spool
- For example, if there were 10 Orders listed in the Job Traveler Spool and each Order had 10 Jobs (Line Items) on it, the system would generate 100 Travelers
- Be mindful of the number of records and line items present on each record in the spool when the "Generate All" option is used.
- Generate Report

- This option is used in situations where multiple items are not an issue when generating the form
- May be available whether a print spool is used with a form or not
- When present, it would replace the "Single Record" and "All Record" options
Output Options
Regardless the method used, the available output options are the same:
- Open the drop-down menu.
- The Single report dropdown options perform the desired output on the selected report only.
- The All reports dropdown options perform the desired output on all the reports in the list.
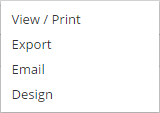
- Select the desired output:
- Generate: A pop-up message opens, showing the report is processing. When generated, the report automatically opens in a new tab as a PDF when finished. To the left, there is a list showing the full breakdown of items within the report. Clicking on any items opens it in a new tab for viewing. From there, it can be sent to a printer or downloaded (as a PDF.)
- Users may print by selecting by selecting Print this report at the bottom of the PDF. The PDF window remains open after the report prints.
- To email the report as well, select Email This Report at the bottom of the screen.
- If you close the PDF before you send it as an email, you will have to re-spool the report.
- To print a document with both portrait and landscape pages, click Print this report at the bottom of the page and print the downloaded PDF with the proper formatting.
- Export as: Select to export the report as a CSV, Excel, or Excel (Data Only) file. Select an option, the report automatically generates and downloads. From there it can be sent to a printer or saved.
- Options for saving will depend on the programs present on the computer being used to generate the report.
- Email: The report is generated and an Email Report dialog box opens, Users can enter a designated email recipient and send the report as a PDF attachment.
- This option requires that outgoing email options are configured properly for the user generating the report.
- For more information, see:
- Design: This opens the Report Designer where the user can edit the report format.
- Existing reports can be modified and saved as custom reports, but the original report is not deleted from the system.
- Users that do not have the ability to create custom reports will not see the Design option
- Option found under Miscellaneous Settings on User Code
- For more information see User Maintenance.
- For more information on the Report Designer, see Using the Report Designer and / or Report Designer Reference Information.
- Queue : This opens the Queue Report form where the user can schedule when the report should be generated and how frequently.
- This option is only available for Summary Reports and Table Lists.
- For more information see Queued Reports.
- Generate: A pop-up message opens, showing the report is processing. When generated, the report automatically opens in a new tab as a PDF when finished. To the left, there is a list showing the full breakdown of items within the report. Clicking on any items opens it in a new tab for viewing. From there, it can be sent to a printer or downloaded (as a PDF.)
Pop-ups must be allowed from JobBOSS2 in order for a report / form to be successfully generated.
Email Template
The email template at the bottom of the page is used to create standard messages for the form being generated. For example, if you edit the email template on a job traveler spool, all job travelers that are generated as an email will display the message you set in the email template. At least one report must be emailed out after editing the email template in order for the changes to save.
- Enter and format a message in the Email Template.
- Select the Spooled record you want to email.
- Use Single (Record Type) or All (Record Type) dropdown menu to select Email.
See the message from the Email Template displayed on the Email Report. You can edit the text as necessary to personalize the email.