Service Logs; JobBOSS2 Service
Triggers
Triggers are SQL statements that can be used to provide information to designated individuals when a specified ("triggering") event occurs. When working with Triggers, keep the following items in mind:
- Only Users that have the option 'Allow user to add/modify standard triggers' can create or assign Triggers.
- This setting is located in User Maintenance > Misc. Settings Section.
- The JobBOSS2 Service must be running.
Triggers require the JobBOSS2 Service to be running in order to process as expected.
For more information see Service Logs and the JobBOSS2 Service.
To open the Triggers screen, go to the desired area of and click the JobBOSS2 'Triggers' button located in the Quick Access Toolbar.
 Trigger Selection
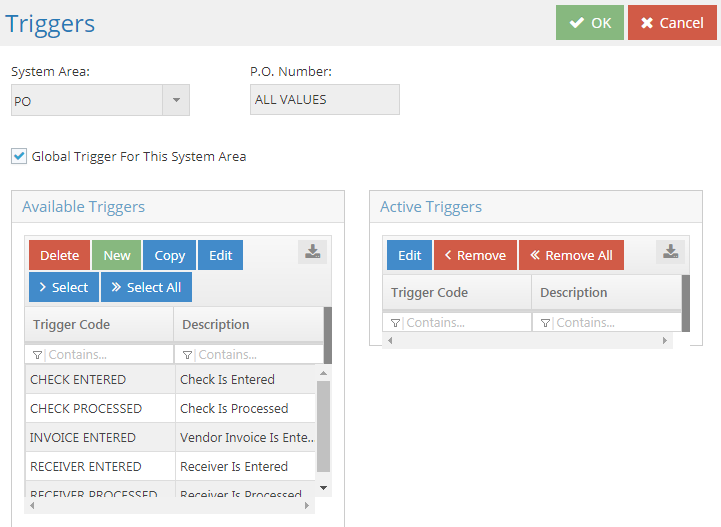
The Available Triggers and Active Triggers boxes are used to determine which Triggers are being actively monitored by the JobBOSS2 Service.
System Area
This field is automatically populated based on the area of JobBOSS2 the user is in when the Triggers button is clicked.
- If multiple areas are open, the System Area represents the one that is selected when the Triggers button is clicked.
Record Identifier (P.O. Number in image above)
This field represents which record from the selected area the trigger will be associated with.
- The value used to identify the record will vary based on the area selected.
- In the example above, P.O. Number is used since the Triggers button was clicked while the Purchase Order Navigator was opened.
- If the Trigger is for a specific record, it must be selected in the appropriate Navigator when the Triggers button is clicked.
Global Trigger For This System Area
When this option is selected, the Trigger will be applied against all records in the specified area as opposed to one specific record.
- A Trigger can be associated with a single record or "all" records, but not multiple, specifically selected records.
- In order to be notified about the same action for some - but not all - records in an area, multiple Triggers would need to be created; one for each record.
Available Triggers Box
This box provides access to pre-defined Triggers available for immediate use along with options that can be used to create customized Triggers.
Action Buttons
Delete
This button is used to delete the selected Trigger from the grid.
New
Clicking this button opens a blank 'Trigger Detail' screen that can be used to create a Trigger from scratch.
- The 'Build' button can be used to help create the desired SQL Statement.
Copy
This button is used to create a copy of the selected Trigger.
Edit
This button is used to open the 'Trigger Detail' screen of the selected Trigger for the purpose of editing it.
- The 'Build' button can be used to help create the desired SQL Statement, though it may be easier to edit the existing one if it is close to the desired result.
Select
Clicking this button copies the selected Trigger to the 'Active Triggers' grid.
Select All
Clicking this button copies all the Triggers listed in the 'Available Triggers' grid to the 'Active Triggers' grid.
Copying Triggers to the 'Active Triggers' grid does not remove them from the 'Available Triggers' grid; it merely marks them as Triggers that will be processed by the JobBOSS2 Server. The 'Available Triggers' remain available for future use.
Grid Details
Trigger Code
This identifies each Trigger in the grid.
- This field cannot be edited on an existing Trigger.
Description
This provides additional information about the purpose of each Trigger in the grid.
- This field can be edited on an existing Trigger.
Active Triggers Box
This box displays the Triggers that will be processed by the JobBOSS2 Service for the selected area.
Action Buttons
Edit
This button is used to open the 'Trigger Detail' screen of the selected Trigger for the purpose of editing it with regards to when it will run and to whom it will be sent.
- Edits can also be made in the Service Logs area under 'System.'
Remove
Clicking this button removes the selected Trigger from the 'Active Triggers' grid.
Remove All
Clicking this button removes all the Triggers listed in the 'Available Triggers' grid.
Trigger Detail Screen
Whether opened using 'New' or 'Edit', the options available on the Trigger Detail Screen are the same. The difference is that all fields are blank when 'New' is used and are filled in when 'Edit' is used.
An asterisk [*] indicates a required field.
General Section
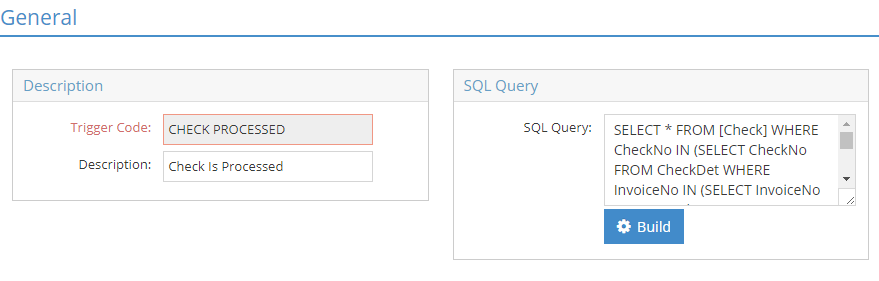
*Trigger Code
This field is used to identify the Trigger.
- The field is automatically populated if an existing Trigger is being edited, but can be changed.
Description
This field can be used to provide additional information about the Trigger being edited / created.
SQL Query
This is where the SQL Statement is placed that determines what information is being monitored and what conditions need to be met in order for a notification to be sent.
- SQL Statements can be created by entering the information manually or using the 'Build' button to open the Trigger Wizard.
- Existing SQL Statements must be edited manually.
- This field can be expanded by clicking the lower right corner and dragging it down.
Build (button)
Clicking this button launches the Trigger Wizard that can be used to create or replace an existing SQL Statement in the 'SQL Query' field.
Existing SQL Statements will be deleted and replaced if the Trigger Wizard is used to create a SQL Statement.
Message Section
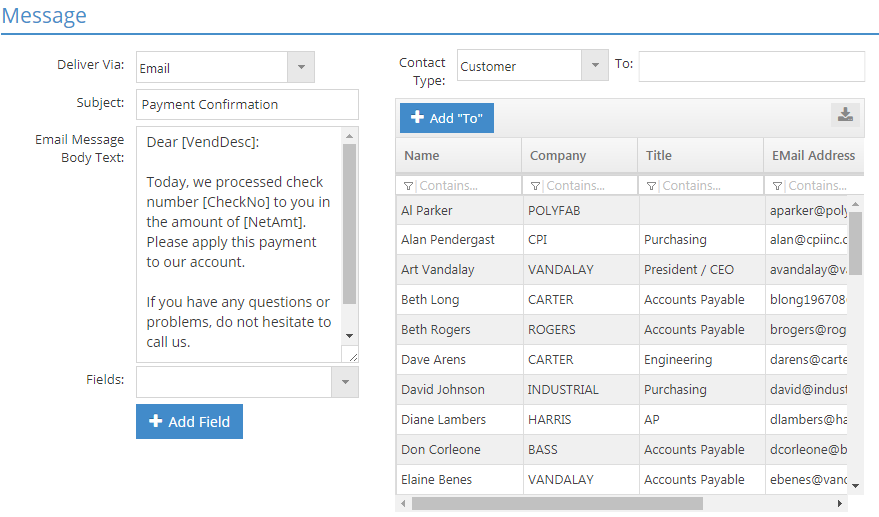
Deliver Via
This dropdown menu allows the user to select whether the Trigger notification is sent by Email or added to the Contact Management Calendar in JobBOSS2 and determines what related fields are displayed based on the choice made. Click an option to see what the related fields are.
- Email
Subject
This value will be used as the subject line of the Email.
- By default the subject will refer to the nature of the Trigger, but can be edited.
Email Message Body Text
This field is used to enter information that will be used as the body of the Email being sent.
- This field can be expanded by clicking the lower right corner and dragging it down.
- Calendar
Object
This determines the value used as the 'Object' for the calendar entry, which indicates the area / type of record involved.
- The value will default to one associated with the Trigger.
Code
This determines the value used as the 'Code' for the calendar entry, which helps provide details about the specific record involved.
Contact
When applicable, this field can be used to provide a contact reference.
Mark Entry as PRIVATE
When this option is selected, the entry to the calendar will be marked as private, meaning only the User associated with the entry will be able to see it.
Calendar Comment Text
This field is used to enter information that will be used to populate comments on the calendar entry.
- The 'Email Message Body Text' field can be expanded by clicking the lower right corner and dragging it down.
Fields
This dropdown menu can be used in conjunction with the 'Add Field' button to select additional fields to populate in the 'Email Message Body Text' or 'Calendar Comment Text' field depending on the option selected for 'Deliver Via.'
Add Field (button)
Once a field is selected in the 'Fields' dropdown menu, clicking this button places it in the 'Email Message Body Text' or 'Calendar Comment Text' field depending on the option selected for 'Deliver Via.'
Contact Type
This dropdown menu determines the contacts that display in the grid. Options include:
- Customer
- Vendor Contacts
- User (JobBOSS2)
Email addresses must be associated with a Customer, Vendor, or JobBOSS2 User in order to be available in any of these grids.
To
This is the Email address of the person (or people) that will receive the notification once it is generated.
- Email addresses are separated by a comma if more than one is present.
- Email addresses can be entered manually or selected from the system by clicking the 'Add From Contacts' button (covered below.)
- If the trigger is a global trigger and you would like for the trigger server to send the email based on the contact set for that record, then enter [@] in the To: field.
Add To (button)
Clicking this button places the contact(s) selected in the grid in the 'To' field.
Documents Section
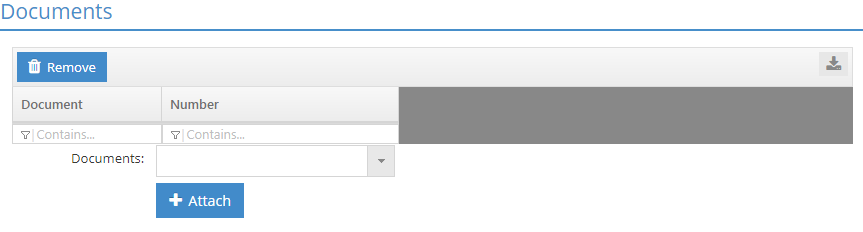
Documents associated with the Trigger will be sent as an attachment when a notification is sent.
Remove (button)
This button is used to remove documents already associated with the Trigger.
Documents
Use this dropdown menu to select which document(s) to associated with the Trigger.
- Only documents that exist within JobBOSS2 itself can be selected.
Attach (button)
Clicking this button adds the document selected in the dropdown menu to the Documents grid.