Global Use; Features - PLACEHOLDER
Contact Calendar
This reference document discusses the features and concepts of this application in JobBOSS2. The document explains the fields and buttons as they appear in the software, beginning at the top of the page and working down to the bottom. If you need any additional information on process or implementation, see the Additional Topics links to the right.
About the Contact Calendar
Contact Management provides a calendar of events for users and employees. The calendar can hold everything from a sales call to employee training to holidays. Any JobBOSS2 user with access to this module can create, assign, and modify items on the calendar. Only the assigned users can delete an event, and items marked Private will only show for that assigned user.
Note: To use Contact Calendar, a user must have a User ID attached to their employee code.
Calendar
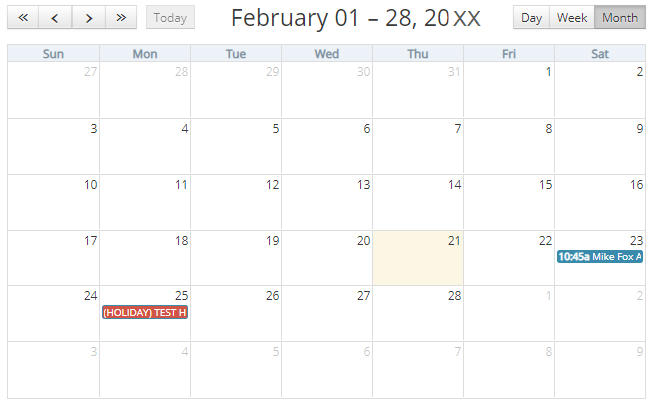
When you initially enter the Contact Calendar screen, you will see a monthly view of your personal calendar. The monthly view opens by default, but you can toggle the view between Month, Day, and Week in the upper right corner of the screen. To view different months, days, or weeks, use the arrows in the upper left corner of the screen.
Events
If there is an event saved within the time frame displayed on your calendar, you will see the event as either a blue or red ribbon.
- Blue events denote employee specific items.
- Red events denote company holidays.
Events can be added to the calendar within the calendar itself or through other areas of the software. This topic specifically discusses the addition of events through the calendar, but you can also add events in the following areas:
- Customer Codes
- Employee Codes
- Company Maintenance
- Quotes
- Orders
- Purchase Orders
- Inventory Items
- Work Center Maintenance
- Tooling Maintenance
- Billing
- Check Writing
Add / Edit / View Events within the Contact Calendar
In order to add, edit, or view an event, double click anywhere on the day of the event to reach the Contact Calendar Details. Go to the Contact Calendar Details section below for more information.
Filters
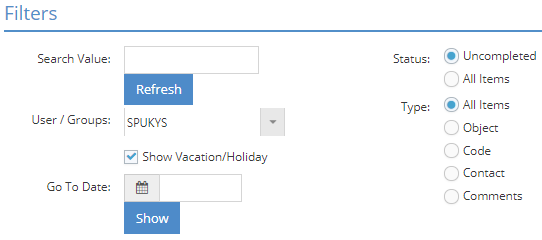
If you have a large number of events on your calendar, you can limit the events you see by using the Filters section at the bottom of the calendar. You will notice that the User / Groups defaults to the user you logged in as; however, you can view calendar events for other users as well.
- Search Value - type a value into the field to narrow the results on the calendar
- User / Groups - limit the calendar to only displaying events for only one particular user or group
- Go To Date - this feature will display the date you select
- Status - filter to view only events that are uncompleted or view all events on the calendar
- Type - filter to view by item type
Contact Calendar Details
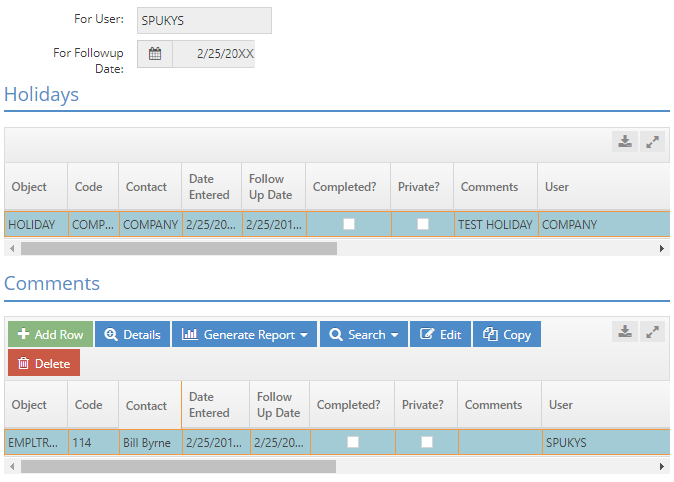
The Contact Calendar Details screen allows you to add, view, or edit events on your calendar. The page breaks events up into two categories: Holidays and Comments. See a breakdown of the information displayed here below.
Header
The page has two reference fields at the top to identify what part of the calendar you are viewing.
- For User - this field identifies the user
- For Followup Date - this field indicates the date on which these events take place
Holidays
The holidays gird is a reference grid that lists any holiday time allotted by the company on this particular day. This time is established in Company Maintenance through the Holidays button.
- There are no action buttons for this grid since it is a reference only area.
Comments
The comments grid holds all of the events scheduled for the current day that are not company wide holidays. You can add and edit events through the action buttons listed above the grid.
- Add Row - click to add a new line item to the grid
- Details - click to view the Contact Detail screen
- Generate Report - click to print or email the selected event
- Search - click to add an event filtered by objects
- Edit - this button takes you to the record associated with the line item for edits
- Copy - this button creates an exact copy of the selected line item and adds it to this grid
- Delete - click to remove a line item from the grid
The grid columns track information related to the event.
- Code - this dropdown provides a list of either customers or employees from the system depending on the object selected
- Object - this is the record to which you are attaching this event
- Contact - this dropdown provides a list of contacts for the customer assigned by the selected code
- Date Entered - defaults to the current day
- Follow Up Date - defaults to the current day, but will likely need changed
- Completed? - place a check here once the event has been completed
- Private? - this tells the system that only the assigned user has access to this event
- Comments - this section holds descriptions or directions regarding the event
- User - a user can be assigned here if different than the user logged into the system