Tables
Employees
System Location: Settings > Tables > Employees
Employee Table records, referred to as Employee Codes, represent the people that perform work within the selected Company Code. Employee Codes are used to store the following kinds of information:
- Personal contact information such as addresses and phone numbers
- Payroll information including pay rate (dollar amounts) and overtime settings
- Scheduling information including the employee's standard shift times
Information from Employee Codes is used on Attendance Tickets and Time Tickets for payroll and job costing purposes, respectively.
Related Tables
The following Tables and / or Base Tables are used on Employee Codes (an asterisk [*] indicates it is a required field on this Table):
- User ID
- Departments
Associated Reports
Employee Codes contain the following Sections (clicking a Section Title will take you to that portion of the help topic):
| General | Payroll | Comments | Schedule | Image | User-Defined |
 Record Header - Employee Code
The Record Header located at the top of the page indicates which specific record has been selected and for what purpose (new, edit, quick view)
For more information see User Interface.

Action Buttons
Documents (button)
This feature allows for external documents to be attached to the selected Employee Record for reference and review.
Documents Button Details
This feature allows for external documents to be attached to the selected record for reference and review.
- Any kind of file can be uploaded to the Repository Manager, however only PDFs can be selected to print with records in JobBOSS2
- User Groups are used to administer access and security rights within the Repository Manager
Only PDF documents can be selected to print with E2 records such as Job Travelers and Purchase Orders.
For more information see Repository Manager, Documents, and Images.
Holidays (button)
This feature provides access to the list of days the employee has already taken or is scheduled to take off of work.
- Holidays can be copied from the list of holidays associated with the JobBOSS2 Company in Company Maintenance
- Dates entered in Company Maintenance as holidays impact scheduling since the system assumes the shop will be closed
- Additional days taken off that are unique to the employee should be entered here
Dispatch (button)
Clicking this button opens the Dispatch Detail screen that can be used to indicate which work centers the employee is able to operate in addition to what other employees this individual can perform work for.
Work Center Grid
This grid lists all the work centers that have been defined within the Work Center Table for reference.
Can Run (checkbox)
Checking this field for a specific work center indicates the employee is capable of running that work center.
- Can be used during scheduling if a replacement is needed to perform work
Pct Eff (Percent Efficient)
This value indicates how efficiently the employee can operate the specified work center.
Alternate Employees Grid
This grid lists all other employees that have been defined within the Employee Table for reference.
Runs Like (checkbox)
Checking this field for a specific employee indicates that employee can perform the work of the employee who's record is being created / edited.
- Can be used during scheduling if a replacement is needed to perform work
Pct Eff (Percent Efficient)
This value indicates how efficiently the "other" employee can perform the duties of the employee who's record is being created / edited.
Audit Trail (button)
This option displays information regarding the activity that has taken place on the selected record.
Audit Trail Button Details
This option displays information regarding activity that has taken place on the selected record.
- Provides the following information:
- User: Indicates who performed the Action
- Action: Indicates what the User did
- NEW: Used when the record is created
- EDIT: Used when the record is closed by clicking OK - even if nothing was changed on the record
- VIEW: Used when the record is closed by clicking Cancel
- Date: Indicates when the Action took place
- Information can only be viewed, not edited or deleted
- An Audit Trail Summary can be printed by going to Reports > G/L > Audit Trail Summary within the system.
For more information see Audit Trail.
Save (button)
Save Button Details
This button is used to close the record and save any changes that have been made while it was open. In addition, the dropdown button allows you to Save and:
- Close - close the open record.
- New - open a new blank record.
- Print - print any of the reports related to the open record.
Cancel (button)
Cancel Button Details
This button is used to close the record without saving any changes that may have been made while it was open. If this button is used after a change has been made to the record, the system prompts to verify whether the record should be closed without saving the changes.
Answering "Yes" to the prompt closes the record without saving the changes.
Answering "No" to the prompt leaves the record open.
 General Section
The General Section is used to provide identifying information for the employee in addition to their contact information.
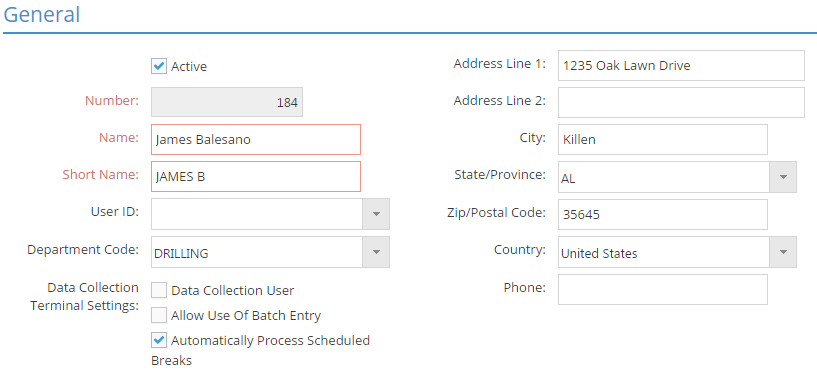
An asterisk [*] indicates a required field.
Active (checkbox)
Checking this box indicates the person is a current employee.
- Searches for ALL records includes active employees only by default
- Can be used as a search filter
- Remove check for employees that you no longer do business with
- Remain in system as a Employee Table records, but do not appear in search results unless specifically filtered to do so
*Number
This value is used throughout the system when selecting an employee.
- Must be unique
- Can be up to 4 numeric characters
*Name
Use this field to enter the employee's first and last name.
- Can be up to 30 alpha-numeric characters
- Does not need to be unique
*Short Name
This value is the shortened name assigned to the employee that is displayed in situations where the full Name does not appear.
- Can be up to 20 alpha-numeric characters
- Does not need to be unique
User ID (dropdown menu)
Assigning a User ID can provide the following during the use of PC Data Collection devices:
- Access to Hot Spots
- Hot Spots associated with the User ID selected here will be available to the employee when he / she logs into a PC Data Collection device
- Ability to transfer parts from stock to jobs
- If the User ID has security rights to create Inventory Transfers, the employee will be able to perform Stock To Job transfers on PC Data Collection devices
Department Code (dropdown menu)
Assigning a department provides a way to group the employee with other employees that perform the same kind of work.
- Can be used as a filter for searches and when running reports associated with employees
Address Line 1 / Line 2
Use these fields to track the employee's physical address.
- Can be up to 50 alpha-numeric characters in length
ZIP / Postal Code
Enter a valid postal code for the United States or Canada in this field and then click the Tab key to have the system automatically populate City, State/Province, and Country.
- Are only auto populated the first time a postal code is entered
- Can be manually populated as needed
Phone Number
Enter the employee's phone number for reference.
Data Collection Terminal Settings
These settings impact the behavior of real time data collection devices when the employee uses them to clock in and out.
Data Collection User
This option must be selected in order for the employee to be able to clock on to a data collection device, and it is selected by default.
- The number of Employees that can be marked as Data Collection Users is limited by the number of Data Collection Licenses that have been purchased
- For example, if 5 Data Collection Licenses have been purchased, only 5 specific Employees can be marked as Data Collection Users
- If an employee was selected as a Data Collection User but becomes an inactive employee, the Data Collection seat becomes available.
- Only Data Collection Users will appear in Data Collection employee search grids.
Allow Use Of Batch Entry (checkbox)
When this option is checked, the employee will be able to use the Batch Entry feature available on PC Data Collection and wall mounted clocks. Batch entry allows the employee to enter time against a job after the work has been completed as opposed to having to clock in at the beginning of the job and then clock out at the end.
- Does not capture specific times work was performed and instead relies on employee to provide the details
- Convenient in situations where it may be difficult for an employee to efficiently clock on and off multiple jobs in rapid succession
Automatically Process Scheduled Breaks (checkbox)
When this option is checked, the system will automatically place the employee ON BREAK based on the information provided in the AUTOMATIC Break Settings area located under the Schedule Section (below.)
- Employee must be using real time data collection devices for this to take place
 Payroll Section
Use the Payroll Section to keep track of the employee's pay rates, overtime settings, and pertinent employment related dates.
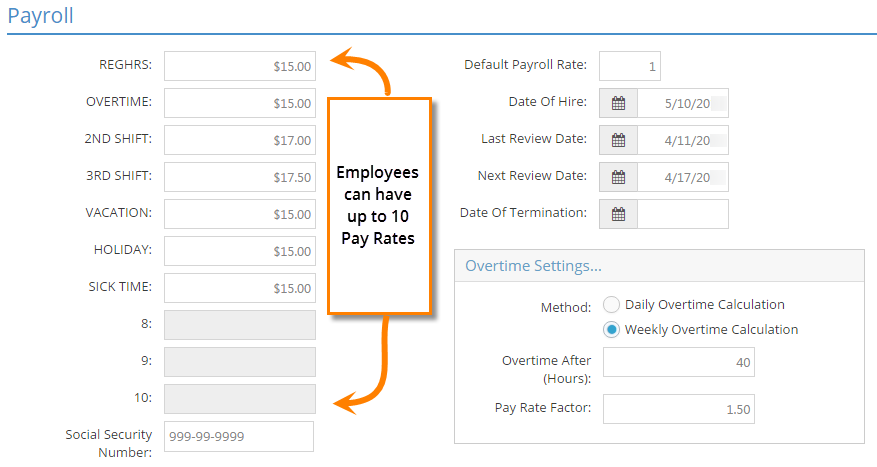
An asterisk [*] indicates a required field.
Pay Rates (1-10)
Pay rate fields are used to track the dollar amount paid to the employee on an hourly basis.
- Up to ten (10) pay rates can be defined in Company Maintenance
- Dollar amounts cannot be entered if a pay rate is not defined (See pay rates 8-10 in the image above)
- Dollar amounts entered are used for payroll and labor related job costing
- Dollar amount entered in the first defined pay rate field is used to auto populate all remaining defined pay rates
- Dollar amounts can be changed for each pay rate as appropriate
Default Payroll Rate
Designate which of the defined pay rates should be used as the default pay rate when creating time records for the employee.
- Defaults to this rate on Attendance Tickets and Time Tickets
- Can be changed on the time record
Date Fields (Hire Date / Review Dates / Termination Date)
Enter dates to track each event as appropriate.
- Can be entered by directly typing or by clicking on the calendar icon
- Can be used as a filter for Employee Lists
Social Security Number
Enter the employee's social security number for reference.
Overtime Settings Box
Use these settings if overtime (OT) will be automatically tracked and calculated by JobBOSS2.
The system only uses these values if the Calculate Overtime option is selected in Company Maintenance and the time records are created on data collection devices.
Method
Use this radio button to select whether OT will be calculated based on the number of hours worked in a day or within the work week.
- What day the work week begins on is determined in Company Maintenance.
Overtime After (Hours)
Enter the number of hours that must pass within the appropriate time frame (determined by the Method selected) before E2 begins calculating OT.
- Common examples include 8 (hours) if OT is calculated daily and 40 (hours) if calculated weekly.
Pay Rate Factor
Enter the value the system should apply against the employee's pay rate (dollar amount) for payroll and job costing purposes when the designated OT threshold is reached.
Example:
- Assume an employee reaches 40 hours worked midway through the last day of the work week and works 4 additional hours afterward.
- The Payroll Rate on the time record is listed as 1.
- The employee clocks in and out each day using real time data collection devices such as PC Data Collection.
Based on these assumptions and using the information included in the image above, the following would take place:
- The employee's pay would be $15.00 per hour up to the point where he or she reached the 40 hour threshold.
- Payroll Rate 1 is represented by the REGHRS value in this example.
- At the point the 40 hour threshold is reached, E2 automatically creates a new line item on the time record that is marked as OT "Yes."
- For the remaining 4 hours worked on that day, the employee's pay would be calculated at $22.50 per hour.
- $15.00 X 1.5 (Pay Rate Factor) = $22.50
If Overtime is defined as a Pay Rate, be mindful of the dollar amount entered if Overtime Settings are used to automatically calculate overtime amounts paid to employees.
 Comments Section
The Comments Section provides the ability to both track historical notes and schedule future follow up items related to the employee.

Action Buttons
An asterisk [*] indicates a required field.
Add Row (button)
This is used to add a new entry to the grid.
Generate Report (dropdown menu)
This option is used to print, export, or email a report containing all the Details for the line items in the grid.
Delete (button)
This button is used to delete the selected entry from the grid.
Comments Grid
*Date Entered
This represents the date the comment was entered.
- System generated
- Cannot be edited
Follow Up Date
This field can be used to indicate when a follow up should take place for the selected comment.
- Optional
- Can be edited
User (dropdown menu)
This indicates which JobBOSS2 User the comment is associated with.
- Defaults to the User ID that was used to log in to JobBOSS2 and physically make the entry
- Can be changed to a different User ID
- Comment entries cannot be edited by a User that is different than the one listed
If the person that enters the comment changes the User ID, they will not be able to make any additional changes to the entry since they are not logged in with the listed ID.
Completed (check box)
When checked, this indicates the action associated with the comment has been completed.
- Can be marked manually
- Will automatically be marked if the comment has a Follow Up Date and is marked as complete in the Contact Calendar
Private (checkbox)
When checked, the comment can only be seen by the listed User in the Contact Calendar if a Follow Up Date is present.
Comments
Use this field to provide the details of the entry.
- Will display in the Contact Calendar if a Follow Up Date is entered
 Schedule Section
Information under the Schedule Section will be used to determine the employee's default availability for work.
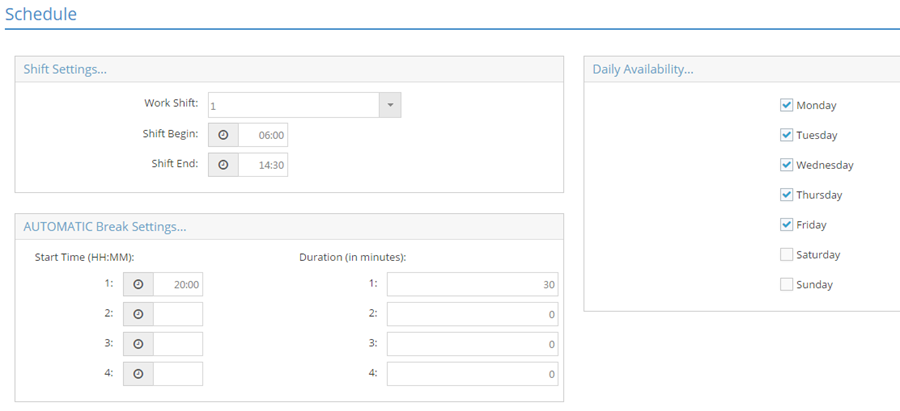
An asterisk [*] indicates a required field.
Shift Settings
Work Shift (dropdown menu)
Select the employee's default shift from the list of shifts defined in Company Maintenance.
Shift Begin / Shift End
The employee's Shift Begin and End times auto populate using the values from the Work Shift selected above, but can be edited for each person as needed.
Daily Availability (checkboxes)
Place a check next to each day in the list that the employee works throughout the week. While the Scheduling module is driven by work center availability, this information can be used to help determine if the appropriate personnel will be available to perform work.
AUTOMATIC Break Settings
When information is entered within the Automatic Break Settings area:
- E2 will automatically clock the employee out at the designated times and place them ON BREAK, but only if the following conditions are met:
- Real time data collection devices are being used AND
- The option to Automatically Process Scheduled Breaks is enabled under Data Collection Terminal Settings located under the General Section (above)
- If the employee is listed as the default operator of a work center, the system will assume the work center is unavailable during the listed breaks
- No work will be assigned to the work center during these times if scheduling is enabled
Start Time (HH:MM) [1-4]
Enter the time each break should begin using a 24 hour (or military time) format.
- Example: 1 AM would be entered as 01:00 while 1 PM would be entered as 13:00
Duration (in minutes)
Enter how long, in terms of minutes, each break should last.
- E2 will automatically begin the break (clock the employee out) at the designated time and then automatically end it (clock the employee back in) after the designated number of minutes have passed.
 Image Section
Image files associated with employee's can be printed on employee badges for security purposes.
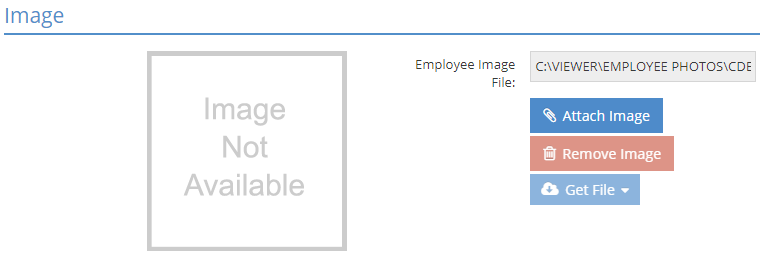
Employee Image File
This reference field represents the path where the employee's image file is located.
Attach Image
Click this button to open the Repository Manager and select an image to add to the Employee.
For more information see Repository Manager, Documents, and Images.
Remove Image
Click the Remove Image button to remove the image from the Employee. The image will not be removed from the Repository Manager.
Get File
The Get File function allows you to either View the image in a separate tab or Download the image to your local device.
User-Defined Section
User-Defined fields can be configured to track information about employees that is unique to your business.
For more information see User Defined Fields.
 Location Fencing Section
Location fencing allows designated employees to connect to your network for the purpose of using the related DCiOS apps on a wireless device.
For more information see JobBOSS2 Data Collection Android Applications and JobBOSS2 Data Collection Application.

Enable Location Fencing
Select this option to allow the employee to access your network from a wireless device for the purpose of running the DCiOS app.
Fence Location
Use the dropdown menu to select which location the employee will have access to.
- This list populates from the Shipping Addresses provided for your company in Company Maintenance.
Fence Radius (in meters)
This value determines how wide an area the employee can be within and still access your wireless network.
- In the image provided, the employee could travel within a "circle" of roughly 1,000 meters in diameter centered on the physical address associated with the Fence Location selected.
- This perimeter will be approximate since the system is using geo locating to determine the selected location.
Enable WiFi Fencing
Select this option to prevent the employee from connecting to any wireless network other than the one identified.
- The employee will be able to connect to any wireless network within the listed parameter if this is not selected.
SSID
Enter the ID of the wireless network you want to limit the employee's access to.
 Signature Section
Provide an image of the employee's signature to allow it to be electronically attached to various documents in JobBOSS2.
In order for electronic signatures to work properly, the employee must have an associated User ID (General Section) AND only one employee can be associated with that User.
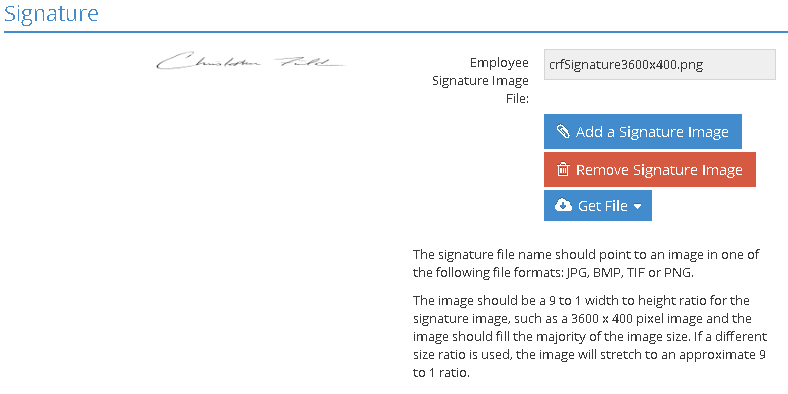
Employee Signature Image File
This identifies the file being used as the signature for the employee / user.
- The field is read only and cannot be manually entered.
Add a Signature image
Click this button to select the desired image from the Repository Manager.
- Supported image formats are JPG, BMP, TIF, and PNG.
- The image should have a ratio of 9 (width) to 1 (length) in size, such as 3600 x 400 pixels.
For more information see Repository Manager, Documents, and Images.
Remove Signature Image
Click this button to delete the attached signature image.
Get File
Use this dropdown menu to view or download the attached signature image.
- Quote
- Acknowledgment
- Certification
- Customer Return Authorization
- Packing List
- Purchase order
- Outside Delivery Ticket
- Receiver
- Vendor Request for Quote
- Debit Memo