Global Features; User Defined Fields
User-Defined Fields
User-defined fields provide a way to create custom fields that can be used to store information as well as filter reports and searches. This topic discusses the settings related to user-defined fields and explains how to edit them for use.
User-defined fields are located in most customer and vendor related records for the purpose of tracking information that may be unique to your business.
Specifically, user-defined fields are found in
- Customer Codes
- Vendor Codes
- Employee Codes
- Work Centers
- Parts (Inventory Items / Estimates)
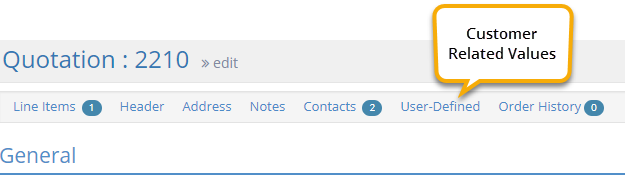
- Quotes
- Orders
- Purchase Orders
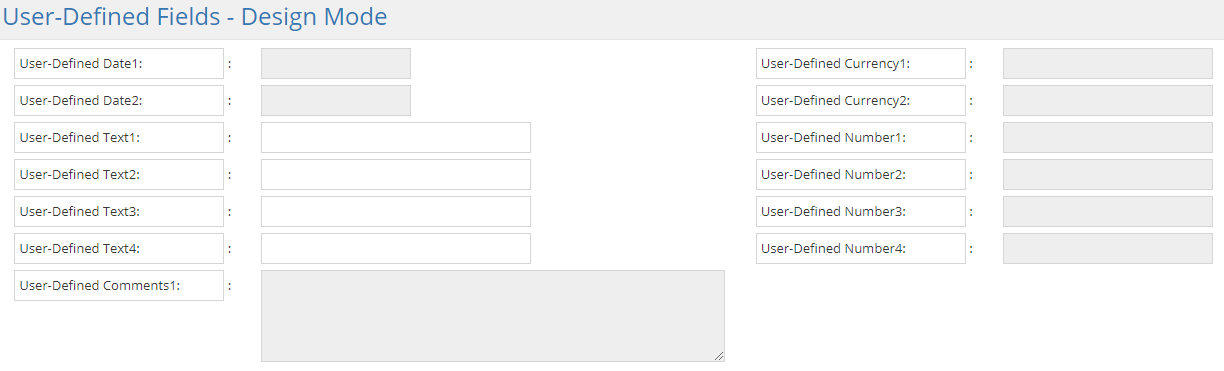
User-defined fields come in a variety of formats that includes dates, text, currency, and numbers.
Specifically, each user-defined area provides the following options:
- Two (2) date fields
- Four (4) text fields
- Each text field allows up to 30 alpha-numeric characters.
- These text fields can be designed to provide dropdown menus.
- One (1) comment field
- This memo field allows for large amounts of alpha-numeric input.
- Two (2) currency fields
- These fields display two decimal places (rounded) regardless the setting in Company Maintenance Defaults.
- Four (4) number fields
- These fields display up to 8 decimal places, rounded.
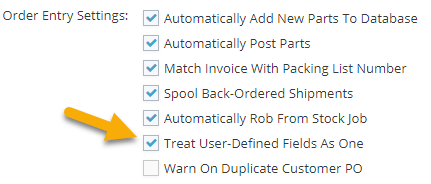
Whether information entered in user-defined fields moves from one record to another or remains "stationary" in one area depends on the Treat User-Defined Fields As One setting located in Company Maintenance.
- Click the Settings button.

- Open the System dropdown menu and select Company Maintenance.
- Select the desired company from the grid and click Edit (located at the top of the page.)
- Go to the Order Entry Section.
- Under Order Entry Settings, locate Treat User-Defined Fields As One.
- Select this option to allow user-defined values to move from source records to related destination records.
- Example: User-defined fields and their values entered on a Customer Code would be visible and available for editing on quotes and orders in the User-Defined Section that displays on the "main" screen.
- Similarly, user-defined fields and the values associated with parts would be available in the line item details of each (defined) part present.
- Leave this option blank to prevent user-defined values from moving to other records.
- Example: Quotes, orders, and purchase orders still have User-Defined Sections in the main area and in line item details; however they will not display labels or values that have been entered at the customer, vendor, or part level.
- This means you could use the Design Mode option on Customer Codes and again on quotes and orders and create different labels and dropdown menus (for text fields only.)
- Click OK to save any changes and close Company Maintenance.
- If you choose to Treat User-Defined Fields As One and have multiple records open while editing a user defined field, the last record you save will overwrite all the records. Therefore, if you save the open record used to make user-defined field changes first, saving the open and unchanged record next will overwrite the user-defined fields with the unedited information. To ensure your changes hold, it is recommended that you edit user-defined fields with only record open at the time.
User-defined values can be used to filter reports and navigator searches when available.
Report Filters
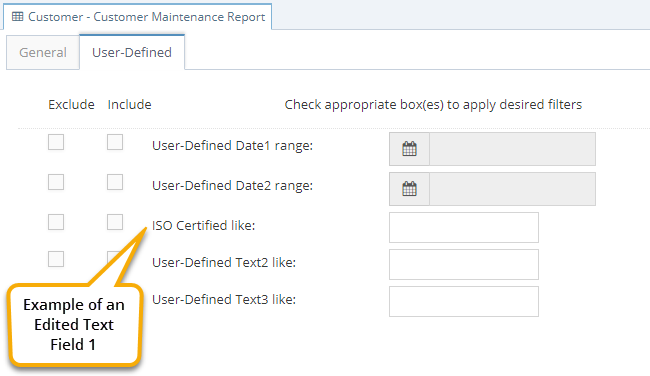
Table lists for records that have user-defined fields display an additional tab labeled User-Defined that allow you to select user-defined fields as a filter.
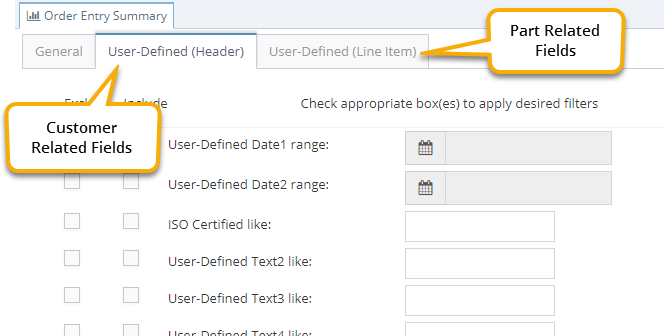
Summary reports for quotes, orders, and purchase orders display 2 additional tabs - one for the Header Area (customer or vendor fields) and one for the Line Item Area (parts.)
These filters are used just as any of the "standard" filters and can be used by themselves or in conjunction with other filters.
Users must have the ability to at least view User-Defined Fields (set in User Maintenance) in order to see these filters.
Navigator Searches
User-defined fields display as Available Field options in the Advanced Search Wizard, making it possible to create searches based off any user-defined field you edit and provide values for.
The ability to see, populate, and create user-defined fields depends on the permissions granted to the User.
- Click the Settings button.
- Open the System dropdown menu and select User Maintenance.
- Select the desired User from the grid and click Edit.
- In the Misc. Settings Section, locate the User-Defined Field Settings.
- Select each option the user should be able to do.
- Allow user to view values
- Select this setting to allow the user to view values displayed in user-defined fields throughout JobBOSS2.
- Allow user to edit values:
- Select this setting to allow the user to edit and view values displayed in user-defined fields throughout JobBOSS2.
- This setting requires the Allow user to view values setting to be selected as well.
- Allow user to design fields
- Select this setting to allow the user to design user-defined fields as well as edit and view the values they display.
- This setting requires the Allow user to edit values and Allow user to view values settings to be selected as well.
- Click OK to close the record and save any changes.
Users that have none of these options selected will not be able to see User-Defined Sections at all.
Users that have been granted access to do so in User Maintenance can edit the labels for user-defined fields and create dropdown menus for the four custom text fields provided.
- Select the area you want to design the user-defined fields for.
- This example will use Customer Code.
- Select an existing record (Customer) and click Edit.
- You could do the same thing on a New record as well.
- Go to the User-Defined Section and click Design Mode.
- The User-Defined Fields Design Mode Screen displays.
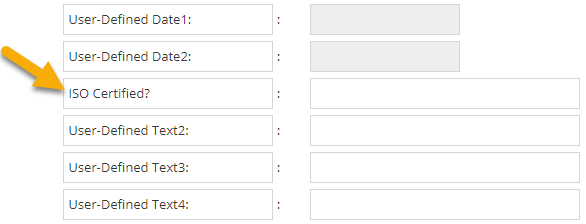
Edit Labels
- Left click in the label field that needs to be edited.
- This example will use the User-Defined Text1 field.
- Edit the default label of the appropriate field.
- The information entered will be visible in the User-Defined section of ALL records in the selected area, but not in the User-Defined Section of other areas.
- Example: The edited label in this example will display in all Customer Codes, but it would not display in the User-Defined Section of Vendor Codes, Employee Codes, Work Centers, or Parts.
- Whether changes to user-defined fields on these table items display on quotes, orders, and purchase orders depends on how the Company Maintenance setting Treat User-Defined Fields As One is configured.
- See How User-Defined Values Move Through JobBOSS2 in this topic for additional information on this setting and the flow of user-defined values throughout JobBOSS2.
- In this example we will enter ISO Certified? in the Text1 field.
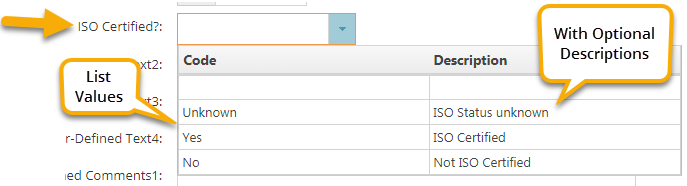
Create Dropdown Menus (Text Fields ONLY)
- Left click in the text field that will display the dropdown menu.
- Only the 4 text fields are available to select outside the label.
- Enter the values that should display in the dropdown menu, separating each one with the "pipe symbol," displayed immediately to the right of this text. |
- On most keyboards this symbol is located on the same key as the "back slash." \
- The value entered first will display at the top of the list; the system does not alphabetize them.
- There is no need to enter spaces between the values and the pipe symbols.
- You do not need to enter a pipe symbol after the final value.
- In this example we will create a list that includes the values Unknown|Yes|No.

- OPTIONAL: Enter a description for each value displayed in the dropdown menu.
- Enter a semicolon (;) immediately after the value and provide a description to go with it.
- There is no need to leave a space between the end of the description and the pipe symbol that indicates the break between one value and the next in the list.
- Repeat for each value as desired. Not every value present needs a description even if others have one.
- An example of our list might look something like this:

- The 30 character limit for text fields does not apply to entering list values and descriptions; the system allows you to continue typing beyond the visible box border.
- That said, no single list value should be longer than 30 characters since that is the size limit of the field in terms of what it will display outside of Design Mode.
- When finished editing labels and creating dropdown menus, click OK to save the changes.
- The labels and menus are now available for use in all records of the selected area (Customer Codes in this example.)
 Where User-Defined Fields Are Located