JobBOSS2 Data Collection Application
The JobBOSS2 Data Collection application operates as a mobile time clock that can be used by any employee available in the connected JobBOSS2 Company. This application is designed for use on a tablet.
JobBOSS2 cannot guarantee compatibility for all mobile devices.
When used in conjunction with this app, the site on which JobBOSS2 is installed must be secured (https). Hosted users are automatically on a secure site; however On-Premise users are responsible for purchasing, installing, and maintaining their own SSL certificate. The SSL certificate cannot be self-signed. If you have questions about setting up a valid SSL certificate, please contact your IT provider.
Currently, JobBOSS2 apps do not support iOS™ dark mode.
To use the internal scanner feature, mobile devices must be running iOS version 15.0 or higher.
 Configuring JobBOSS2 for Use With the Applications
Verify these items have been set up within JobBOSS2 before logging in to the applications for the first time.
Options

Tap the Options button in the bottom right corner of the screen.
Connection Settings

The Connection Settings establish the link between the app and your company within JobBOSS2. You can use the Connection Settings if you need to switch between companies. Connection Settings lists the:
- Server
- API Key
- Username
- Password
- This information can be input manually or by scanning the QR code.
You can also attach the app to multiple companies:
- New - this button allows you to add a new company to the app by clearing the connection fields for additional input.
- Delete - this button removes the current company from the app.
- Reset - this button removes any changes you've made without saving and restores the connection settings for the company you're currently logged into.
Work Queue
This takes you to the work queue area of the app.
- More information regarding the Work Queue can be found below.
Change Language
This function allows you to select a language from English, Spanish, and French.
- Your JobBOSS2 System must be on a build version that is compatible with the latest version of the JobBOSS2 apps in order for them to operate. If you get an error stating that this version of the app is not supported during the log in process, check this about page. If the App API Version number does not fall within the Supported API Range, then you need to either update JobBOSS2 or the app itself.
Data Entry Screen
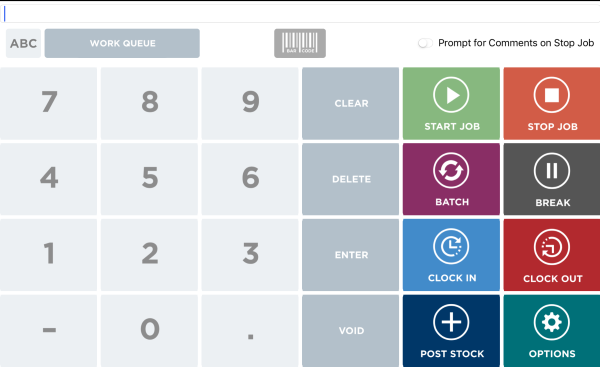
Start Job
This button begins a series of prompts that guide you through the information input process to start the job. There are three ways to enter data:
- Type in the information using the keyboard.
- Use the ABC / 123 button above the keyboard to switch between alpha and numeric characters.
- Tap the barcode icon, center the barcode on the screen, and tap Start Scan if you are scanning a barcode through device camera.
- Simply use your Scan gun (if applicable) without clicking anything else on the screen.
Stop Job
This button opens a screen to enter a job number and end a job.
- The same data entry methods apply here as do for the Start Job feature.
Batch
Tap Batch to begin entering job details.
- The data entry window appears if the employee is allowed to batch enter job information.
Start Break / Stop Break
This places the employee on break.
- Use this same button (now Stop Break) to log the employee back into the system after the break.
Clock In / Out
This logs the employee in and out of the system for attendance purposes.
Post Stock
This button opens a scanner window to enter data in order to post stock to a job.
Options
Please see the information above in the Options section.
You may incur charges from your provider if cellular data is used to operate this app.
Work Queue
The Work Queue is accessed by clicking the Work Queue button above the keyboard on the home screen. The Work Queue shows you information relating to all the jobs within the scheduling app based on either a selected employee or a selected work center.
Cards
Jobs in the work queue are displayed on cards. The following information can be found on each card:
- Job Number
- The job number is stated at the top of the card.
- Part Number
- The part number indicates what part is being made on the job.
- Step Number
- This indicates the current step number for the job.
- Due Date
- This date indicates when the job is due.
- Qty. Left
- The quantity left indicates how many parts still need to be completed for this step.
- Start Job
- This button starts the job and opens a time ticket.
- Once you start a job, you will be taken out of the work queue and back to the home screen.
- In order to stop a job, you must use the data entry terminal.
- This button starts the job and opens a time ticket.
- Docs
- The docs button opens a pop up box that displays all of the documents attached to the part or job. The View button will open the document for viewing.
- Numbering
- The numbers in the upper left corner of the card number all of the jobs.
- Symbols
- There are two symbols that may appear in the top right corner of the card:
- Caution Triangle
- This represents a job is late.
- Thumbs Up/Down
- This represents whether or not the requirements are met.
- Caution Triangle
- There are two symbols that may appear in the top right corner of the card:
- Card Colors
- The card colors represent different job statuses.
- Work Queue Cards
- Green - current
- Yellow - pending
- Red - future
- Work Queue Cards
- The card colors represent different job statuses.
Card Details
When you click on a job card, the card opens to display a picture of the part and further details about the job. The following additional information is found on the expanded card:
- Job Required (yes or no)
- 1st Shift Employee
- 2nd Shift Employee
- Work Center
- Scheduled Begin (date)
- Scheduled End (date)
- Status
- Quantity To Make
- Hours Left