Base Tables
Collection Terminals
System Location: Settings > Base Tables > Collection Terminals
Collection terminals provide a means of identifying the various devices that can be used to capture time related information from employees on the shop floor for the purpose of creating attendance and / or time tickets. Collection terminals can be configured to represent either wall mounted clocks or PCs used to access the Data Collection login option of JobBOSS2.
Data Collection is sold as a separate application and must be available in order to take advantage of real time data collection options. For additional information, please contact Sales at 1-800 525 2143.
 Record Header - Collection Terminal
The Record Header located at the top of the page indicates which specific record has been selected and for what purpose (new, edit, quick view) and displays record specific Action Buttons (discussed below.)
For more information see User Interface.

Action Buttons
Save (button)
Save Button Details
This button is used to close the record and save any changes that have been made while it was open. In addition, the dropdown button allows you to Save and:
- Close - close the open record.
- New - open a new blank record.
- Print - print any of the reports related to the open record.
Cancel (button)
Cancel Button Details
This button is used to close the record without saving any changes that may have been made while it was open. If this button is used after a change has been made to the record, the system prompts to verify whether the record should be closed without saving the changes.
Answering "Yes" to the prompt closes the record without saving the changes.
Answering "No" to the prompt leaves the record open.
General Section
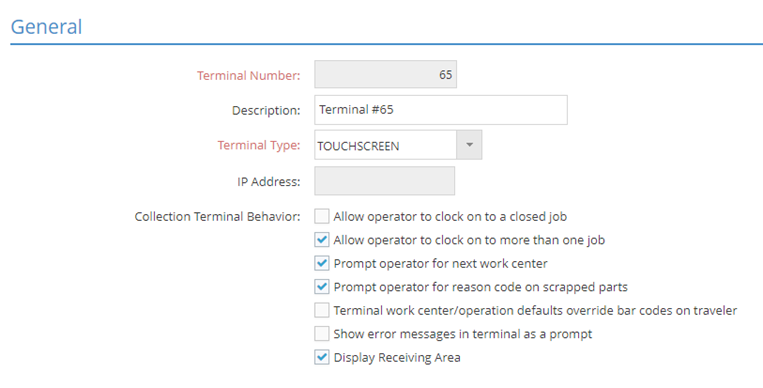
An asterisk [*] indicates a required field.
*Terminal Number
This is the numeric value assigned to the collection terminal for use by the system.
- Must be a unique number
- Non-productive work may include work center maintenance and mandatory meetings
Description
Use the description to provide information about where and / or for what purpose the collection terminal will be used.
- Can be up to 30 alpha-numeric characters in length
- Appears on Collection Terminal Navigator and various reports for reference
*Terminal Type
This setting designates the type of data collection device the terminal represents. Options include the following:
- Ethernet terminals or TransTerm
- Used for various styles of wall mounted clocks
- Mobile
- Used for tablets or similar mobile devices
- TouchScreen Terminal
- Used for computer terminals
A network can have multiple terminal types present though the various styles have different installation instructions. For information on installation issues and hardware requirements, please contact Support.
Each physical data collection device needs its own terminal number and designation regardless of the type selected.
IP Address and Port Number
These values are required to identify the collection terminal within the network when setting up an Ethernet Terminal or a Pocket PC device.
Collection Terminal Behavior Settings
These settings affect the behavior of the selected collection terminal in the following ways.
Determine User Access to Jobs
- Allow operator to clock on to a closed job
- When checked users will be able to clock on to jobs that are already closed
- When blank users will only be able to clock on to open jobs
- Allow operator to clock on to more than one job
- When checked users will be able to clock on to as many jobs as they want at the same time
- When blank users will only be able to clock on to one job at a time
Provide Prompts for Specified Actions
These settings come into play when the user is clocking off of a job.
- Prompt operator for next work center
- When checked users will be prompted by the work center that is expected to be used next
- When blank the system will look to routed steps to determine the next expected work center
- Prompt operator for reason code on scrapped parts
- When checked users will be prompted for a reason code when one or more parts are marked as scrapped
- When blank there will be no need to indicate a reason for scrapped parts
Determine Where to Look for Work Center and Operation Code Values When Using Bar Codes
This setting comes into play when the user is clocking on to a job using a bar coded job traveler.
- Terminal work center/operation defaults override bar codes on traveler
- When checked the system will look for work center and operation values in the following order until found:
- Defaults Section of Collection Terminal
- Bar code on traveler
- Prompt user
- When blank the system will look for values in the following order until found:
- Bar code on traveler
- Defaults Section of Collection Terminal
- Prompt user
- When checked the system will look for work center and operation values in the following order until found:
If bar codes are not being used, this setting is ignored and the system behaves as noted in the Defaults Section below with regards to populating work center and operation code.
Determine How to Display Error Messages
The setting "Show error messages in terminal as a prompt" determines how your error messages present themselves.
- When the box has a check, error messages in the terminal will appear in the middle of the screen as a prompt. You must "okay" out of them.
- When the box does not have a check, the error messages in the terminal will appear within the ribbon. You simply enter the correct data to move forward.
Give Permission for Receiving Functionality
To give a user permission for Receiving functionality in Data Collection, follow these steps:
-
Set the Terminal Type to Touchscreen.
-
Check the Display Receiving Area check box under Collection Terminal Behavior to give the Touchscreen User ID permissions.
Give Permission for Inspections Functionality
To give a user permission for Inspections functionality in Data Collection, follow these steps:
-
Set the Terminal Type to Touchscreen.
-
Check the Display Inspections Area check box under Collection Terminal Behavior to give the Touchscreen User ID permissions.
Defaults Section
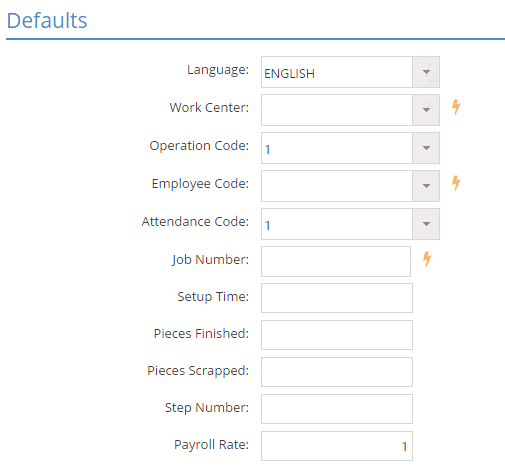
Values entered here will be used when a user is clocking in for attendance purposes or clocking on or off of a job for as appropriate.
Language
This value determines what language prompts are displayed in by default when using the data collection device assigned to the selected collection terminal.
- Also affects the language used to display information on tab headers and on some grids when using PC Data Collection
- Does not affect how information entered into JobBOSS2 is displayed or values in the Main Application
- This can be changed in PC Data Collection using the Language dropdown menu
Work Center
If bar codes are not being used, the system will automatically use the value listed here when a job is started on the data collection device assigned to the selected collection terminal.
- If left blank, the system prompts the user for a value
Operation Code
If bar codes are not being used, the system will look for an operation code in the following order until a value is found when starting a job:
- Routed step
- Collection terminal defaults
- Default operation code assigned to selected work center
- Prompt user
Employee Code
The user will not be prompted for an employee code if this field is populated.
- The same employee would be clocked in every time.
- This is used for clocking in / out and starting / stopping jobs.
Attendance Code
The user will not be prompted for an attendance code when clocking in if this field is populated.
Job Number
The user will not be prompted for a job number when starting a job if this field is populated.
- The same job number would be used every time.
- This would prevent the effective use of bar codes located at the step level of the traveler.
Setup Time
The user would not be prompted for setup time when stopping a job if this field is populated.
- Setup time represents the amount of time it takes to prepare the parts / work center before work can actually begin.
- Cycle time (time spent actually working one the parts) is automatically calculated based on the amount of setup time provided.
- Time Spent on Step - Setup Time Provided = Cycle Time
- If 0.00 is entered the user would not be prompted and the system would assume that ALL time captured against any job would be cycle time.
Pieces Finished
The user will not be prompted for Quantity Good when stopping a job if this field is populated.
- As noted, the prompt on the data collection device for this field displays as "Quantity Good".
- This value represents the number of parts the employee completed work on while clocked on to the job.
- Entering a value less than the total quantity open simply means the employee did not get the chance to work on the remaining pieces.
- If 0 is entered the system assumes that no pieces are ever completed.
- The user will still be prompted for Quantity Good if the pieces are going to stock.
Pieces Scrapped
The user will not be prompted for Quantity Scrap when stopping a job if this field is populated.
- If 0 is entered the system assumes that no pieces are ever scrapped.
Step Number
The user will not be prompted for a step number when starting a job if this field is populated.
Payroll Rate
The user will not be prompted for a pay rate when clocking in if this field is populated.
- If this field is left blank, the system will then prompt the user for a pay rate when clocking in.
- Pay rate is used for different purposes based on the type of time record:
- Pay rate on attendance tickets is used for payroll
- Pay rate on time tickets is used for job costing