System; Company Defaults; API Key
Company Maintenance
System Location: Settings > System > Company Maintenance
This area identifies which data source(s) should be used to store and access information related to the use of JobBOSS2 and provides the ability to enter information such as available addresses and related contact details for each one listed. In addition, Company Maintenance settings affect the behavior of each attached company and can be configured to provide many default values that are used when creating new records throughout JobBOSS2.
Company Maintenance Navigator
 Navigator Header

The Company Maintenance Navigator Header provides access to the following options:
Edit
Use this option to access behavioral settings and default values for the company selected in the Company Maintenance Navigator Grid.
See the "Company Maintenance Details - Edit" section of this topic below for additional information on these settings and values.
Fiscal Year Settings
This option is used to create or edit Fiscal Years used within the Accounting Application for the company selected in the Company Maintenance Navigator Grid.
For more information see Fiscal Year Settings - Reference Information.
Close
This option closes the navigator.
For On-premise customers, the Company Maintenance Navigator Header provides access to the following options:
New Company
Use this option to create a new JobBOSS2 Company from "scratch."
- Tables and parts are entered "manually" (as opposed to being imported).
Attach Existing Company
Use this option to connect to an existing data source that already contains information in a format designed for JobBOSS2.
- Typically used when converting information from JobBOSS2 or connecting to a restored data source.
Detach (Existing Company)
Use this option to disconnect from a data source so it can be deleted.
Navigator Grid
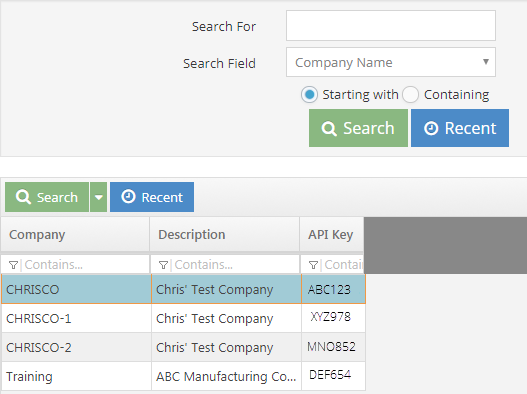
The Company Maintenance Navigator Grid displays the companies (data sources) that have been attached (connected to) for purposes of accessing business related information.
- All attached companies display by default.
- The search options provided can be used to narrow the list of available companies if needed.
- 'API Key' is used when creating Shipments from within JobBOSS2 and is also displayed for reference when the selected company is edited.
Company Maintenance Details - Edit
The following information is found by clicking the edit button on the main Company Maintenance navigation screen.
Related Tables
The following Tables and / or Base Tables are used when setting up Company Maintenance / designating Default Values (an asterisk [*] indicates it is a required field):
- Currency Code
- Employee Code
- *G/L Account
- Product Code
- Sales Code / ID
- Shipping Code
- Tax Code
- Terms Code
- User Code / ID
- Work Code
Company Maintenance Header

The Record Header located at the top of the page indicates which specific record has been selected and for what purpose (new, edit, quick view)
For more information see User Interface.
Action Buttons
Defaults
This option provides access to default values that can be used throughout JobBOSS2. Sections available within Defaults include:
- Customers
- General Ledger / Accounting Divisions
- Inventory
- Forms
- Quoting / Calculators (BAR and SHEET)
- Interfaces and Documents
- Document numbering
For more information see Company Maintenance Defaults.
Holidays
Use this option to indicate what holidays the selected company observes throughout the year.
- Listed holidays are not included as available work days for scheduling purposes.
- Holidays can be copied to employees for individual time tracking purposes.
- Holidays do not "roll over" from one year to the next.
For more information see Company Maintenance - Holidays.
Security
Use this option to set the default level of security the system will apply on Users created by clicking the New button in User Maintenance.
Keep default security settings to a minimum and provide additional access on a case by case basis as appropriate.
For more information see Company Maintenance - Security.
Audit Trail
This option displays information regarding activity that has taken place within the selected Company.
Audit Trail Button Details
This option displays information regarding activity that has taken place on the selected record.
- Provides the following information:
- User: Indicates who performed the Action
- Action: Indicates what the User did
- NEW: Used when the record is created
- EDIT: Used when the record is closed by clicking OK - even if nothing was changed on the record
- VIEW: Used when the record is closed by clicking Cancel
- Date: Indicates when the Action took place
- Information can only be viewed, not edited or deleted
- An Audit Trail Summary can be printed by going to Reports > G/L > Audit Trail Summary within the system.
For more information see Audit Trail.
Save
Save Button Details
This button is used to close the record and save any changes that have been made while it was open. In addition, the dropdown button allows you to Save and:
- Close - close the open record.
- New - open a new blank record.
- Print - print any of the reports related to the open record.
Cancel
Cancel Button Details
This button is used to close the record without saving any changes that may have been made while it was open. If this button is used after a change has been made to the record, the system prompts to verify whether the record should be closed without saving the changes.
Answering "Yes" to the prompt closes the record without saving the changes.
Answering "No" to the prompt leaves the record open.
General Section
This section contains information that identifies your company and sets the time zone you are operating in.
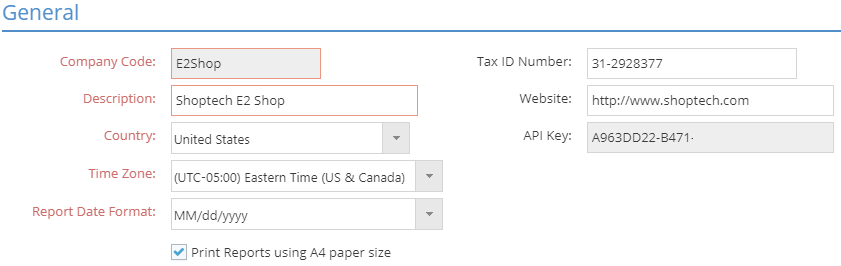
An asterisk [*] indicates a required field.
*Company Code / *Description
These values identify the company you are currently editing.
- Description can be edited at any time.
*Country
This field indicates the home country of the company.
- If the country is NOT the United States or Canada, the address fields are changed to text fields in order for users to enter proper address formatting for your country.
*Time Zone
Use the dropdown menu provided to select the time zone your company operates in.
*Report Date Format
Select a date format for all reports generated out of JobBOSS2.
This setting affects REPORTS ONLY. The date format for the rest of the system is determined by the date format associated with your browser language.
Print Reports using A4 paper size
Select this setting if you intend to print on A4 paper.
- This box is unchecked by default.
Tax ID Number
Enter your company's Tax ID Number for reference.
Website
Enter your company's website URL for reference.
API Key
This value is used to communicate with third party applications.
- This field is populated by the system and cannot be edited.
Shipping Addresses Section
This section contains the addresses associated with your company and allows you to define your company's Billing Rates and Payroll Rates.
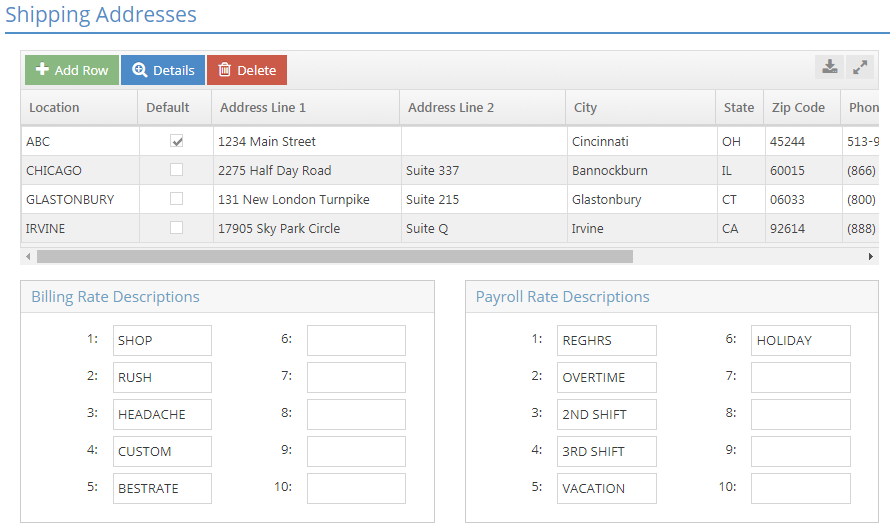
Shipping Addresses Grid
Enter as many addresses as needed to account for the physical locations used by your company. Use the Add Row and Delete buttons to create and remove locations. Information for each location can be entered / edited directly in the grid or by selecting a line and clicking Details.
Location
This value represents the "ID" or "name" for each location created.
Default
Use this box to identify which location should be considered the primary or default one to be used by the system.
Remaining Fields
Use the remaining fields to provide address and contact related details for each location.
Billing Rate Descriptions Box
Enter values in the fields provided to determine the options that will be available for use on work centers, estimates, and orders.
- You can enter up to 10 Billing Rate Descriptions.
- Dollar values can only be entered on work centers for Billing Rates that have been given a description here.
- That means "blank" Billing Rates cannot have dollar amounts entered.
- Only Billing Rates that have been given a description will appear in Billing Rate dropdown menus located on estimates and orders.
Payroll Descriptions Box
Enter values in the fields provided to determine the options that will be available for use on Employee Codes and time records.
- You can enter up to 10 Payroll Rate Descriptions.
- Dollar values can only be entered on employees for Payroll Rates that have been given a description here.
- That means "blank" Payroll Rates cannot have dollar amounts entered.
- Only Payroll Rates that have been given a description can be selected in Pay Rate dropdown menus located on time records.
Overtime Rates
An "overtime" Pay Rate would typically be created only when the option to have JobBOSS2 automatically calculate overtime is not used.
For more information, see the Time And Attendance Section of this topic.
Order Entry Section
This section contains settings related to job numbering, inventory costing, and system behaviors related to order entry.
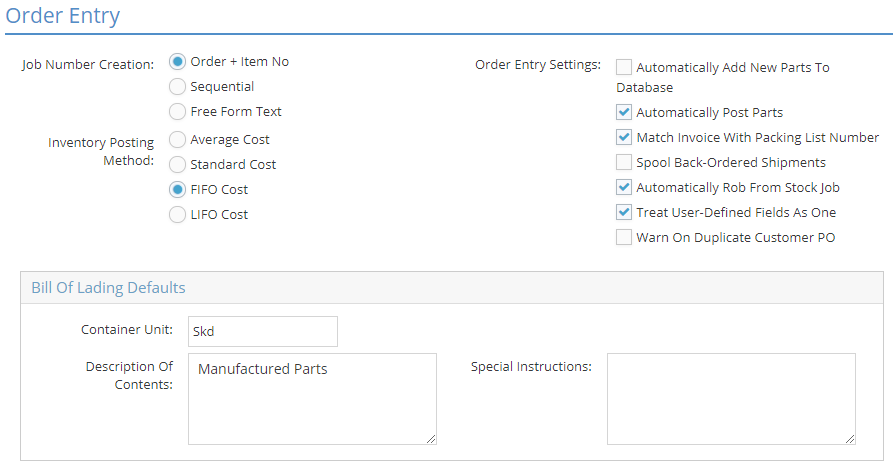
Job Number Creation
Use this radio button to determine how Job Numbers are assigned on orders.
- Order + Item Number: The system automatically assigns each Job Number using the Order Number as the "base" and placing a number at the end that starts with 1 and increments by 1 for each job created.
- Example. Assume Order 1234 has 3 line items that become jobs once processed. The Job Numbers assigned would be 1234-01, 1234-02, and 1234-03 in the order they were added to the order.
- This option does not require Auto Numbers be turned on for Job Numbers and the system ignores the value provided as the Next Job Number (under Auto-Numbers Options.)
- Sequential: The system automatically assigns each Job Number based on the value provided in the Next Numbers Section.
- This option does require that Auto Numbers are turned on for Job Number and uses the value under Auto-Numbers Options as the next Job Number.
- There is typically no connection between Job Number and Order Number with this method.
- Free Form Text: The user enters the Job Number during processing.
- This option requires the user to verify each Job number is unique.
Acceptable characters are a dash (-) and alpha numeric characters (0-9, A-Z).
Job Numbers are assigned during order processing.
Inventory Posting Method
Use this radio button to determine how the system calculates the cost of material that is posted to jobs during order processing or as the result of an inventory transfer.
- Average Cost: The system divides the sum of all Unit Costs by the Total Quantity On Hand at the time of the calculation.
- Standard Cost: The system uses the value entered in the Cost field of the part (Inventory Section > Stocking information Box.)
- The user "manually" enters this value which remains constant unless edited.
- FIFO Cost: The system uses the Unit Cost of the earliest entry for the Inventory Item based on its date (and time) posted.
- FIFO stands for First In, First Out.
- LIFO Cost: The system uses the Unit Cost of the latest entry for the Inventory Item based on it date (and time) posted.
- LIFO stands for Last In, First Out.
Order Entry Settings
These settings determine how the system behaves with regards to order related transactions.
- Automatically Add New Parts To Database: Select this option to have JobBOSS2 add free-form parts entered on orders as estimates when the job is processed.
- Estimates added in this way will include any routing present in the job details, but will not have a BOM by default.
- Automatically Post Parts: Select this option to have JobBOSS2 open the Line Item Quantity Specification screen(s) as a result of processing an order for the purpose of posting available material to the jobs being created.
- The system actually gives the user the option to post available parts - including the items being ordered - as opposed to "automatically" doing so.
- The system ignores available parts and automatically creates material requirements when this option is not selected.
- Requirements are filled at a later date via purchase orders, inventory transfers, or the Fill Job Requirement Utility.
- Match Invoice With Packing List Number: Select this option to have the system force new Customer Invoice Numbers to match the Packing List Number used to create them.
- Invoice numbers must be unique, and the system provides a prompt if the number it wants to create already exists.
- Spool Back Ordered Shipments: Select this option to have the system automatically place Job Travelers in the Print Spool when less than the full amount is shipped to the customer.
- Automatically Rob From Stock Job: Select this option to allow the system to look to eligible Stock Releases during order processing as a way to fill demand for a customer order.
- Automatically Post Parts must also be selected in order for this option to function.
- For more information see Robbing From Stock Jobs.
- Treat User-Defined Fields As One: Select this option to have User-Defined values "flow" from one record to another.
- Example: User-Defined values associated with manufactured parts (estimates) appear on orders (in Line Item Details) when this option is selected.
- This behavior applies to any area where User-Defined information can flow from one record to another and is not limited to order related records. (Example: Customer to Quote, Vendor to Purchase Order, etc.)
- When this option is left blank, User-Defined values do not move through the system.
- For more information see User Defined Fields.
- Example: User-Defined values associated with manufactured parts (estimates) appear on orders (in Line Item Details) when this option is selected.
- Warn On Duplicate Customer PO: Select this option to have the system provide a warning prompt when a P.O. Number is entered on a customer order that has been used on another customer order.
- The prompt provides the Number of the other order with the same PO Number for reference.
- Answer Yes to the prompt to allow the use of the duplicate PO Number.
- The system will not provide a warning when this option is left blank.
- This warning appears even when the PO number is replicated between different customers.
Bill Of Lading Defaults Box
Container Unit and Description Of Contents
The system uses these values as the defaults for new Shipping Codes.
- Shipping Codes provide these details on Packing Lists / Bills of Lading.
Special Instructions
The system uses this information as the default value on the Bill Of Lading Section of new Packing Lists.
Job Planning
This section determines whether you are using the Planning Board application or the Scheduling application. The Job Planning section is visible for all customers, but it only has an effect on gold or platinum status customers.
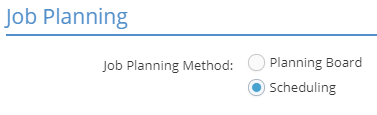
If you switch from one Job Planning Method to another, no changes are saved on the previous selection or carried over to the new selection
Time Tickets Section
This section determines what information displays in Time Tickets and Routing Grids and contains behavioral settings related to entering Time Tickets directly in JobBOSS2 (as opposed to using real time data collection devices.)
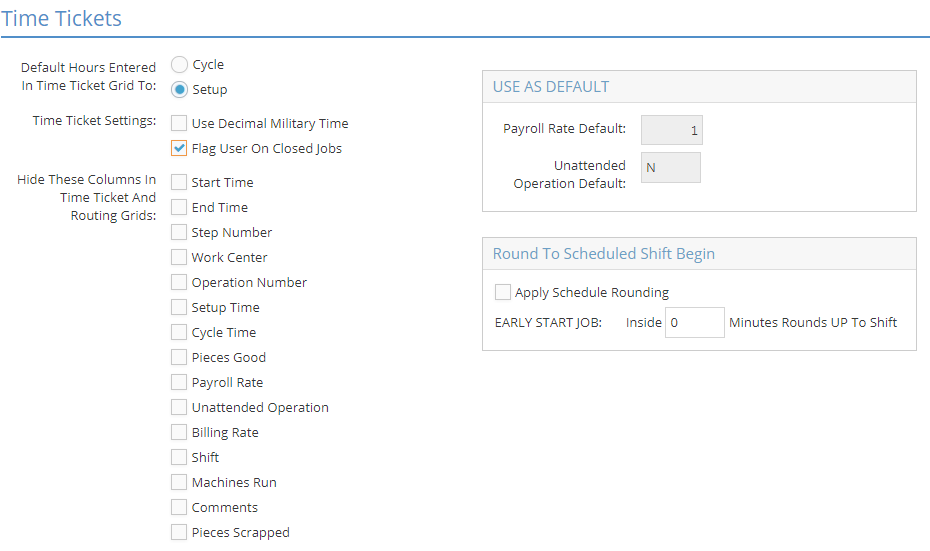
Default Hours Entered In Time Ticket Grid To
This radio button determines whether hours based on Start and End Times entered manually on time tickets will be applied to Setup or Cycle by default.
- This option applies only to time tickets entered directly into the Shop Floor Control area of the system. Time tickets created from data collection devices will be broken out into Cycle and Setup hours based on information provided by users.
- You can enter time directly in the Setup and Cycle Hours fields as opposed to entering Start and End Times when creating time tickets in this manner.
Time Ticket Settings
These options affect system behavior when entering time tickets directly - or "manually" - into the Shop Floor Control area.
- Use Decimal Military Time: Select this option to require the use of decimal values when entering time as opposed to "standard" minute designations.
- Example: Two-thirty in the afternoon would be entered as 14.5 as opposed to 14:30 when this option is selected.
- Time is still entered using a military, or 24 hour, format regardless of how this option is set.
- Flag User On Closed Jobs: Select this option to have the system prompt the user when they enter time against a closed job.
- The system does not prevent the time to be entered against the job; it simply provides a warning regarding the job's status.
Hide These Columns In Time Ticket And Routing Grids
Place a check in any of the options provided to prevent them from displaying in the Time Ticket and Routing grids.
- Selecting Operation Number prevents the Operation column from appearing in the routing grids of estimates and jobs.
Use As Default Box
These options are only available for use when the corresponding option has been selected under the Hide These Columns... setting.
Payroll Rate Default
Enter the default Payroll Rate the system should use on time tickets entered manually when the Payroll Rate field is hidden by default.
Unattended Operation Default
Indicate whether time should be considered as unattended (Y) or not (N) by default on time tickets entered manually when the Unattended Operation checkbox is hidden by default.
Round To Scheduled Shift Begin Box
These settings determine whether the system rounds the Start Time of an employee's job to his or her scheduled Shift begin time or not.
Apply Schedule Rounding
Select this option to have the system attempt to round the Start Time of the employee's first job to his or her scheduled Shift Begin time.
- This setting only applies to time tickets created from data collection devices (as opposed to manual entry) and only for jobs started before the employee's scheduled shift.
- When selected, the system looks to the value provided for EARLY START JOB to attempt to round.
EARLY START JOB
Inside _____ Minutes Rounds UP To Shift
Enter the value (in terms of minutes) in the field provided that the system should use to determine whether rounding should take place or not.
- The system rounds the Start Time up to the employee's Shift Begin Time when he or she starts the job within the time frame provided.
- The system does not round if the employee starts the job outside the time frame provided.
- Rounding is applied against the employee's Shift Begin time and not the company shifts entered in the Time And Attendance Section of Company Maintenance.
Next Numbers Section
Use this section to turn auto numbering on or off for specific records and, for areas where it is being used, to set what the next number the system should use is for each one.
Note: If the Next Number option is enabled, when new items (quote, order, PO, etc.) are created but then are canceled (not saved), the Next Number logic does not roll back the number consumed. The next number logic will skip this number in the future. However, this number can be manually entered on a new item.
If you open a new record and close out of the browser before saving it, the next time you open that type of record, the numbering will increase by one.
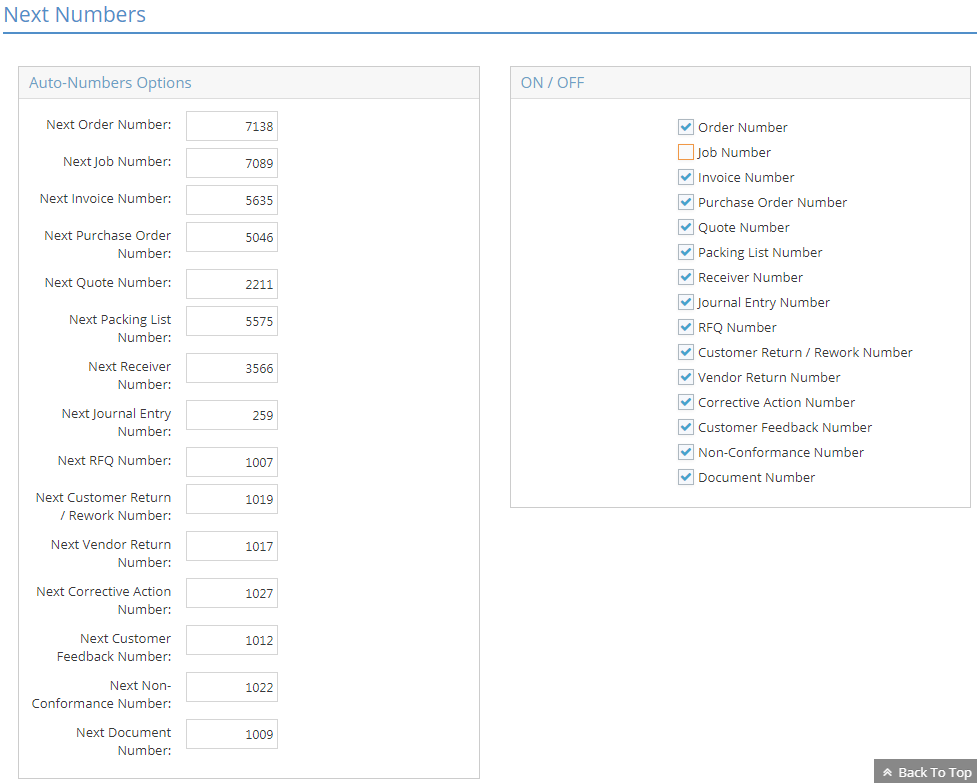
Auto-Numbers Options Box
Enter the next number the system should use for each record you want it to auto-number in the field provided.
- Values default to 1000.
- The system will only use these values if the corresponding option has been turned On.
ON / OFF Box
Select each number type for which you want the system to automatically provide a value when you create a new record.
- Users must provide numbers for records that are not selected.
- Job Number does not need to be selected if the Order + Item Number option is selected as the Job Number Creation method in the Order Entry Section of Company Maintenance.
Time And Attendance Section
Use this section to define your company's shifts, provide default overtime settings, and define rounding rules for Attendance Tickets created from real time data collection devices.
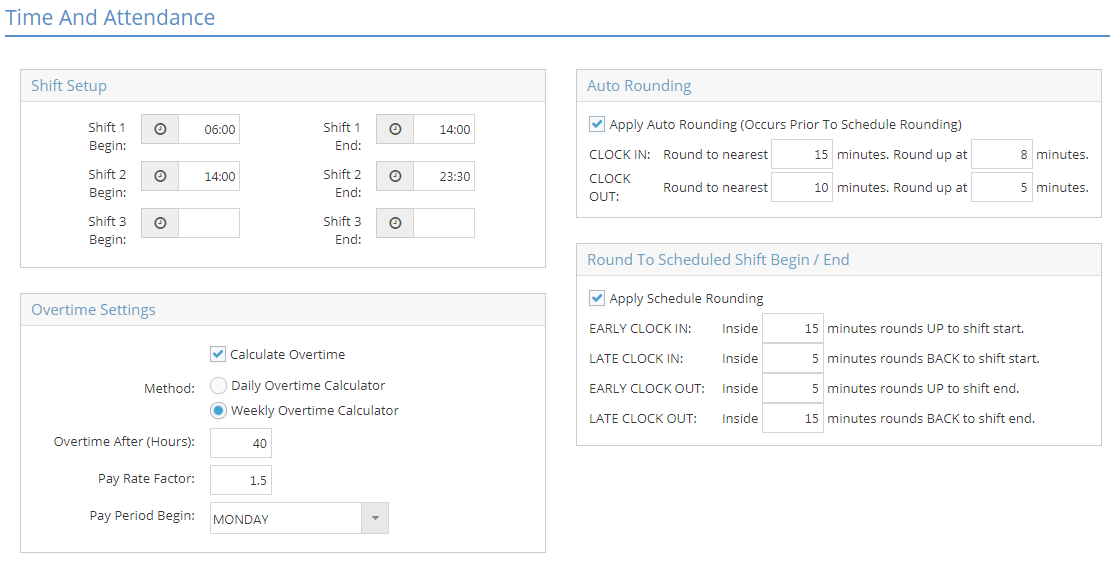
Shift Setup Box
Enter the Begin and End time for each default shift used in your shop.
- Times are entered using the military / 24 hour format.
- The end of one shift needs to be the beginning of the next one; they should not have gaps or overlap.
- Example: If Shift 1 ends at 14:00, Shift 2 needs to start at 14:00.
- If a shift spans midnight, it needs to be set up as Shift 3.
These values provide the overall capacity of your shop for scheduling purposes and are used as the default shifts for employees.
- Employee shifts can be edited and do not have to fall within the time frames entered here.
For more information, see the following topics:
Overtime Settings Box
Calculate Overtime
Select this option if you want JobBOSS2 to automatically calculate overtime (OT) on time records created from data collection devices.
- This setting is not applicable for time records created manually.
- The system uses information from the Employee Code to calculate overtime, meaning each employee can have different OT settings.
When selected, the system applies the Pay Rate Factor
Method
Use this radio button to select whether OT will be calculated based on the number of hours worked in a day or within the work week on new Employee Codes by default.
Overtime After (Hours)
Enter the number of hours that must pass within the appropriate time frame (determined by the Method selected) before JobBOSS2 begins calculating OT.
Pay Rate Factor
Enter the value the system should apply against the pay rate (dollar amount) for payroll and job costing purposes when the designated OT threshold is reached.
- The Factor is applied against the Pay Rate used on the time record where OT began, which is typically the "standard" Pay Rate.
- The system splits the time record and marks the time worked beyond the provided threshold as OT; it DOES NOT switch the Pay Rate to an "overtime" Pay Rate.
Method, Overtime After, and Pay Rate Factor are passed on to new Employee Codes as default values that can be edited for each employee.
Pay Period Begin
Use this dropdown menu to determine which day of the week should be used as the first one payroll purposes.
- This is particularly important for weekly overtime calculations.
- This value is used for all employees.
For more information see Employees.
Auto Rounding Box
Apply Auto Rounding (Occurs Prior To Schedule Rounding)
Select this option to have JobBOSS2 round employees' Clock In and Clock Out times using the rounding rules provided.
- This rounding takes place every time employees click the Clock In or Clock Out button on a data collection device, but not when they click the Break button.
- Rounding is applied to all employees when this option is selected.
CLOCK IN
Round to nearest ______ minutes. Round up at ______ minutes.
Provide the rounding rules the system should use when employees click Clock In.
CLOCK OUT
Round to nearest ______ minutes. Round up at ______ minutes.
Provide the rounding rules the system should use when employees click Clock Out.
The following details apply to each setting.
- Round to nearest ______ minutes: This determines what time increment the system should round to.
- Common examples are 5, 10, and 15.
- Round up at ______ minutes: This value determines at what point the system should round to the designated time increment.
- There is no validation on when the rounding occurs, meaning it can take place anywhere from 1 minute after to 1 minute before the time increment.
Round To Scheduled Shift Begin / End Box
Apply Schedule Rounding
Select this option to have JobBOSS2 round employees' initial Clock In and final Clock Out times for each day to their scheduled begin and end times IF they are within the time frames provided.
- The system rounds to each employee's Shift Begin and End time, not the shifts defined in Company Maintenance.
- Shift rounding is based on the results of Auto Rounding rules when both options are selected.
EARLY CLOCK IN
Inside ______ minutes round UP to shift start.
This value determines at what point (in terms of minutes) the system rounds employees' Clock In times to their scheduled Shift Begin times when they clock in early.
LATE CLOCK IN
Inside ______ minutes round BACK to shift start.
This value determines at what point (in terms of minutes) the system rounds employees' Clock In times to their scheduled Shift Begin times when they clock in late.
EARLY CLOCK OUT
Inside ______ minutes round UP to shift end.
This value determines at what point (in terms of minutes) the system rounds employees' Clock Out times to their scheduled Shift End times when they clock out early.
LATE CLOCK OUT
Inside ______ minutes round BACK to shift end.
This value determines at what point (in terms of minutes) the system rounds employees' Clock Out times to their scheduled Shift End times when they clock out late.
Rounding only takes place on Attendance Tickets created on data collection devices.
For more information see Auto Rounding And Shift Rounding Examples.
Data Collection Section
This section contains validation settings applicable for all data collection devices along with behavioral settings related to displaying information on PC Data Collection terminals.

Touch Screen User ID
Use this dropdown menu to associate a User ID with Touch Screen (PC DC) collection terminals.
- Anyone using a Touch Screen data collection terminal has access to the Hot Spots assigned to the selected User ID.
- The selected User ID also determines whether people using Touch Screen data collection devices can perform stock to job inventory transfers (based on the User security settings.)
Default Display Mode
Use this dropdown menu to determine whether the Logins Section of Touch Screen data collection terminals display Job Details, Job Summary, or Attendance information by default.
Refresh Display Rate
Use this dropdown menu to determine how frequently information displayed in the Logins Section of Touch Screen data collection terminals updates. Options include (all in terms of seconds):
- 10
- 15
- 30
- 45
- 60
Delete Current Logins
Use this dropdown menu to delete all currently open Time Tickets or Time & Attendance Tickets at one time.
- This option is useful to delete time records that get "stuck" open due to network errors or multiple "old" time records that were started but never closed correctly.
- This option only deletes time records that are currently open; saved (and closed) records are not affected.
- This option deletes ALL open time records and should not be used during an active shift. This feature should only be used after all "legitimate" time records have been saved and closed.
Optional Validation Settings Box
These settings affect all data collection devices and are applicable for all employees.
Previous routing steps must be completed or closed before operator may start on a new routing step
Select this option to prevent users from starting work on a routed step until the previous step has been completed or manually closed.
- Work can be performed on any step regardless of the status of other steps when this option is left blank.
- You must have the JobBOSS2 Scheduling module enabled in order for this setting to function properly.
Operator may not report a quantity good greater than the quantity good on the previous routing step
Select this option to prevent users from reporting a value for "Pieces Good" on a step that is larger than the value provided on the previous step.
- Any quantity can be reported as "Pieces Good" on any step when this option is left blank.
Require Inspections Measurements Before Moving to Next Routing Step.
Select this option if inspection measurements are required before a user can advance to the next step (e.g. stopping a job with an inspections requirement).
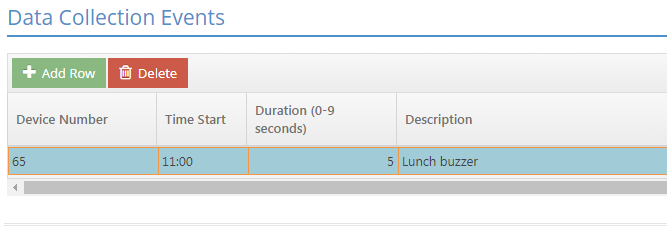
Data Collection Events Section
Use this section to create audible notifications for use with data collection devices equipped with speakers.
Action Buttons
Add Row
Click this button to add a new event to the grid.
Delete
Click this button to delete the selected event.
Data Collection Grid
Device Number
Use this section to create audible notifications for use with data collection devices equipped with audio equipment.
The selected device must have applicable audio equipment (bells, buzzers, horns, etc.) for the alarm to be heard. A supported device with the required connections can be purchased from your Account Manager.
Time Start
Enter the time the alarm should sound each day.
- Enter the time in a military, or 24 hour , format.
Duration (0-9 seconds)
Enter a value from 1 to 9 to determine how many seconds the alarm will sound.
Description
Enter a description regarding the purpose of the alarm for reference.