Global Use; Export Report; Schedule Report; Queue Report; Email Report
Generating Reports
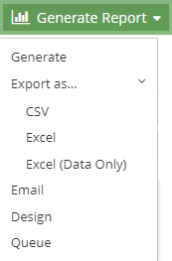
Once the appropriate filters have been applied, the report can be sent to multiple output options.

- Open the drop-down menu.
- The Single report dropdown options perform the desired output on the selected report only.
- The All reports dropdown options perform the desired output on all the reports in the list.
- Select the desired output:
- Generate: A pop-up message opens, showing the report is processing. When generated, the report automatically opens in a new tab as a PDF when finished. To the left, there is a list showing the full breakdown of items within the report. Clicking on any items opens it in a new tab for viewing. From there, it can be sent to a printer or downloaded (as a PDF.)
- Users may print by selecting by selecting Print this report at the bottom of the PDF. The PDF window remains open after the report prints.
- To email the report as well, select Email This Report at the bottom of the screen.
- If you close the PDF before you send it as an email, you will have to re-spool the report.
- To print a document with both portrait and landscape pages, click Print this report at the bottom of the page and print the downloaded PDF with the proper formatting.
- Export as: Select to export the report as a CSV, Excel, or Excel (Data Only) file. Select an option, the report automatically generates and downloads. From there it can be sent to a printer or saved.
- Options for saving will depend on the programs present on the computer being used to generate the report.
- Email: The report is generated and an Email Report dialog box opens, Users can enter a designated email recipient and send the report as a PDF attachment.
- This option requires that outgoing email options are configured properly for the user generating the report.
- For more information, see:
- Design: This opens the Report Designer where the user can edit the report format.
- Existing reports can be modified and saved as custom reports, but the original report is not deleted from the system.
- Users that do not have the ability to create custom reports will not see the Design option
- Option found under Miscellaneous Settings on User Code
- For more information see User Maintenance.
- For more information on the Report Designer, see Using the Report Designer and / or Report Designer Reference Information.
- Queue : This opens the Queue Report form where the user can schedule when the report should be generated and how frequently.
- This option is only available for Summary Reports and Table Lists.
- For more information see Queued Reports.
- Generate: A pop-up message opens, showing the report is processing. When generated, the report automatically opens in a new tab as a PDF when finished. To the left, there is a list showing the full breakdown of items within the report. Clicking on any items opens it in a new tab for viewing. From there, it can be sent to a printer or downloaded (as a PDF.)
Pop-ups must be allowed from JobBOSS2 in order for a report / form to be successfully generated.
On-Premises Configuration Requirements
On-premises installations are required to install and configure RabbitMQ software as part of this enhancement. For more information, see documentation for on-premises upgrades.