Tables
Work Centers
System Location: Settings > Tables > Work Centers
Work Centers represent areas within a shop where work is performed. They can represent machines or tasks a job must go through during production, and as a table record, Work Centers are used to store the following kinds of information:
- Details that help identify what the Work Center represents, how labor costs should be tracked against it, and how it should be grouped with other Work Centers
- Rate information regarding anticipated costs of operation in addition to billing rates to help determine how much to charge customers for its use
- Scheduling information including availability details and a designation on how much work should be assigned with regards to that availability
Information from Work Centers is used on Time Tickets for job costing purposes as well as the Scheduling Whiteboard to create a suggested order of production with regards to customer orders.
- Scheduling is driven by Work Center capacity and availability, however the Scheduling Application must be purchased in order to have access to the Scheduling Whiteboard.
Related Tables
The following Tables and / or Base Tables are used on Work Centers (an asterisk [*] indicates it is a required field on this Table):
- Departments
- GL Codes
- Operation Codes
- Attendance Codes
- Employee Codes
Associated Reports
Work Centers contain the following Sections (clicking a Section Title will take you to that portion of the help topic):
| General | Rates | Comments | Schedule | User-Defined |
 Record Header - Work Center
The Record Header located at the top of the page indicates which specific record has been selected and for what purpose (new, edit, quick view)
For more information see User Interface.

Action Buttons
Documents (button)
This feature allows for external documents to be attached to the selected Work Center for reference and review.
Documents Button Details
This feature allows for external documents to be attached to the selected record for reference and review.
- Any kind of file can be uploaded to the Repository Manager, however only PDFs can be selected to print with records in JobBOSS2
- User Groups are used to administer access and security rights within the Repository Manager
Only PDF documents can be selected to print with E2 records such as Job Travelers and Purchase Orders.
For more information see Repository Manager, Documents, and Images.
Dispatch (button)
Clicking this button opens the Dispatch Detail screen that can be used to indicate which employees might operate the work center in addition to what other Work Centers are capable of performing the same type of work.
For more information see Dispatching.
Operators Grid
This grid lists all the employees that have been defined within the Employee Table for reference.
Run by
Checking this box next to an employee's name indicates that person is capable of operating the Work Center.
- Can be used during scheduling if a replacement is needed to perform work
Pct Eff (Percent Efficient)
This value indicates how efficiently the employee can operate the specified work center.
- The Percent Efficient value will carry forward to the Scheduling application if you switch the employee on the schedule to an employee who has the Run by box checked here in Dispatch. The new Percent Efficient value is used to calculate estimated time if a Global Reschedule is performed.
When entering percentages in JobBOSS2, enter the value as a "standard" number instead of the decimal equivalent. For example, if the value should be five percent, simply enter "5" as opposed to ".05"; the system will automatically convert the value accordingly.
Alternate Work Center Grid
This grid lists all the other work centers that have been defined within the Work Center Table for reference.
Runs Like
Checking this field for a specific Work Center indicates that Work Center can perform the work of the one that is currently selected.
- Can be used during scheduling if a replacement is needed to perform work
Pct Eff (Percent Efficient)
This value indicates how efficiently the Work Center can replace the one currently selected.
When entering percentages in JobBOSS2, enter the value as a "standard" number instead of the decimal equivalent. For example, if the value should be five percent, simply enter "5" as opposed to ".05"; the system will automatically convert the value accordingly.
Audit Trail (button)
This option displays information regarding activity that has taken place on the selected Work Center.
Audit Trail Button Details
This option displays information regarding activity that has taken place on the selected record.
- Provides the following information:
- User: Indicates who performed the Action
- Action: Indicates what the User did
- NEW: Used when the record is created
- EDIT: Used when the record is closed by clicking OK - even if nothing was changed on the record
- VIEW: Used when the record is closed by clicking Cancel
- Date: Indicates when the Action took place
- Information can only be viewed, not edited or deleted
- An Audit Trail Summary can be printed by going to Reports > G/L > Audit Trail Summary within the system.
For more information see Audit Trail.
Save (button)
Save Button Details
This button is used to close the record and save any changes that have been made while it was open. In addition, the dropdown button allows you to Save and:
- Close - close the open record.
- New - open a new blank record.
- Print - print any of the reports related to the open record.
Cancel (button)
Cancel Button Details
This button is used to close the record without saving any changes that may have been made while it was open. If this button is used after a change has been made to the record, the system prompts to verify whether the record should be closed without saving the changes.
Answering "Yes" to the prompt closes the record without saving the changes.
Answering "No" to the prompt leaves the record open.
General Section
The General Section is used to provide identifying information for the Work Center in addition to details regarding how it is grouped with other Work Centers and how labor costs should be tracked for work performed on it.

An asterisk [*] indicates a required field.
Active (checkbox)
Checking this box indicates the Work Center is currently in use.
- Searches for "ALL" records only include active Work Centers by default
- Can be used as a search filter
- Remove check for Work Centers that are no longer in use
- Remain in system as table records
- Do not appear in search results unless specifically filtered to do so
- Not available as an option on routing steps
*Work Center Number
This value is used throughout the system when selecting a Work Center.
- Can be up to 4 numeric characters in length
- Must be unique
Description
Use this field to provide a full description of what the Work Center is / represents.
- Can be up to 30 alpha-numeric characters
- Does not need to be unique
- Appears on the job traveler printed to accompany a job on the floor
- Can indicate whether the Work Center represents machinery, a process, a personnel group, or a cellular work area
*Short Name
This value is the shortened name assigned to the Work Center that is displayed in situations where the full Description does not appear.
- Can be up to 10 alpha-numeric characters
- Must be unique
Department Code
Selecting a department provides a way to group the Work Center with other Work Centers that perform the same kind of work.
- Can be used as a filter for searches and when running reports associated with Work Centers
- Can be used to sort Whiteboard view if Scheduling Application has been purchased
Labor Account
This GL Code is used to report and track labor costs for work performed on the Work Center.
- Can be different from one Work Center to another if applicable
Default Operation Code
Assigning an Operation Code here causes the system to automatically populate the Operation Code field and all the related details associated with it on routing steps where the Work Center is selected.
- Useful to assign a Default Operation Code for Work Centers that perform the same function, or operation, the majority of times it is used
- For multi-purpose Work Centers it may be easier to leave this field blank and simply select the appropriate operation on the routing step as needed
- Operation Code can be added / edited on routing steps at any time as needed
Default Attendance Code
Assigning an Attendance Code here causes the system to automatically populate the Attendance Code field and all the related details associated with it on routing steps where the Work Center is selected.
- Used to indicate whether work performed on work center should be considered productive or not
- Can be edited on routing steps as needed
Work Center Image File
Enter the path where the Work Center's image file is located by manually entering it or by using the Browse For Image button.
View Image
This feature can be used to view the Work Center's image file from within JobBOSS2 if one is present.
- AutoVue must be loaded on the PC being used and a license must be available in order for this to function properly
Rates Section
Use the Rates Section to keep track of dollar amounts associated with the Work Center for both costing and sales purposes.
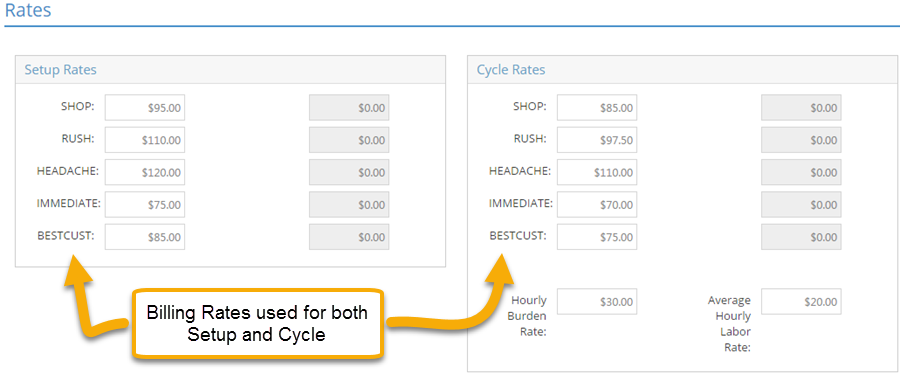
Setup Rates
Rate Fields 1-10
Setup Rates are used to track the suggested hourly dollar amount to charge for time spent preparing (or setting up) the Work Center.
Cycle Rates
Rate Fields 1-10
Cycle Rates are used to track the suggested hourly dollar amount to charge for time spent working on customers' items.
With regards to both Setup and Cycle Rates:
- Use Billing Rates defined in Company Maintenance
- Up to ten (10) Billing Rates can be defined
- Dollar amounts cannot be entered if a Billing Rate has not been defined (note grayed out fields)
- Dollar amounts are used to help determine the suggested sales price of manufactured parts / estimates that use the Work Center in their routing details
- Dollar amounts do not need to be the same between setup and cycle
- Rates can vary between Work Centers as well
At least one Setup and Cycle Rate needs to be present on a Work Center in order for the system to include the estimated time in its calculations of a suggested sales price for estimated items when using the Billing Rate method to do so. The lowest dollar amount entered for any of these rates should be NO LESS than the combined amount of Hourly Burden Rate and Average Hourly Labor Rate (covered below.)
Hourly Burden Rate
This dollar amount represents the estimated hourly (indirect) overhead cost of operating the Work Center.
- Typically includes items such as utilities, insurance, depreciation, etc.
- Defined costs should be reviewed over a period of multiple years in order to best estimate future costs
- This amount is also used as the actual burden cost when time tickets are turned in during production
Average Hourly Labor Rate
This dollar amount represents the average hourly (direct) labor cost of operating the Work Center.
- Common examples of values to use include:
- Weighted average of hourly labor of employees that operate the Work Center
- The highest possible hourly cost of labor based on the employees that operate the Work Center
- This amount is replaced by the pay rate amount of the employee that actually performs the work when time tickets are turned in
It is strongly recommended that an accountant or financial adviser be consulted to help calculate the estimated costs of operating work centers, especially with regards to burden costs.
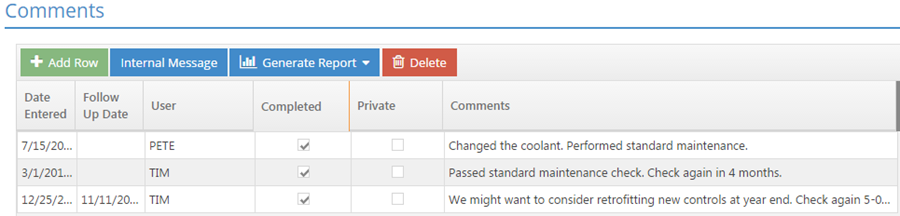
Comments Section
The Comments Section provides the ability to both track historical notes and schedule future follow up items related to the Work Center.
Action Buttons
Add Row (button)
This is used to add a new entry to the grid.
Internal Message (button)
This option can be used to send details related to a selected comment to any JobBOSS2 User.
- This is not the same as sending an email, though User accounts can be configured to forward internal messages to email if desired
Generate Report (dropdown menu)
This option is used to print, export, or email a report containing all the Details for the line items in the grid.
Delete (button)
This button is used to delete the selected entry from the grid.
Comments Grid
*Date Entered
This represents the date the comment was entered.
- System generated
- Cannot be edited
Follow Up Date
This field can be used to indicate when a follow up should take place for the selected comment.
- Optional
- Can be edited
User
This indicates which JobBOSS2 User the comment is associated with.
- Defaults to the User ID that was used to log in to JobBOSS2 and physically make the entry
- Can be changed to a different User ID
- Comment entries cannot be edited by a User that is different than the one listed
If the person that enters the comment changes the User ID, they will not be able to make any additional changes to the entry since they are not logged in with the listed ID.
Completed
When checked, this indicates the action associated with the comment has been completed.
- Can be marked manually
- Will automatically be marked if the comment has a Follow Up Date and is marked as complete in the Contact Calendar
Private
When checked, the comment can only be seen by the listed User in the Contact Calendar if a Follow Up Date is present.
Comments
Use this field to provide the details of the entry.
- Will display in the Contact Calendar if a Follow Up Date is entered
Schedule Section
Information under the Schedule Section will be used to determine the Work Center's default availability in addition to establishing how much work should be assigned to it with regards to that availability.
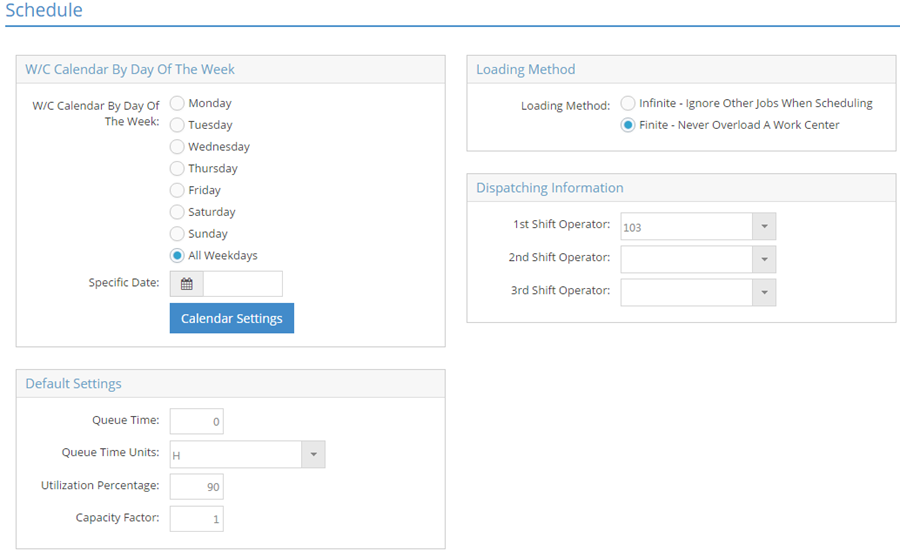
W/C (Work Center) Calendar By Day Of The Week
Information here is used to determine the expected availability of the Work Center.
W/C (Work Center) Calendar By Day Of The Week
Select the radio button that best indicates when the Work Center will be available for production purposes by way of day(s) of the week.
Specific Date
Use this option to designate specific dates the Work Center will limited availability due to scheduled maintenance or anticipated down time for some other reason.
- Enter a date in the Specific Date field and click the Calendar Settings button to designate what availability the Work Center will have for that date
- This can be repeated for multiple dates as needed
- If the Calendar Settings button is clicked without a specific date selected, the system will allow the user to limit availability for a group made up of "All <SELECTED> Days" based on which radio button is selected at the time
- For example, if no specific date is selected and the radio button next to Thursday is selected when the Calendar Settings button is clicked, the user would be able to limit availability for ALL THURSDAYS as opposed to a specific one.
- This could be useful if a Work Center is limited in availability due to an employee's schedule
Default Settings
Information here is used to help determine how much time should actually be scheduled with regards to work assigned to the Work Center based on external factors.
Queue Time
Queue Time is used to "pad" a schedule by taking into account dead time that typically occurs between steps associated with the Work Center.
- The value entered needs to be taken into account in terms of the Queue Time Unit (designated below)
- The designated time is added between every step assigned to the Work Center
- Examples for the use of Queue Time include:
- Allowing for dry time at a paint booth
- Allowing for cleanup between steps
- Allowing for the movement of material between steps
Queue Time Units
Designate the appropriate unit to apply against the time value entered for Queue Time (above) if this feature is being used. Options include:
- H (Hours)
- M (Minutes)
- S (Seconds)
Utilization Percentage
Utilization represents the amount of the Work Center's listed capacity to perform work that can actually be used in a given time frame.
- If less than 100, the number of hours the work center is considered to be truly available is decreased accordingly
- Example: If utilization is set to 90(%), the amount of its listed capacity is decreased by 10%
- Routing time is not affected by this value
When entering percentages in JobBOSS2, enter the value as a "standard" number instead of the decimal equivalent. For example, if the value should be five percent, simply enter "5" as opposed to ".05"; the system will automatically convert the value accordingly.
Capacity Factor
This value represents the number of machines that are physically available to perform work assigned to the Work Center.
- Could be set to 2 if there are 2 machines on the shop floor capable of performing the type of work assigned to the Work Center
- Alternately they could be set up as 2 individual Work Centers ("Machine 1" and "Machine 2" for example)
- When capacity is greater than 1, the amount of available time to do work is multiplied accordingly to determine the number of machine hours available for scheduling purposes
- For example, if a Work Center has 10 hours of available time on a given day due to shift settings, a Capacity Factor of 2 would make 20 machine hours available for scheduling
When Capacity Factor is greater than 1, it is important to keep the following in mind:
- Each machine represented must be able to perform the same type and amount of work
- The system will not be able to distinguish which machine actually performed the work with regards to maintenance schedules
- The value for "Machines job being run on" located in the routing step details of estimates and jobs needs to match the Capacity Factor to allow for proper scheduling
If Capacity Factor is greater than one, the machines represented must be able to perform the same kind and amount of work in order to avoid possible bottlenecks if using the Scheduling Application.
Loading Method
Information here is used to determine how much work will actually be assigned to the Work Center in a given time frame relative to its stated capacity and utilization.
Loading Method
Select the appropriate radio button to determine whether the system will limit the amount of work assigned to the Work Center or not.
- Infinite: The system ignores the Work Center's stated capacity and will overload it by way of assigned work
- Work is assigned even though other jobs are already present that are expected to take up the Work Center's amount of available time for the stated time frame
- Finite: The system takes the Work Center's stated capacity into account and will stop assigning work to it once it has been reached
- Jobs are pushed off to the next available block of time in which the work can be successfully scheduled
- If Utilization Percentage is less than 100, the amount of work that can be scheduled to the Work Center during a stated time frame is reduced accordingly
Dispatching Information
1st, 2nd, and 3rd Shift Operators
Select an employee for each shift if that person is expected to operate the Work Center during that time frame and it is expected that work will not take place on the Work Center when that employee is on break.
- The Work Center's amount of available time is reduced within the stated shift for scheduling purposes by any breaks assigned to the selected employee
- It is not required to designate shift operators
For more information see Dispatching.
User-Defined Section
User-Defined fields can be configured to track information that is unique to your business.
For more information see User Defined Fields.
The User-Defined Section and related information will only be available if the User has been granted adequate permissions within User Maintenance.