Tables
Customers
System Location: Settings > Tables > Customers
Customer Codes represent the different businesses or individuals to which products and / or services are sold. Customer Codes are used to store the following kinds of information:
- Business level contact information such as addresses, phone numbers, and website (URL)
- Contact information for specific people within the business
- Credit related details such as the amount of credit to extend and what terms to provide for invoicing
Information from Customer Codes is used on sales related transactions such as Quotes, Orders, Packing Lists, AR Invoices, and Cash Receipts.
Information provided by a Customer Code can be edited on transactions created for the customer as needed.
Related Tables
The following Tables and / or Base Tables are used on Customer Codes (an asterisk [*] indicates it is a required field on this Table):
- *Currency Codes
- *Salesmen
- Shipping Codes
- Tax Codes
- Terms Codes
- Work Codes
Associated Reports
Click a Section Title below to see details for that portion of the Customer Code.
 Record Header - Customer Code
The Record Header located at the top of the page indicates which specific record has been selected and for what purpose (new, edit, quick view)
For more information see User Interface.

Action Buttons
Documents (button)
This feature allows for external documents to be attached to the selected Customer Code for reference and review.
Documents Button Details
This feature allows for external documents to be attached to the selected record for reference and review.
- Any kind of file can be uploaded to the Repository Manager, however only PDFs can be selected to print with records in JobBOSS2
- User Groups are used to administer access and security rights within the Repository Manager
Only PDF documents can be selected to print with E2 records such as Job Travelers and Purchase Orders.
For more information see Repository Manager, Documents, and Images.
Audit Trail (button)
This option displays information regarding activity that has taken place on the selected Customer Code.
Audit Trail Button Details
This option displays information regarding activity that has taken place on the selected record.
- Provides the following information:
- User: Indicates who performed the Action
- Action: Indicates what the User did
- NEW: Used when the record is created
- EDIT: Used when the record is closed by clicking OK - even if nothing was changed on the record
- VIEW: Used when the record is closed by clicking Cancel
- Date: Indicates when the Action took place
- Information can only be viewed, not edited or deleted
- An Audit Trail Summary can be printed by going to Reports > G/L > Audit Trail Summary within the system.
For more information see Audit Trail.
Save (button)
Save Button Details
This button is used to close the record and save any changes that have been made while it was open. In addition, the dropdown button allows you to Save and:
- Close - close the open record.
- New - open a new blank record.
- Print - print any of the reports related to the open record.
Cancel (button)
Cancel Button Details
This button is used to close the record without saving any changes that may have been made while it was open. If this button is used after a change has been made to the record, the system prompts to verify whether the record should be closed without saving the changes.
Answering "Yes" to the prompt closes the record without saving the changes.
Answering "No" to the prompt leaves the record open.
 General Section
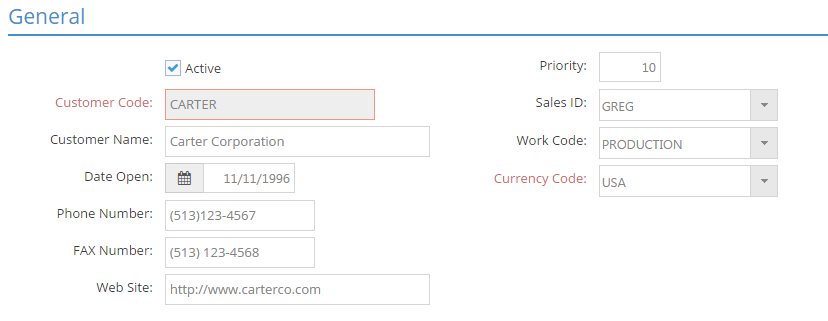
The General Section is used to provide identifying information for the customer in addition to values related to their relative importance to your company and how they are grouped in relation to other customers.

An asterisk [*] indicates a required field.
Active
Checking this box indicates the customer should be considered as an active account.
- Searches for "ALL" records include only active customers by default
- Can be used as a search filter
- Remove check for customers that you no longer do business with
- Remain in system as Customer Table records, but do not appear in search results unless specifically filtered to do so
- What constitutes an active account varies from company to company
*Customer Code
This value is the "short name" assigned to the customer.
- Can be up to 12 alpha-numeric characters
- Must be unique for each customer
Customer Name
This is the "long name" for the customer that appears on printed forms such as Acknowledgments and Invoices.
- Can be up to 50 alpha-numeric characters
- Does not need to be unique
Date Open
This is the date the customer is considered to have started doing business with your company.
- Defaults to the date the Customer Code was entered into JobBOSS2
- Can be changed
Phone Number
The main phone number used to contact the customer.
- Automatically populates as the phone number for contacts associated with the Customer Code (see Contacts Section below)
- Can be changed for each contact
- If this number is changed, JobBOSS2provides the option to update all contacts and shipping addresses with the new value
FAX Number
The main FAX number for the customer.
- Automatically populates as the FAX Number for contacts associated with the Customer Code (see Contacts Section below)
- Can be changed for each contact
- If this number is changed, JobBOSS2 provides the option to update all contacts and shipping addresses with the new value
Web Site
This is the URL associated with the customer's web site.
- Reference purposes only
Priority
This value is used to indicate the relative importance of the customer and their Orders entered into JobBOSS2.
- Used to determine which jobs (on orders) receive material first and which ones receive scheduling preference
- The higher the value, the more important the customer and their Orders are considered to be
- Job Priorities can be changed within the Scheduling Application
- Populates with value from Customer Defaults (in Company Maintenance) for all new Customer Codes
- Can be edited at any time
- Multiple customers can have the same priority
*Sales ID
This is the salesperson assigned to the customer.
- Selected from Salesmen Table entries
- Populates with value from Customer Defaults (in Company Maintenance) for all new Customer Codes
- As a required field, it is suggested to create some sort of "HOUSE" Salesmen account to use on customers that do not have a default salesperson
- Used later in system to determine commissions due to sales representatives
Work Code
This is used to group customers together by some criteria such as industry in order to make it easier to track Jobs and related production information.
- Selected from Work Code Base Table entries
- Populates with value from Customer Defaults (in Company Maintenance) for all new Customer Codes
- Very useful as a filter on multiple reports and in record searches throughout JobBOSS2
- If the option in Company Maintenance has been set to drive Customer Billing by Work Code, this is also used to provide GL Codes for AR Invoices
- GL Codes provided by Work Code include:
- AR Account
- Discount Account
- Sales Account
- Freight Account
- GL Codes can be changed on AR Invoices
- See Settings > System > Company Maintenance > Defaults > Customer in help for additional information about Customer Billing GL Coding
- GL Codes provided by Work Code include:
- Each job on an order “inherits” the Work Code associated with the customer by default but can be changed
*Currency Code
This determines the currency used on financial related transactions for the customer.
- Selected from Currency Code Base Table entries
- If set to a foreign currency, this will provide a default value for sell and buy rates on financial transactions created for the customer
Currency Code should represent the currency used in financial transactions with the customer, which may not necessarily be the currency of the customer's country of origin. For example, many companies outside the United States have accounts in U.S. dollars for the purpose of doing business in the states.
Pricing Tier (If used)
Pricing Tiers can be used in place of Quantity Breaks as a way of determining what price a customer will pay for goods or services you sell.
The Pricing Tier field will only display if the option in Company Maintenance has been set to use Pricing Tiers instead of Quantity Breaks.
- Assign the customer to a Pricing Tier defined within Company Maintenance
- On Manufactured Parts created within JobBOSS2, the Quantity Break field will be used to display the price for each Pricing Tier instead
- See Settings > System > Company Maintenance > Defaults > Inventory in help for additional information about using Pricing Tiers
 Contacts Section
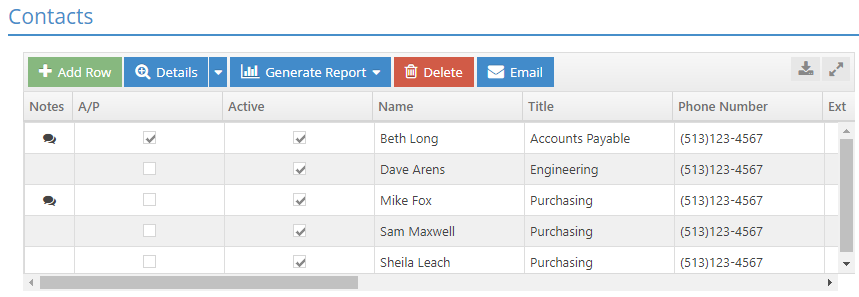
Use the Contacts Grid to keep a list of specific individuals within the customer's company that are dealt with on a regular basis.

Action Buttons
Add Row (button)
This is used to add a new entry to the grid.
Details (dropdown menu)
This is used to open details related to the entries in the grid. Detail options are for the Contact and for Comments.
- Information displayed is for the contact selected in the grid when the Details option is used
- Information displays for first entry in the grid if one is not otherwise selected
- Contact Details provides information on the values listed in the Contacts Grid for the selected contact
- Values that are present in both the grid and the details can be entered or edited in either location
- This is also where WebView settings can be changed for a specific person if they should be different than the default values listed in the Table Record Toolbar
- To enter a new contact in Details as opposed to doing so directly in the grid, click Add Row, enter the contact's Name, and then use the Contact Details option.
- Comment Details displays a list of all Comments that have been entered for the selected contact.
- Comments need to be entered using the Comments Details option to display in the list
If you want to discard the changes you've made in the details section, be sure to use the Cancel button to return to the main Customer Code screen.
Generate Report (dropdown menu)
This option is used to print, export, or email a report containing all the Details for the line items in the grid.
Delete (button)
This button is used to delete the selected entry from the grid.
Deleting a contact that is referenced on any sales related transactions will cause the Contact field to be "blanked out" on all those transactions.
- The system provides a prompt warning this will happen and provides the opportunity to continue with the delete or to cancel it and leave the contact information in place
- Comments associated with a deleted contact would remain in the system and will still appear on the Comments Detail report
- Consider marking the contact as Inactive as opposed to deleting their information altogether in order to maintain a record
This option generates an email box with the To: field generated by the contact who is selected in the grid.
Contacts Grid
An asterisk [*] indicates a required field.
Enter as many contacts as necessary in the Contacts Grid.
Notes
This field indicates whether there are Comments associated with a particular contact or not.
- The presence of the Notes Icon
 indicates that there is at least one comment present for the contact.
 - Comments are entered by using the Comments Details option (located in the Details drop down)
A/P
Marking an entry as an A/P (Accounts Payable) Contact will cause that person's name and contact information to appear on the A/R Aging Summary for invoices to the selected customer.
Active (check box)
This indicates whether the contact is someone that should be considered a current (i.e. active) contact for the customer or not.
*Name
Enter the contact's name here.
- The Name field is required when entering a new contact
- Names do not need to be entered in a particular format, but it is strongly suggested that they be entered in a consistent manner
Title
Enter the contact's title here.
Phone Number / Ext / Fax Number
These represent numbers used to reach the designated contact.
- Populate by default with the values provided for the Customer in the General Section but can be edited
Cell Phone Number
Enter the contact's cell number here.
Email Address
Enter the contact's email address here for use throughout JobBOSS2.
- Contacts that have an email address provided will be available to select from Contacts when emailing forms and reports from within JobBOSS2
Mobile Email Address
This field can be used to enter a second email address for the contact.
- Will not display when using Contacts to select recipients for forms and reports emailed from within JobBOSS2
Conferencing Server / Conferencing Address
These fields may be required for sending emails from within JobBOSS2 depending on the service used.
Consult your IT personnel or contact the Hardware Specialists at ECI Software Solutions, Inc. if you have questions regarding the use of these settings.
- These settings work in conjunction with the Email Settings present in User Maintenance
- Email Settings in User Maintenance must be configured properly in order to be able to send emails from within JobBOSS2
Comments
Use this field to enter comments for the selected contact that do not need to appear in the Comments Details.
- Same as entering comments in Contact Details - Comments field
- Not the same as entering a comment within the Comments Details
- Information will not be included in the Comments Details Report
Opted Out
Use this field to track which of your customer contacts have opted out of communication with you.
- Selecting this button does NOT prevent you from emailing the customer contact.
- Result can be filtered based on the Opted Out field when generating or exporting the customer Contact List report.
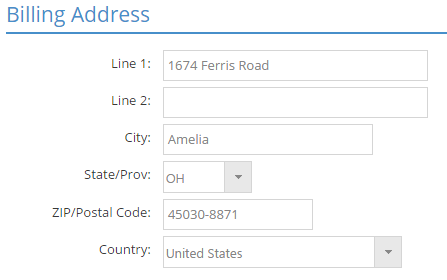
 Billing Address Section
Each customer can have one billing address listed to indicate where invoices should be sent for payment.

An asterisk [*] indicates a required field.
Line 1 / Line 2
Use these fields to indicate the street location and any additional information such as suite number as needed.
- Can be up to 50 alpha-numeric characters in length
ZIP / Postal Code
Enter a valid postal code for the United States or Canada in this field and then click the Tab key to have the system automatically populate City, State/Province, and Country.
- Are only auto populated the first time a postal code is entered
- Can be manually populated as needed
 Shipping Addresses Section
Enter as many shipping related addresses as needed to accommodate deliveries to the selected customer.

Action Buttons
An asterisk [*] indicates a required field.
Add Row (button)
This is used to add a new entry to the grid.
Details (button)
This is used to open details related to the entries in the Shipping Addresses Grid.
- Information displayed is for the address selected in the grid when the Details option is used
- Information displays for first entry in the grid if one is not otherwise selected
- Values can be entered or edited in either the grid or in details
To enter a new address in Details as opposed to doing so directly in the grid, click Add Row, enter the Location, and then click Details.
Delete (button)
This button is used to delete the selected entry from the grid.
Shipping Address Grid
*Location
Provide a Location (referred to as Location Code in Details) to identify the shipping address.
- Location is required when adding a new shipping address
- It is suggested Locations are distinguished in some way to avoid confusion
Ship To Name
This value will appear on Packing Lists when the selected shipping address is used.
- Defaults to the Customer Name but can be edited to allow for drop shipments, etc.
Address Line 1 / Address Line 2
Use these fields to indicate the street location and any additional information such as suite number as needed.
- Can be up to 50 alpha-numeric characters in length
Zip Code
Enter a valid postal code for the United States or Canada in this field and then click the Tab key to have the system automatically populate City, State/Province, and Country.
- Are only auto populated the first time a postal code is entered
- Can be manually populated as needed
Ship Via
This field indicates what method of shipping will be used for the selected address.
- Populates with description associated with the selected Shipping Code by default
- Can be manually edited
Territory
This field can be used to group customer locations into geographic categories.
- Common examples include:
- State or Province
- Regional designation such as North, South, Southeast, etc.
- Available as a filter on many customer and sales related reports
FOB
FOB, or Freight On Board, is used to indicate the physical location where shipping charges originate.
- Commonly the city and state where the items are shipped from
- Populates with value from Customer Defaults (in Company Maintenance) for all new addresses
Phone / Fax
Enter the phone and fax numbers for the selected location.
- Populates with values provided for customer in General Section by default
Ship Code (drop down)
This field determines what shipping method will be used for deliveries to the selected address along with providing many other shipping related values.
- Selected from Shipping Code Base Table entries
- Populates with value from Customer Defaults (in Company Maintenance) for all new addresses
Contact (drop down)
Use this field to indicate who the contact should be at the selected location.
Default (check box)
Place a check in this field for the location that should be considered the primary, or default, address for shipping purposes.
- Will display on documents needing a customer shipping address
- Additional shipping addresses can be selected via drop down if available
Print Cert (check box)
Place a check in this field to have a Certificate of Conformance automatically sent to the print spool when a shipment is processed for the selected location.
- Leave blank if a certificate is not needed
- A certificate can be printed later as needed
Shipping Accounts Section
Enter information in this grid to use on Shipments for FedEx and UPS that are set up on the customer's account as opposed to yours.

- Information entered here will pull forward onto Shipments created for the customer when Recipient is selected in the Payor Information section of the Shipment.
- The system provides information for either UPS or FedEx depending on the Shipping Code selected on the Shipment.
For more information see Shipments.
 Comments Section
The Comments Section provides the opportunity to store comments that are unique to each customer that can be used over and over. Information entered under this header will remain in use until they are removed or edited.

An asterisk [*] indicates a required field.
Comments To Customer
Information entered here will display on documents sent to the customer such as Acknowledgments, Delivery Tickets, Quotes, and Invoices.
- If a large amount of information is entered , consider the space that will be taken up on forms
- Comments will be visible to the public
Do not confuse this with Comments About Customer!
Comments About Customer
Information entered here is intended for internal use and will not appear on any customer documents.
- Comments can be seen here and in QuickView when viewing customer details
 Credit Section
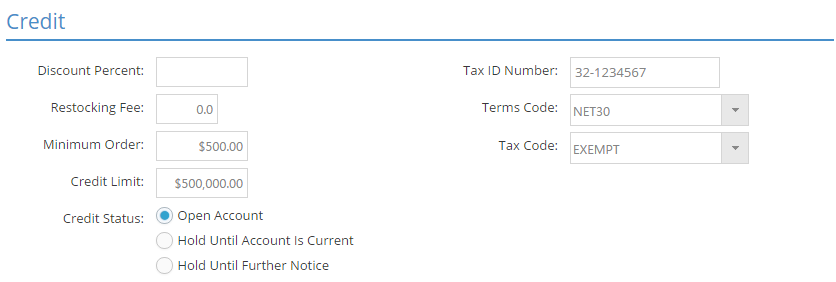
Information under the Credit Section will be used when creating sales related transactions for the customer from quotes to invoices.

An asterisk [*] indicates a required field.
Discount Percent
This represents the discount amount that will be applied on sales transactions with the customer.
When entering percentages in JobBOSS2, enter the value as a "standard" number instead of the decimal equivalent. For example, if the value should be five percent, simply enter "5" as opposed to ".05"; the system will automatically convert the value accordingly.
- Automatically applied on dollar values on Quotes, Orders, and Invoices
- Can be edited on each record if needed
- Dollar amounts do not show the "original amount less the discount" - the discounted amount is simply displayed as the amount charged
Restocking Fee
Represents the percentage charged to the selected customer for restocking parts as a result of a customer return.
- Populates with value from Customer Defaults (in Company Maintenance) for all new customers
Minimum Order
Enter a dollar value that should be used as the minimum amount allowed when creating an order for the selected customer.
- System will prompt if order total is less than the amount listed here
- Can choose to ignore the minimum order amount
Credit Limit
This value represents the highest balance the selected customer can reach with regards to open AR invoices before the system prompts they have reached their credit limit.
- Quotes and orders can still be entered if the credit limit has been reached or exceeded
Credit Status (radio button)
The credit status determines how the system behaves when a new quote, order, or packing list is created for the selected customer.
- Open Account – No restrictions on creating listed transactions
- Hold Until Account Is Current – System prompts to confirm the creation of the new transaction
- Hold Until Further Notice – System prevents creation of the new transaction
- Credit Status is changed manually and is not dependent on other transactions
Tax ID Number
This value is listed for reference purposes.
Terms Code (drop down)
This code determines what discount, if any, the selected customer will be eligible to receive if their invoices are paid within the defined terms.
- Selected from Terms Code Base Table entries
- Applied by default to all sales related transactions for the customer but can be changed
- Required on AR invoices
Tax Code (drop down)
Represents the tax percent to apply against sales related transactions for the selected customer.
- Selected from Tax Code Base Table entries
- Applied by default to all sales related transactions for the customer but can be changed
- Required on AR invoices
It is recommended to create an EXEMPT (or similarly named) Tax Code for use with customers that do not have to pay sales tax.
 Customer History
This information is system generated and provides several bits of useful information regarding sales related transactions with the selected customer.

Date Last Activity
This represents the Order Date of the most recent Order created for the selected Customer.
Current Receivables
This is the dollar total of all unpaid invoices associated with the selected Customer.
Open Orders
This is the dollar total of all open Orders for the selected Customer.
YTD Sales
This is the dollar total of all AR Invoices created for the selected Customer within the current fiscal year.
Avg Days To Pay
This is the average number of days it takes the selected Customer to pay invoices once they are created.
 User-Defined Section
User-Defined fields can be configured to track information that is unique to your business.
For more information see User Defined Fields.
The User-Defined Section and related information will only be available if the User has been granted adequate permissions within User Maintenance.