Implementation
How To Implement Accounting in JobBOSS2
The following topic is designed to provide an overview of how to implement the accounting application within JobBOSS2. For specific questions regarding accounting / tax related issues, please contact an accounting professional.
Terms Used in This Topic
The following terms are used in one or more places within this topic.
Accounting Go Live Date
This refers to the date that the accounting application will first be used in JobBOSS2 to fully handle day to day accounting functions and all related reports on a "go forward" basis.
Chart of Accounts
This refers to the complete / official list of all general ledger accounts that are used for accounting purposes.
GL Accounts / GL Codes
These terms are used interchangeably to refer to the general ledger accounts / general ledger codes used in JobBOSS2.
Legacy System
This refers to the system that is currently being used to maintain accounting related information.
- This is the system that is being moved away from.
Short Year or Shortened Accounting Year
This term refers to a fiscal year created in JobBOSS2 that does not cover an entire 12 month time frame like a "standard" fiscal year does.
- Short years would only be needed when implementing JobBOSS2 at some point other than the beginning of a fiscal year in order to account for open invoices and unreconciled checks.
The first thing to do is determine the date the accounting application will "go live" for daily use within JobBOSS2.
When selecting this date, consider the following:
- The date should be the first day of a month unless your fiscal year does not match the calendar year or you are using nonstandard periods, such as a 4-4-5 pattern.
- See the Define Non-standard Fiscal Years portion of this topic for details on how to set non-standard fiscal years up BEFORE you enter any accounting related records.
- The date / month selected does not have to be at the beginning of the fiscal year since it is possible to implement JobBOSS2 accounting in the middle of an ongoing fiscal year.
- When this happens, the implementation process will typically result in two short years. This is covered in greater detail in the Complete Accounting Setup portion of this topic.
- Beginning balances, aging reports, and outstanding check balances in JobBOSS2 will all be entered based on the ending balances and values provided from your legacy system as of the day before the selected go live date. With this in mind, begin planning on how to gather this information from the appropriate sources in advance.
Verify GL Group Codes
GL group codes provide the structure for the chart of accounts and are required on GL codes. Though the system comes with a default list of GL group codes, it is recommended to review the list to make sure it can be used to match the way your legacy system was broken out.
For more information see GL Group Codes.
Verify GL Codes
Though GL accounts should already be present, it is important to make sure that the entire chart of accounts is properly represented and available for use before implementing the accounting application.
To print a list of current GL accounts in JobBOSS2:
- Click the Reports button.

- Open the Tables dropdown menu and select Print Tables.
- Locate GL Codes and place a check in the box.
- Generate the report to the desired output option.
If the existing list does not match the chart of accounts provided from your legacy system, add them as needed.
For more information see Create a GL Code.
Verify Additional Accounting Related Tables
Verify that the following additional tables represent all of the options that will be needed for complete accounting functionality.
Tables
- Bank Codes: Required on checks and cash receipts
Base Tables
- Currency Codes: Additional codes may be needed if you deal with foreign currencies
- Product Codes: Associated with parts; can be used to provide GL codes on AR invoices if selected to do so in Company Maintenance
- Tax Codes: Represent taxing authorities and tax rates; required on invoices
- Terms Codes: Provide terms for payment; required on invoices
- Work Codes: Associated with customers; can be used to provide GL codes on AR invoices if selected to do so in Company Maintenance
For more information see Tables.
Verify Accounting Related Defaults
Once you have verified the necessary tables are present, make sure the following default values have been properly selected.
- In the Navigation Sidebar, click the Settings button.

- Open the System drop down menu and select Company Maintenance.
- Verify the correct company is selected in the Navigator Grid if more than one is available.
- Click Edit (located at the top of the page.)
- Click Defaults (located at the top of the page) and go to the Customer section.
- Verify the following values have been selected as appropriate:
- Work Code
- Terms Code
- Tax Code
- Setting these values at the Customer Default level can help provide information required for accounting records more efficiently and reliably. These options can be added / edited on customer related records as needed.
- Verify how Customer Billing GL Coding Driven By is set. Options include:
- Work Code - Provides GL codes on AR invoices based on customer (who items are sold to)
- Product Code - Provides GL codes on AR invoices based on part (what is sold)
- Go to the General Ledgers section.
- Verify the following GL Code values have been selected as appropriate:
- AP Account
- Retained Earnings Account
- Current Earnings Account
- Purchase Discounts Account
- AR Account
- Cash Discount Account
- Freight Account
- These values are all required and must have a value present in order to save changes made to Company Maintenance settings.
- Verify the appropriate bank codes have been selected as the default values for the following:
- AR Bank Account (Cash Receipts)
- AP Bank Account (Checks)
- These values are not required in Company Maintenance but are required on the appropriate cash instruments you create.
- Click OK to close Company Defaults.
- Click OK to close Company Maintenance and save any changes that have been made.
You would only perform this action if your fiscal year does not match the calendar year or your fiscal year has periods that follow a 4-4-5 (or similar) pattern.
It is important that you complete this process BEFORE entering ANY accounting records in any of the existing fiscal years.
Using information from your legacy system, enter any open AR invoices, AP invoices, and any unreconciled checks.
When entering these records, keep the following in mind:
- They are only being entered to keep aging summaries and reconciliation reports accurate.
- Fiscal years that contain open records for implementation purposes will typically not be posted. Instead, the system will mark them as historical and close them without posting them in order to avoid overstating the affected GL accounts once beginning balances are entered.
- Open records will be used in the fiscal year marked as Current to create cash receipts, write checks, and perform bank reconciliations.
- Each open record should be entered independently as opposed to being "grouped"; however they do not need to have all the details provided. Information required includes:
- Date
- Customer Code / Vendor Code / Pay To Information (as appropriate, depending on the record)
- Invoice Number or Check Number
- Total dollar amount
- Bank Code (checks only)
The amount of any additional details provided is up to you.
Enter Open AR Invoices
- In the Navigation Sidebar, click the Data Entry button.

- Open the AR dropdown menu and select Billing.
- Click New (located at the top of the page.)
Enter as much information as required to allow for accurate reporting.
For more information see Create a Customer Invoice Without a Packing List.
Enter Open AP Invoices
- In the Navigation Sidebar, click the Data Entry button.
- Open the AP dropdown menu and select Vendor Invoices.
- Click New (located at the top of the page.)
Enter as much information as required to allow for accurate reporting.
For more information see Create a Vendor Invoice Without a Receiver.
Enter Open Checks
- In the Navigation Sidebar, click the Data Entry button.
- Open the AP dropdown menu and select Check Writing.
- Click New (located at the top of the page.)
These checks can be entered as "manual checks" even if there were invoices associated with them in your legacy system.
For more information see Create a Manual Check (No Invoice).
Verify Values
Once all the open records are entered, the information should be verified to make sure that all the records were accounted for and that they were entered correctly.
Run AR Aging Summary
- In the Navigation Sidebar, click the Reports button.
- Open the AR dropdown menu select AR Aging Summary.
- Select items to include or exclude from the report (i.e. Customer or Work Codes) and apply desired filters.
- In the Include These Reports box, select which reports to include.
- Under Report Data Cutoff Options, select the As Of Date radio button.
- In the As Of Date date field, enter the day BEFORE the accounting go live date.
- This will be the last day of the month prior to the one in which accounting is used on a daily basis in JobBOSS2.
- In the Report Options box, select the following options (if applicable):
- Calculate Average Days To Pay
- Note:If not selected, the summary will not calculate Average Days To Pay (ADTP) for the report. Instead, the summary uses ADTP from the Customer Code. For accuracy, run the JobBOSS2 Service nightly to get accurate ADTP information prior to generating the summary.
- Generate the report and compare the results to the aging summary generated from your legacy system on the same date.
Run AP Aging Summary
- In the Navigation Sidebar, click the Reports button.
- Open the AP dropdown menu select AP Aging Summary.
- Under Report Data Cutoff Options, select the As Of Date radio button.
-
In the As Of Date date field, enter the day BEFORE the accounting go live date.
- This will be the last day of the month prior to the one in which accounting is used on a daily basis in JobBOSS2.
- Generate the report and compare the results to the aging summary generated from your legacy system on the same date.
Run Check Summary
- In the Navigation Sidebar, click the Reports button.
- Open the AP dropdown menu and select Bank Reconciliation.
- Select the Bank Code from the dropdown menu for the appropriate cash account.
- In the Ending Date field, enter the day BEFORE the accounting go live date.
- This will be the last day of the month prior to the one in which accounting is used on a daily basis in JobBOSS2.
- In the Include These Reports box (located toward the bottom of the page), select Check Detail Summary.
- Generate the report and compare the results to the aging summary generated from your legacy system on the same date.
If any of these values do not match the information from your legacy system, the incorrect records(s) must be located and corrected in order for the values to be accurate from the accounting go live date forward.
Using information from your legacy system, enter the beginning balances for all GL codes as appropriate.
If accounting is being implemented part way through the current fiscal year, this will include income and expense accounts as well as current earnings in order to account for the activity that occurred in the "skipped" periods.
Edit GL Accounts
- In the Navigation Sidebar, click the Settings button.
- Open the Tables dropdown menu and select GL Accounts.
- Click Search.
- This displays all active GL Codes by default.
- Select the first GL code that needs to be updated and click Edit.
- In the Fiscal Year Section, verify the year displayed in the Fiscal Year dropdown menu is correct.
- This will display the fiscal year with a Status of Current.
- If the year displayed here is not the correct one, you can select the correct year from the dropdown menu or you can edit your fiscal years to get teh correct Current fiscal year.
- Enter the appropriate dollar value as the Beginning Balance.
- This value will be the same as the ending balance from your legacy system reports.
- Credit values are entered as "negative" values (i.e. with a minus sign in front of them)

- Debit values are entered as "positive" values (i.e. without a minus sign; Do not use a plus sign)

- (OPTIONAL) Enter Beginning Balance for previous year (for comparative purposes.)
- Select the previous year from the Fiscal Year dropdown menu.
- Enter the Beginning Balance for the same month from the previous year (if available.)
- Click OK to close and save the GL code.
- Repeat for as many GL codes as needed.
Verify Balances
Once all the beginning balances have been entered, they need to be compared against your legacy system values.
- In the Navigation Sidebar, click the Reports button.
- Open the G/L dropdown menu and select Trial Balance.
- Select the first period of the current year in the Period Number dropdown menu.
- Typically this report would only be run once the period was posted; however in this case all that is needed is the beginning balance values.
- Select Yes for the Print Zero Accounts? option.
- This will ensure that every account can be viewed.
- Generate the report and compare the results to the information generated from your legacy system on the same date.
If any of these values do not match the information from your legacy system, the balances must be corrected in order for financial reports to be accurate from the accounting go live date forward.
Make sure to verify Current Earnings as well since this value does not appear on the Trial Balance.
Once all the open records and beginning balances have been entered, it is time to remove accounting from "Setup Mode."
- In the Navigation Sidebar, click the Settings button.
- Open the System drop down menu and select Company Maintenance.
- Click Fiscal Year Settings (located at the top of the page.)

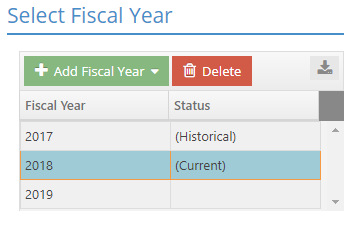
- Verify that the year you will be entering information in to is marked as your current fiscal year (in the Select Fiscal Year grid.)
- Click Accounting Setup Complete (located at the top of the page.)

- Click OK on the first prompt provided to verify that you have entered the information referenced.
- Click OK on the next prompt provided to verify that the appropriate fiscal years are marked as historical and the correct year is marked as Current.
- Select the period from the Beginning Period dropdown menu that represents your Go Live Date.
- This will become the first period available in the current fiscal year and is the one that has a Begin Date that matches your accounting Go Live Date.
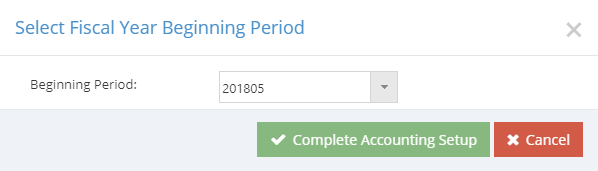
- Click Complete Accounting Setup.
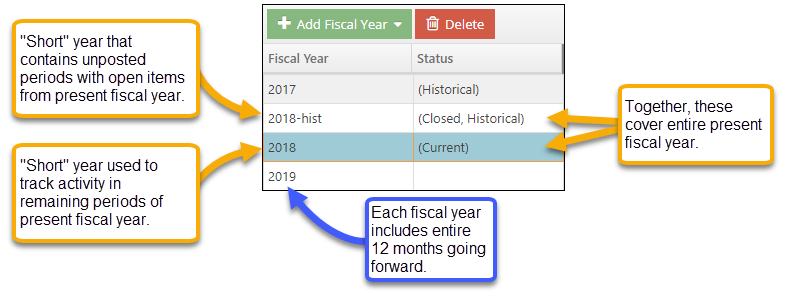
- The system automatically creates a new fiscal year that includes only the periods that fall before the one selected as the Beginning Period that is marked as Closed, Historical to prevent accounting records from being entered into them going forward.
- The system names this new, short fiscal year the same as the current one and appends -hist to the end.
- The system removes the Accounting Setup Complete button.
- Any fiscal years that were marked as historical will no longer appear in any Fiscal Year dropdown menu nor will their associated periods appear in any Period Number dropdown menus on accounting records.
For more information see Fiscal Year Settings - Reference Information.
 Determine the Accounting Go Live Date