Scheduling Whiteboard
System Location: Data Entry > Shop Floor Control > Scheduling
The Scheduling Whiteboard provides a visual representation of the systems assumptions regarding when jobs should be worked on based on work center setup, job routing details, and the various decisions that are made on the Whiteboard itself. This topic provides information about the options available on the Whiteboard and the settings that affect how it operates.
Before using the Whiteboard, it is important to make sure that the proper "foundation" has been laid by setting up work centers and job routers and that time tickets are used for labor reporting purposes.
For more information see Scheduling JobBOSS2.
For information about obtaining the Scheduling Application and / or the Data Collection Application, please contact sales at 1-800-525-2143.
 Whiteboard Screen
The Whiteboard Screen displays by default when the Scheduling area is opened and provides the visual representation of the various scheduling settings and assumptions.
For purposes of this topic, we will simply begin at the top of the page and work our way down with regards to available features.
Whiteboard Action Buttons
Search
This dropdown menu can be used to filter the information that displays in the Whiteboard. Options include:
- All - No filter applied; information for all open, processed jobs will be displayed
- Part Number - Only information for jobs for the selected part will be displayed
- Description - Only information for jobs that include the value provided in the 'Part Description' field will be displayed
- Customer - Only information for jobs created for the selected customer will be displayed
- Work Code - Only information for jobs that include the selected Work Code will be displayed
- Product Code - Only information for jobs that include the selected Product Code will be displayed
- Cust. P.O. Number - Only information for jobs that include the value provided as the Customer P.O. will be displayed
- Job Number - Only information for the selected Job Number will be displayed
- Job Notes - Only information for jobs that include the value provided in the 'Job Notes' field will be displayed
Global Reschedule
Click this button to open the Global Reschedule utility to update the Whiteboard Grid based on the options selected.
Only jobs that are open and unlocked will be affected by the Global Reschedule utility.
For more information see Global Reschedule Utility.
Scheduling Advisor
Click this button to see a list of scheduling related items that provide an overview of how things stand and point out potential problem spots (listed in red.) Each item displays the number of jobs that meet the listed situation and provides a 'Details' button that can be used to display information about the jobs in question in addition to granting access to selective rescheduling options and the ability to lock any of the jobs listed.
For more information see Scheduling Advisor.
Generate Report
Use this feature to generate a Scheduling Summary based on the information currently displayed in the Whiteboard Grid. Menu options include:
- View / Print - Information displays to the screen and can be printed from there
- Export - Information can exported to a .csv file or an Excel spreadsheet
- Email - A PDF version of the report can be sent to the selected recipient
For more information see Generating Reports in JobBOSS2.
Close (button)
Click this button to close the Scheduling Whiteboard.
Whiteboard Options
These options determine how information is grouped in the Whiteboard Grid.
Date Range
This field determines on which date the Whiteboard begins displaying information.
The radio button selected determines how scheduling related details are displayed in the Whiteboard.
- Work Center
The first column of the Whiteboard displays all the work centers that have work assigned to them along with the following information for each one:
- Job Number being worked on
- Displays "Multiple" if more than one job is being run at the same time.
- Employee Number / Code
- Only displays if the work center is being used.
- If the work center is not in use, it displays 'Idle' instead of Job Number and Employee information.
Information in the remaining columns indicates the amount of work scheduled to the work center in each time frame represented.
- Job Number being worked on
- Employee
The first column of the Whiteboard displays all the employees associated with work centers that have work assigned to them along with the following information for each one:
- Job Number being worked on
- Displays "Multiple" if more than one job is being run at the same time.
- Work Center Number / Code
- Only displays if the employee is clocked on to a job.
- If the employee is not clocked on to a job, it displays 'Idle' instead of Job Number and Work Center information.
Information in the remaining columns indicates the amount of work scheduled to the work centers the employee is assigned to in each time frame represented.
- Job Number being worked on
- Department
The first column of the Whiteboard displays all the departments associated with work centers that have work assigned to them. Information in the remaining columns indicates the amount of work scheduled to all the work centers assigned to each department for each time frame represented.
- Job Number
The first column of the Whiteboard displays all the jobs with open, routed steps that have work assigned to them along with the Part Number being made on the job. Information in the remaining columns indicates the amount of work scheduled to all the work centers assigned to the job in each time frame represented.
- The presence of a "thumbs down" icon indicates that some or all of the job's material requirements have not yet been filled.
The radio button selected determines the time frame represented by the columns of the Whiteboard that display information for specific time "buckets."
- Day - Each column represents a single day.
- Week - Each column represents a week,
- Month - Each column represents a month.
Regardless the option selected, the Whiteboard always displays information based on the date entered in the 'Date Range' field.
The time bucket represented by the 2nd and 8th columns depends on the options selected as the 'Days To Show' under 'Common Settings' of the Settings Screen.
Whiteboard Grid
The Whiteboard Grid is the visual representation of the collective settings and job routing assumptions and provides information grouped by the 'Whiteboard View' selected and broken out in time frames determined by the 'Date Range' and 'Bucket Size' options selected.
Jobs that are On Hold will not appear on the grid.
Steps only close automatically if all of the parts are submitted as pieces good. If some parts are scrapped, the step must be manually closed. Otherwise, it will remain on the grid.
Whiteboard Grid Action Buttons
The Action Buttons available for use vary based on the Whiteboard View selected.
Work Center View Action Buttons
Details
Displays as a dropdown menu with the following options:
- Scheduling
Scheduling details include information about each job scheduled to the selected work center and provides the ability to do the following:
- Move steps to different work centers, employees, or departments
- Lock and unlock jobs
- Create new jobs by splitting an existing one
- Edit job dates
- Manually reassign and 'balance' the load on the work center
The amount of information displayed varies based on what area of the grid is selected when Scheduling Details are opened.
- All jobs / steps assigned to the work center are displayed if the focus is on first column (that is, on the work center itself.)
- Only the jobs / steps scheduled to the work center in the selected time frame are displayed if the focus is on column 2 through 8.
- Work Center Maintenance
Work center maintenance details provide access to Work Center Maintenance options that include the ability to create maintenance jobs and to schedule maintenance tasks for the selected work center.
- The same information displays for the selected work center regardless of which column the focus is on.
- The same options are available under Data Entry Items > Quality > Work Center Maintenance.
If you want to discard the changes you've made in the details section, be sure to use the Cancel button to return to the main scheduling screen.
Edit Defaults
Click this button to access the Calendar Details assigned for 'ALL DATES' to the selected work center.
- The options are the same regardless what time bucket is selected.
- Editing available values here has the same effect as editing them on the Settings screen under 'Calendar Settings.'
Calendar Details Action Buttons
OK
Click this button to save any changes made and return to the Whiteboard screen.
- The system provides a prompt when changes are made to verify whether they should be applied or not.
- Answering 'Yes' to the prompt overwrites the existing value for the selected time value, whether that is the work center's default or a custom value entered previously.
Cancel
Click this button to return to the Whiteboard screen without saving any changes made.
General
The values located under the General Section are all "Read Only" and cannot be edited on this screen.
Code
This is the 'Short Name' assigned to the selected work center.
Date
This defaults to 'ALL DATES', indicating that the values provided in the Dispatching and Defaults Sections will be applied to every day the work center is in use.
Workday Begin, Workday End, Hours Per Day
These fields all display 'N/A' since this screen is used for all days.
Dispatching
Shift Operators
Use the dropdown menus provided to assign a default operator (Employee Code) for each shift the work center is in use.
- Work center capacity is reduced if the assigned operator has a scheduled 'Automatic Break' that falls within the shift time frame.
For more information see Dispatching.
Defaults
For more information see Scheduling JobBOSS2.
Queue Time / Queue Time Units
Queue time can be used to represent "dead time" associate with work performed on a specific work center.
- When used, queue times are added to every step routed to the work center.
- Select the appropriate 'Queue Time Unit' value in relation to the amount of "down time" desired between each step.
Utilization Percentage
Utilization represents the work center's ability to perform the work assigned to it within a given time frame.
- When utilization is less than 100%, the amount of time the work center is considered to be truly available is decreased accordingly.
Capacity Factor
This value represents the number of machines that are physically available to perform assigned work and is used to determine the total amount of daily machine hours available to the work center.
Loading Method
This setting determines how much work will be assigned to the work center during scheduling calculations.
- Infinite: The system ignores any limits placed on the work center's ability to perform work and will overload it as necessary to handle the work assigned.
- Finite: The system considers limits placed on the work center's ability to perform work and will stop assigning work to it once they have been reached.
Calendar Settings
Use this dropdown menu to access the Calendar Details or to reset the default values for a specific date, day of the week, or all weekdays on the selected work center.
- The column selected affects the items available in the dropdown menu.
- When the work center field (in the first column) is selected, the menu provides access to 'Settings' and 'Restore Defaults' for the following:
- All Weekdays
- All Sundays
- All Mondays
- All Tuesdays
- etc. (for each individual day of the week, including weekends)
- When the 'Bucket Size' is set to 'Day' and a specific date is selected, the menu provides access to 'Settings' and 'Restore Defaults' for the following:
- The specific date selected
- All "days" the selected date happens to be on (i.e. "All Mondays," "All Tuesdays," etc.)
- All Weekdays
- Calendar Settings are not available for columns that span multiple dates. This includes
- Past Due Hours
- Hours In Future
- Any time bucket when 'Bucket Size' is set to 'Week' or 'Month'
- When the work center field (in the first column) is selected, the menu provides access to 'Settings' and 'Restore Defaults' for the following:
- The options and information provided in the Calendar Details are the same for whatever time frame is selected.
- Editing values here has the same effect as editing them on the Settings screen under 'Calendar Settings.'
Calendar Details Action Buttons
OK
Click this button to save any changes made and return to the Whiteboard screen.
- The system provides a prompt when changes are made to verify whether they should be applied or not.
- Answer 'Yes' to the prompt to overwrite the existing information.
- Answer 'No' to the prompt to abandon any changes and return to the Whiteboard screen.
Cancel
Click this button to return to the Whiteboard screen without saving any changes made.
General
The values located under the General Section are all "Read Only" and cannot be edited.
Code
This is the 'Short Name' assigned to the selected work center.
Date
This displays the date or day of the week selected from the dropdown menu.
- Changes made for the selected time value will override default values that would normally be applied.
Workday Begin
Represents the earliest time of the day the work center can be scheduled on the selected time value.
- Determined by the 'Begin' value provided for the first active Shift for the work center.
Workday End
Represents the latest time of the day the work center can be scheduled on the selected time value.
- Determined by the 'End' value provided for the last active Shift for the work center.
Hours Per Day
This value represents the sum of the 'Hours' available for all the work center's active shifts on the selected time value.
Work Shift Schedule
The values here determine the availability (capacity) of the work center for the selected time value.
Shift
Place a check next to each shift the work center is available for use.
A work center will not be scheduled during any shift that is not marked as active.
Begin
Enter the earliest time of day the work center can be scheduled for the associated shift.
End
Enter the latest time of day the work center can be scheduled for the associated shift.
Time values must be entered in a 24 hour (or military time) format.
Capacity
This field displays the work center's 'Capacity Factor' and is used to determine the total number of machine hours available during the associated shift.
- Capacity Factor can be edited in the Defaults Section.
Hours
This represents the total machine hours available for the work center during the associated shift.
- Shift 'Hours ' = (Number of hours based on Begin and End Times - Automatic Break assigned to the selected 'Shift Operator') X Capacity
Dispatching
Shift Operators
Use the dropdown menus provided to assign a default operator (Employee Code) for each shift the work center is in use.
- Work center capacity is reduced if the assigned operator has a scheduled 'Automatic Break' that falls within the shift time frame.
For more information see Dispatching.
Defaults
For more information see Scheduling JobBOSS2.
Queue Time / Queue Time Units
Queue time can be used to represent "dead time" associate with work performed on a specific work center.
- When used, queue times are added to every step routed to the work center.
- Select the appropriate 'Queue Time Unit' value in relation to the amount of "down time" desired between each step.
Utilization Percentage
Utilization represents the work center's ability to perform the work assigned to it within a given time frame.
- When utilization is less than 100%, the amount of time the work center is considered to be truly available is decreased accordingly.
Capacity Factor
This value represents the number of machines that are physically available to perform assigned work and is used to determine the total amount of daily machine hours available to the work center.
Loading Method
This setting determines how much work will be assigned to the work center during scheduling calculations.
- Infinite: The system ignores any limits placed on the work center's ability to perform work and will overload it as necessary to handle the work assigned.
- Finite: The system considers limits placed on the work center's ability to perform work and will stop assigning work to it once they have been reached.
Quick View Options
Click this button to open the Quick View Screen for the selected work center.
- It does not matter what field / column is selected when the Quick View button is used.
Employee View Action Buttons
Details
Displays as a dropdown menu with the following options:
- Scheduling
Scheduling details include information about each job scheduled to the selected employee and provides the ability to do the following:
- Move steps to different work centers, employees, or departments
- Lock and unlock jobs
- Create new jobs by splitting an existing one
- Edit job scheduling dates
The amount of information displayed varies based on what area of the grid is selected when Scheduling Details are opened.
- All jobs / steps assigned to the employee are displayed if the focus is on first column (that is, on the 'Employee' field itself.)
- Only the jobs / steps scheduled to the employee in the selected time frame are displayed if the focus is on column 2 through 8.
- Employee Training
Employee training details provide access to Employee Training options that include the ability to schedule training tasks for the selected employee.
- The same information displays for the selected work center regardless of which column the focus is on.
- The same options are available under Data Entry Items > Quality > Employee Training.
Quick View Options
Click this button to open the Quick View Screen for the selected employee.
- It does not matter what field / column is selected when the Quick View button is used.
Department View Action Buttons
Information displayed in the Department View is based on the steps assigned to work centers that belong to the listed department.
Departments assigned to employees are not taken into consideration for scheduling.
Details
Click this button to open the Scheduling Details which include information about each job scheduled to the selected department.
Details provide the ability to do the following:
- Move steps to different work centers, employees, or departments
- Lock and unlock jobs
- Create new jobs by splitting an existing one
- Edit job scheduling dates
The amount of information displayed varies based on what area of the grid is selected when the Details are opened.
- All jobs / steps assigned to the department are displayed if the focus is on first column (that is, on the 'Department' field itself.)
- Only the jobs / steps scheduled to the department in the selected time frame are displayed if the focus is on column 2 through 8.
For more information see Scheduling Details.
Job Number View Action Buttons
Information displayed in the Job Number View is based on work assigned to work centers included in the routing details of the listed jobs.
Details
Click this button to open the Scheduling Details which include information about each job.
Details provide the ability to do the following:
- Move steps to different work centers, employees, or departments
- Lock and unlock jobs
- Create new jobs by splitting an existing one
- Edit job scheduling dates
The amount of information displayed varies based on what area of the grid is selected when the Details are opened.
- All steps on the job are displayed if the focus is on first column (that is, on the 'Job Number' field itself.)
- Only the steps scheduled in the selected time frame are displayed if the focus is on column 2 through 8.
For more information see Scheduling Details.
Reschedule Job
Use this dropdown menu to reschedule the selected job using one of the methods provided.
- Backward Schedule Job - Applies 'Backward Scheduling' assumptions to the selected job only.
- Forward Schedule Job - Applies 'Forward Scheduling' assumptions to the selected job only.
Neither of these options consider settings available under the 'Global Reschedule' utility when rescheduling the selected job.
Split Job
Click this button to open the Split Job utility.
- This option creates a new job by "splitting" an existing one at a step and for a quantity designated in the utility.
- This feature is also available in the Job Details.
Quick View Options
Click this button to open the Quick View Screen for the selected job.
- It does not matter what field / column is selected when the Quick View button is used.
Whiteboard Grid Information
The information in the Whiteboard Grid varies significantly based on the values selected above the grid itself.
The left-most column in the Whiteboard Grid is used to identify how scheduling information is displayed.
Based on the 'Whiteboard View' selected, information in Column 1 will display a list of work centers, employees, departments, or jobs.
We will refer to these as 'View Items' since the items listed depend on thew View selected.
- The system only displays View Items that have work assigned to them.
The remaining columns in the grid represent time frames, or "time buckets", in which scheduled work is displayed. The amount of time represented by each column depends on the 'Bucket Size' selected and the options selected in Settings for 'Days To Show.'
- Bucket Size
This radio button is located immediately above the Whiteboard Grid and determines how many days each column represents. Options include:
- Day - Each column represents a single day.
- Week - Each column represents 7 days.
- Month - Each column represents 31 days.
Regardless the Bucket Size selected, the grid displays information starting on the date entered in the 'Date Range' field (also located above the grid.)
- Days To Show (Located on Settings Screen)
The settings to consider are 'Show Past Due' and 'Show Future.'
- When 'Show Past Due' is selected, Column 2 displays a header of 'Past Due Hours' and represents the total number of hours scheduled for all days prior to the date entered in the 'Date Range' field.
- Depending on the 'Date Range' entered, the work included in the 'Past Due Hours' column may not actually be past due. For example, if the 'Date Range' value is set to 3 weeks in the future, work included in the 'Past Due Hours' column would include anything that is supposed to be worked on before that date, including jobs scheduled for 1 week out, etc.
- When 'Show Past Due' is left blank, Column 2 is the first column to display information for a time bucket and hours that are scheduled before that date are not included in the grid.
- When 'Show Future' is selected, Column 8 displays a header of 'Hours In Future' and represents the total number of hours scheduled for all days after the last date covered by the time bucket in Column 7.
- When this setting is left blank, Column 8 is the last column to display information for a time bucket and hours that are scheduled beyond that date are not included in the grid.
- When 'Show Past Due' is selected, Column 2 displays a header of 'Past Due Hours' and represents the total number of hours scheduled for all days prior to the date entered in the 'Date Range' field.
Columns 3 - 7 always represent time buckets.
![]() Load, Capacity, and Scheduled Utilization
Load, Capacity, and Scheduled Utilization
The amount and nature of information displayed in each time bucket also varies based on the 'Whiteboard View' selected and (once again) the 'Days To Show' settings used.
- Whiteboard View
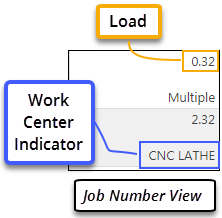
When the Whiteboard View is set to 'Work Center', 'Employee', or 'Department', each column that represents a specific time bucket displays a summary value for capacity and load along with a color coded utilization value and a reference to the job(s) scheduled.

- Load represents the number of hours assigned to the work centers associated with the View Item in the selected Time Bucket.
- Capacity represents the number of hours available on the work centers associated with the View Item in the selected Time Bucket.
- Capacity is increased by Capacity Factors greater than 1.
- Capacity is decreased by Automatic Breaks present on Shift Operators assigned to the work center.
- When Whiteboard View is set to 'Employee', Capacity is limited to the employee's availability within the selected Time Bucket based on their shift setup and assigned breaks.
- When Whiteboard View is set to 'Department', this value is calculated by adding the defined Capacity of each work center being used in the selected Time Bucket.
- Scheduled Utilization represents the amount of Capacity that is being used in the selected Time Bucket.
- Scheduled Utilization = Load / Capacity
- As noted in the image, Scheduled Utilization is also represented by a color coded box to help identify potential bottlenecks.
- The Job Indicator identifies the individual job providing the Load or displays 'Multiple' if more than one job is scheduled to be worked on during the selected Time Bucket.
When the Whiteboard View is set to 'Job Number', the information displayed is different.
- Load is still listed and represents the number of hours assigned to the steps scheduled for work in the selected Time Bucket.
- There are no values displayed for Capacity or Scheduled Utilization since it is possible for work to be performed on multiple work centers within the selected Time Bucket.
- Along those lines, the "Indicator" field displays information about the work centers used.
Regardless the View selected, the Whiteboard displays Totals for each Time Bucket at the bottom of the grid as follows:
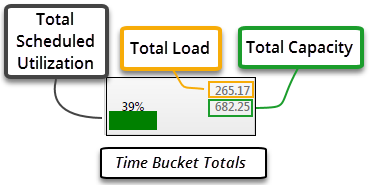
- Load, Capacity, and Scheduled Utilization represent the scheduled and available hours for all work centers used within the selected Time Bucket.
- Days To Show (Located on Settings Screen)
- Show Past Due
When present, the 'Past Due Hours' column displays the total amount of Load assigned in the time frame that falls before the 'Date Range' value entered and displays a red 'Over Load' message. Depending on the View selected, the work center used or job scheduled is listed as well. If there is more than one, the word 'Multiple' will be displayed instead.
- Show Future
When present, the 'Hours In Future' column displays the total amount of Load assigned in the time frame that falls after the last date displayed in the grid. Depending on the View selected, the work center used or job scheduled is listed as well. If there is more than one, the word 'Multiple' will be displayed instead.
- Show Past Due
Job Gantt Screen
The Job Gantt Screen provides a way to view scheduling estimates in a Gantt Chart format. Unlike the Whiteboard Screen, estimated start and end dates cannot be adjusted here.
Job Gantt Action Buttons
Search
This dropdown menu can be used to filter the information that displays in the Gantt Chart. Options include:
- All - No filter applied; information for all open, processed jobs will be displayed
- Part Number - Only information for jobs for the selected part will be displayed
- Description - Only information for jobs that include the value provided in the 'Part Description' field will be displayed
- Customer - Only information for jobs created for the selected customer will be displayed
- Work Code - Only information for jobs that include the selected Work Code will be displayed
- Product Code - Only information for jobs that include the selected Product Code will be displayed
- Cust. P.O. Number - Only information for jobs that include the value provided as the Customer P.O. will be displayed
- Job Number - Only information for the selected Job Number will be displayed
- Job Notes - Only information for jobs that include the value provided in the 'Job Notes' field will be displayed
Global Reschedule
Click this button to open the Global Reschedule utility to update the Gantt Chart based on the options selected.
Only jobs that are open and unlocked will be affected by the Global Reschedule utility.
For more information see Global Reschedule Utility.
Generate Report
This feature is not yet implemented at the Gantt Chart level.
Defect 22419 - On HOLD as of 9/6/17 - Method to generate report "TBD" - No indication of ETA
Close
Click this button to return to the Whiteboard screen.
Job Gantt Details
Legend
This provides the color references for Estimated versus Actual Times in the Gantt Chart.
Time Scale
Select one of the following radio buttons to determine the time increment for displaying information in the grid:
- Monthly
- Weekly
- Daily
- Hourly
Job Gantt Grid
The grid displays information in the order determined by the 'Sort Gantt By' setting located on the Settings screen in the Common Settings Section. Regardless the sort order, the system identifies the Job Number, Customer (Code), and Part Number being worked on in the box to the left and provides the Gantt chart (displayed as a "horizontal bar chart") on the right as a visual representation of when the work is scheduled to be performed.
What If (Scheduling) Screen
What If Scheduling provides the ability to see how potential jobs would impact the schedule before accepting the work or providing estimated completion dates to a customer. If the work is accepted, these potential jobs can be turned into "real" jobs from within the What If Screen.
Before creating What If jobs, we recommend that you create a copy of the current Whiteboard by using the 'Save Settings' option located on the Settings screen.
See the 'Settings Screen' portion of this topic for additional information on the use of this and related options.
What If Action Buttons
Create Order
Click this button to turn the selected What If jobs into "real" jobs assigned to specific customers.
- The system provides an Order Entry screen where the Customer Code is selected and the new Order and Job Numbers are assigned.
- The job does not have to be processed again,
Process
Click this button open the Line Item Quantity Specification utility.
- The utility behaves exactly the same here as it does for jobs created in the Order Entry area of JobBOSS2 with regards to posting material and the creation of material requirements.
- The system includes all unprocessed jobs regardless of whether they are marked as 'Selected' or not.
- Unprocessed jobs do not have a Job Number assigned.
- All What If jobs belong to the "What If" order and are assigned Job Numbers using the 'Order + Item Number' functionality.
- WHATIF-01, WHATIF-02, etc.
- The system reuses 'WHATIF' Job Numbers once they are turned into "real" jobs or deleted.
- The system returns to the What If screen once the jobs are processed.
What If jobs are added to the Whiteboard in one of two ways, depending on whether the line item is selected in the grid prior to processing or not.
- When the line item is selected, the Scheduling Engine adds the What If job to the Whiteboard automatically using the Direction selected in the 'Scheduling Method' setting (immediately above the grid.)
- When the line item is not selected, the Scheduling Engine assigns the Job Number but does not add it to the Whiteboard. In this situation, use the Global Reschedule utility to add the job(s) to the Whiteboard.
Jobs will not appear in the Whiteboard if the demand for the ordered parts is met by posting them from stock or "robbing" them from a stock job.
Processed What If jobs take up resources such as work center capacity and material just like any other job. To avoid purchasing unneeded material and to ensure an accurate Whiteboard, decide what to do with What If jobs as QUICKLY AS POSSIBLE.
Close
Click this button to return to the Whiteboard screen.
What If Grid
Scheduling Method
This radio button determines whether new What If jobs are added using 'Forward' or 'Backward' scheduling logic when they are 'selected' in the grid at the time of processing.
What If Grid Action Buttons
Add Row
Click this button to add a new, blank row to the What If Grid.
- Use this option to create a What If job for an undefined part.
- If routing details are added to an undefined part once the job has been added to the Whiteboard, use the Global Reschedule utility to update the schedule accordingly.
This term refers to an item added to an order that does not have a corresponding record "defined" in the system as either a purchased part (Inventory Item) or a manufactured part (Estimate.) All scheduling and production related information is entered directly in the job's line item details.
Search
Click this button to open the Part Search screen.
- Use this option to create a What If job for a defined part.
- Multiple parts can be selected and added at the same time.
This term refers to an item added to an order that has a corresponding record "defined" as either a purchased part (Inventory Item) or a manufactured part (Estimate.) With regards to manufactured parts, scheduling and production related information pulls from the Estimate but can be edited in the job's line item details.
Select All
Click this button to place a check in the 'Select' box for every job listed in the grid.
Deselect All
Click this button to remove the check from every 'Select' box that is currently present in the grid.
Details
Click this button to open the Line Item Details of the line item that currently has the focus on it.
- The line item will be "highlighted" and does not depend on the 'Select' box being checked.
Use the details to edit the routing and material requirements of the line item just as you would for any other job.
For more information see Order Entry.
Delete
Click this button to delete any items from the grid that have been marked as 'Selected.'
- Deleting a What If job that has been added to the Whiteboard removes it from the Whiteboard and places any material posted during processing back into inventory.
Quick View Details
Select one of the following options from the dropdown menu to see the corresponding Quick View details for the selected job:
- Job Number
- Part Number
What If Grid Values
Select
This check box indicates whether the line is selected for purposes of processing, deleting, and / or creating orders.
- This field does not have any affect on the use of the 'Details' button.
- Lines can be selected and unselected individually by double clicking on one (to gain focus on the record) and then clicking the 'Selected' box.
Part Number / Description
These fields identify the item being scheduled.
- Populate these fields by clicking 'Add Row' and entering the information "manually" or by clicking 'Search' and selecting the desired item(s).
Quantity Ordered / Quantity For Stock
Enter the number of parts to be considered for production.
- Use 'Quantity Ordered' if the parts will be shipped to a customer if the job is turned into a "real" order.
- Use 'Quantity For Stock' if the parts will be placed into inventory if the job is turned into a "real" order.
Due Date
Enter the date the parts should be completed by for review purposes.
Sched Begin Date / Sched End Date
The system calculates these values and populates these fields once the jobs have been added to the Whiteboard.
Job Number
The system assigns Job Numbers during processing.
Priority
The system assigns a 'Priority' of '10' by default, but this can be edited.
Settings Screen
The Settings Screen is the first place to go when setting up scheduling since this is where the Scheduling Engine is "turned on" for daily use. Additional features located here include:
- The ability to set work center defaults and availability from one screen as opposed to editing each work center individually
- 'Common Settings' that determine what information displays in the Whiteboard
- 'Scheduling Defaults' that determine how and when jobs get added to the schedule and defaults used during a Global Reschedule
Settings Action Buttons
The 'Save Settings', 'Restore Previous', and 'Apply Settings' buttons provide the means to test different scheduling assumptions without losing the current Whiteboard information.
These settings are typically used in conjunction with What If Scheduling.
Save Settings
Click this button to create a "snapshot" of the Whiteboard as it currently exists. In addition to saving Whiteboard information, this feature also saves information related to order releases and job requirements.
- This feature is commonly used prior to performing a Global Reschedule to create a "restore point" for the Whiteboard.
Restore Previous
Click this button to replace the current Whiteboard with the copy created with the 'Save Settings' option.
- This setting is commonly used after performing a Global Reschedule if the new assumptions are not preferable to the original ones.
- This feature does NOT remove 'What If' jobs from the system or unpost any material that may have been posted to them.
Apply Settings
Click this button to clear the restore point created with the 'Save Settings' option and make the current Whiteboard the new standard.
- This option is commonly used to make sure the results of a Global Reschedule are not overwritten when the results of the utility are preferable to the original set of scheduling assumptions.
See the 'What If (Scheduling) Screen' section of this topic for additional information about the use of these settings in relation to creating and removing 'What If' jobs.
Close
Click this button to save any changes and return to the Whiteboard screen.
It is NOT necessary to click 'Save Settings' or 'Apply Settings' before closing the Settings screen if changes have been made to any of the values listed below.
Work Center / Company Calendar Settings
Use these settings to update availability and capacity assumptions for active work centers without having to edit each one individually.
Work Center Grid
The grid displays a list of all active work centers in the currently selected JobBOSS2 Company.
It is possible for a work center to appear in the grid but not have any active Shifts associated with it. Make sure each work center used in job routings has at least one active SHIFT to avoid possible errors or inaccurate scheduling assumptions.
The line item selected in the grid determines which work center's details are displayed for editing when the 'Calendar Settings' button is clicked.
- Select the 'DEFAULTS' option to access Shift Schedule details for ALL work centers at the same time; however Dispatching and Capacity related settings are not available and must be edited individually.
Date Options
Day Of The Week
Use the radio buttons provided to determine which day of the week will be the focus of the selected work center when the 'Calendar Settings' button is clicked.
- For example, when 'Monday' is selected, any edits made to the selected work center after clicking the 'Calendar Settings' button would apply to 'ALL MONDAYS.'
- Select the 'All Weekdays' radio button to update work center settings for 'ALL WEEKDAYS' at the same time.
Specific Date Only
Use this field to edit a work center's availability for a specific date as opposed to setting assumptions for every Monday, Tuesday, etc.
- This option is useful for scheduling around planned maintenance.
Calendar Settings
Click this button to open the 'Calendar Details' screen for the line item selected in the Work Center Grid.
- Editing values here has the same effect as editing them on the Whiteboard screen using the 'Edit Defaults' and / or 'Calendar Settings' options (Work Center View only.)
Calendar Details Action Buttons
OK
Click this button to save any changes made and return to the Whiteboard screen.
- The system provides a prompt when changes are made to verify whether they should be applied or not.
- Answer 'Yes' to the prompt to overwrite the existing information.
- Answer 'No' to the prompt to abandon any changes and return to the Settings screen.
Cancel
Click this button to return to the Settings screen without saving any changes made.
General
The values located under the General Section are all "Read Only" and cannot be edited.
Code
This is the 'Short Name' assigned to the selected work center.
- 'Code' displays 'ALL WORK CENTERS' when 'DEFAULTS' is selected in the Work Center Grid, indicating that changes will affect all work centers at the same time.
Date
This displays the date or day of the week selected on the Settings screen.
- Changes made for the selected time value will override default values that would normally be applied.
Workday Begin
This value represents the earliest time of the day the work center can be scheduled on the selected time value.
- Determined by the 'Begin' value provided for the first active Shift for the work center.
Workday End
This value represents the latest time of the day the work center can be scheduled on the selected time value.
- Determined by the 'End' value provided for the last active Shift for the work center.
Hours Per Day
This value represents the sum of the 'Hours' available for all the work center's active shifts on the selected time value.
Work Shift Schedule
The values here determine the availability (capacity) of the work center for the selected time value.
Shift
Place a check next to each shift the work center is available for use.
A work center will not be scheduled during any shift that is not marked as active.
Begin
Enter the earliest time of day the work center can be scheduled for the associated shift.
End
Enter the latest time of day the work center can be scheduled for the associated shift.
Time values must be entered in a 24 hour (or military time) format.
Capacity
This field displays the work center's 'Capacity Factor' and is used to determine the total number of machine hours available during the associated shift.
- Capacity Factor can be edited in the Defaults Section.
Hours
This represents the total machine hours available for the work center during the associated shift.
- Shift 'Hours ' = (Number of hours based on Begin and End Times - Automatic Break assigned to the selected 'Shift Operator') X Capacity
The 'Dispatching' and 'Defaults' sections are not available when 'DEFAULTS' is selected in the Work Center Grid.
Dispatching
Shift Operators
Use the dropdown menus provided to assign a default operator (Employee Code) for each shift the work center is in use.
- Work center capacity is reduced if the assigned operator has a scheduled 'Automatic Break' that falls within the shift time frame.
For more information see Dispatching.
Defaults
For more information see Scheduling JobBOSS2.
Queue Time / Queue Time Units
Queue time can be used to represent "dead time" associate with work performed on a specific work center.
- When used, queue times are added to every step routed to the work center.
- Select the appropriate 'Queue Time Unit' value in relation to the amount of "down time" desired between each step.
Utilization Percentage
Utilization represents the work center's ability to perform the work assigned to it within a given time frame.
- When utilization is less than 100%, the amount of time the work center is considered to be truly available is decreased accordingly.
Capacity Factor
This value represents the number of machines that are physically available to perform assigned work and is used to determine the total amount of daily machine hours available to the work center.
Loading Method
This setting determines how much work will be assigned to the work center during scheduling calculations.
- Infinite - The system ignores any limits placed on the work center's ability to perform work and will overload it as necessary to handle the work assigned.
- Finite - The system considers limits placed on the work center's ability to perform work and will stop assigning work to it once they have been reached.
Company Holidays
Click this button to access the list of holidays defined for the JobBOSS2 Company being used.
- Editing values here has the same effect as editing them in Company Maintenance (Holidays button.)
No work is scheduled on dates listed as Company Holidays.
Defaults To Be Applied To All Work Centers
Apply Defaults
Click this button to update the 'Utilization Percentage' and 'Loading Method' values on all active work centers with the ones provided here.
- The system provides a prompt to verify whether these values should be applied or not.
- Answer 'Yes' to the prompt to overwrite the existing information.
- Answer 'No' to the prompt to leave the existing values as they are.
Use this option BEFORE making changes to individual work centers under 'Calendar Settings' to avoid overwriting exceptions in availability and capacity.
Common Settings
These settings determine what information displays on the Whiteboard screen and how information is sorted on the Gantt Chart screen.
Excluding steps, time frames, or shifts does not mean work has not been assigned; it simply means it will not be included in the calculations displayed in the Whiteboard.
Steps To Show
Place a check next to each of the following step designation that should be displayed in the Whiteboard.
- Current - This represents the last step on which an employee clocked in.
- A step remains the 'Current' one until another step is clocked on to.
- Pending - This represents the step routed immediately after the 'Current' one.
- The first step of a job is marked as 'Pending' if a time ticket has not yet been entered against it.
- Future - This represents any step not marked as 'Current' or 'Pending.'
- What If - This represents ANY step associated with a What If job.
- See the 'What If (Scheduling) Screen' section of this topic for information about What If jobs.
Days To Show
Place a check next to each of the following time values that should be displayed in the Whiteboard.
- Show Off Days - This represents days on which no work is scheduled.
- Typical off days would include weekends and company holidays.
- Show Past Due - This represents the total amount of Load assigned in the time frame that falls before the 'Date Range' value entered on the Whiteboard screen.
- Past Due hours display in the second column of the Whiteboard Grid when selected.
- Show Future - This represents the total amount of Load assigned in the time frame that falls after the last date displayed in the Whiteboard Grid.
- Future hours display in the last (eighth) column of the Whiteboard Grid when selected.
Shifts To Show
Place a check next to each Shift that should be included in the Whiteboard calculations for Load and Capacity.
- Available capacity for the shifts displayed is based on their shift 'Hours' (which can be viewed in Calendar Details.)
- Load for the shifts displayed is based on whether ANY work falls within the defined shift and includes ALL the hours expected to complete the step, even if it spans one or more shifts.
- The system looks to the assigned 'Shift Operator' to determine who work is assigned to when the Whiteboard View is set to 'Employee', NOT the employee's defined shift.
Information is displayed based on work center shifts regardless of the Whiteboard View selected.
Sort Gantt By
Select one of the radio buttons provided to determine how information will be sorted on the Job Gantt screen.
This setting does not affect how information is displayed in the 'Drag And Drop' or 'Job Gantt Chart' screens available within Scheduling Details. Those charts are always sorted by start date / time.
Scheduling Defaults
Scheduling Engine
Direction
This option serves as the "on / off" switch for scheduling based on the radio button selected.
- Backward - The Scheduling Engine adds processed jobs to the Whiteboard using 'Backward' direction logic when 'Update Schedule In "Real Time"' is enabled.
- Forward - The Scheduling Engine adds processed jobs to the Whiteboard using 'Forward' direction logic when 'Update Schedule In "Real Time"' is enabled.
- This selection affects the options available in the 'Global Reschedule' box (covered below.)
- Select one of the above options to "turn scheduling on" even if the 'Update Schedule In "Real Time"' option is not enabled.
- Disabled - Scheduling is not active and will not provide any assumptions regardless of what other settings are enabled or selected.
- Scheduling is marked as 'Disabled' by default and must be changed in order to allow the Scheduling Engine to perform any calculations.
Miscellaneous Settings
Select as many of these settings as desired.
- Update Schedule In "Real Time" - Select this option to add jobs to the Whiteboard as they are processed.
- Jobs not scheduled during processing must be added via the Global Reschedule Utility, even if this setting is enabled at a later date.
- Overlap Routing Steps By Default - Select this option to allow work to be scheduled on the current (and subsequent) routed steps to start as soon as a single piece is completed on the previous one.
- The following rules apply when overlapping steps:
- The last step of a job cannot be overlapped when Scheduling Direction is set to Backward.
- The first step of a job cannot be overlapped when Scheduling Direction is set to Forward.
- The step immediately before and immediately after an outside service cannot be overlapped.
If a pending step has a long setup time associated with it, it is possible that it will be scheduled to start before the current step in order to accommodate the lengthy setup process.
- This setting determines whether all eligible steps on all jobs added to the Whiteboard are scheduled to overlap or not by default; however this decision can also be made / edited at the job level (in Line Item Details.)
- The following rules apply when overlapping steps:
- Base Hours Left On Pieces Left - Select this option to have the system recalculate the amount of time remaining (Load) on an unfinished step based on the number of pieces left to make minus the amount of reported setup time.
- Leave the setting blank to base the amount of remaining Load on the number of estimated hours minus the number of actual hours worked, regardless the number of pieces turned in.
Global Reschedule (Conditional on Direction)
These settings determine whether the corresponding options are selected or not by default when the Global Reschedule Utility is opened. Switch between 'Backward' and 'Forward' as the default 'Direction' (located in the Scheduling Engine box) to view / edit the values as listed below.
Default Direction = Backward
- FORWARD Schedule All Steps Currently Active In The Shop
- BACKWARD Schedule All Open Routing Steps
- FORWARD Schedule Routing Steps That Are In The Past
Default Direction = Forward
- FORWARD Schedule All Steps Currently Active In The Shop
- FORWARD Schedule All Open Routing Steps