Touchscreen; Real Time; PC DC
Data Collection
System Location: Data Collection (Selected at login)
JobBOSS2 Data Collection - also referred to as "Touchscreen" - is an application designed for use with JobBOSS2 that provides secure, real-time data collection functionality for the purpose of tracking attendance and job related time. The Data Collection Application can be used with both wall mounted clocks and PCs which are referred to collectively as “data collection devices”; however the following features are only available on PCs:
- The ability to see who is currently “clocked in” for attendance and job related time records
- The ability to start tracking time on a job by using information presented on the screen as opposed to using a hard copy document (i.e. Job Traveler / Router)
- This feature also requires the presence of the Scheduling Application
- The viewing of documents such as blueprints and drawings that are associated with the selected job
- Allocating material between jobs and stock
- Generating related reports such as the Job Traveler and Dispatch Report
The remainder of this topic assumes the use of a PC to access Data Collection and the purchase of data collection licenses.
When using Data Collection, a period/decimal point is an invalid character in a Job Number. Acceptable characters are a dash (-) and alpha numeric characters (0-9, A-Z).
 Related Tables and Settings
The following Tables and / or Base Tables are used in conjunction with the Data Collection Application and should be configured in advance of its use:
- Attendance Codes
- Collection Terminals
- Employee Codes
- Operation Codes
- Reason Codes
- Work Centers
In addition to these tables, the following areas of Company Maintenance should be reviewed and configured prior to the use of Data Collection:
- Company Maintenance - Time Tickets Section
- Contains default settings and rounding rule for time tickets if a job is started prior to the scheduled shift
- Company Maintenance - Time And Attendance Section
- Contains settings for shift setup, auto rounding rules for attendance tickets, and overtime calculations
- Company Maintenance - Data Collection Section
- Contains settings that impact data collection behavior in multiple ways
- Company Maintenance - Data Collection Events Section
- Provides ability to schedule audible alerts on data collection devices
Accessing Data Collection on a PC
When logging into JobBOSS2 from a computer that will be used as a data collection device, the system will provide Data Collection as a product option after a valid User ID and Password have been entered.
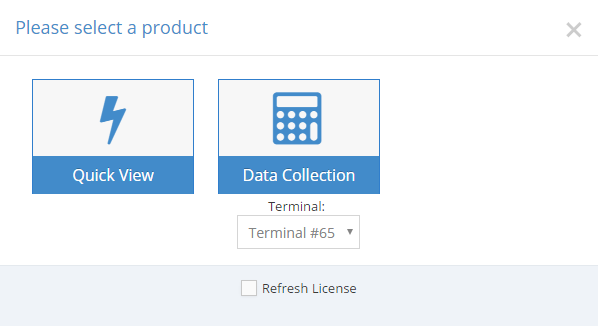
From here the user would select a Terminal ID as the one to associate with the PC being used and would click the Data Collection Icon.
Data Collection Options (PC Based)
When using Data Collection on a computer, the following options are available for use.
Clock Emulation

When dealing with wall mounted clocks, the information contained under the "Clock Emulation" header can be reviewed for functionality purposes.
Data Collection (DC) Prompt
This area is where the system provides the user with information and prompts regarding actions that need to be taken.
Data Entry Area
This area displays information entered by the user via the DC Keypad or the keyboard attached to the PC running the application.
- Information remains displayed until the user clicks an action button of some type, typically 'Enter' in order to let the system know it should continue to the next prompt or screen.
- Information entered through the use of the 'Search' button or bar codes does not appear in the Data Entry Area - the system simply takes the information and proceeds to the next prompt or screen without any additional input.
Values can be entered in different ways when clocking on and off of a data collection device as covered below.
Bar Codes
In many instances, a "scan gun" or scanning device of some sort can be used to read information from a bar coded report or list. Some common examples of bar coded items include:
- Employee Badges
- Job Travelers (Step Details)
- Work Center List
- Operation List
Bar coded lists for work centers and operations can be useful in situations where the user has to perform work that is different than what is provided on a job traveler. In addition, some shops will create lists of common time intervals that can be scanned for the purpose of entering 'Setup Hours'.
- Bar codes printed outside of JobBOSS2 should use "code 39."
When bar codes are used, the system automatically takes the scanned information and advances to the next prompt so long as the scanning device being used has been programmed to provide a carriage return. Contact Hardware Support for additional information if your device is not already configured to do so.
Search Button
Clicking 'Search' when prompted for an input will open a list of appropriate values the user can select from (if available.) Once the desired value is selected and submitted (typically by clicking 'OK' on the selection screen), the system automatically advances to the next prompt or completes the transaction as appropriate.
- The search feature only works for values that can be stored and found within JobBOSS2, such as Employees, Job Numbers, Work Centers, and Operations. Quantities and time values would be entered using the Keypad or Keyboard (covered below.)
Data Collection Keypad / Attached Keyboard
Any numeric value can be entered by using the Data Collection Keypad displayed on the Clock Emulation Screen (referred to as the Keypad) or by using the keyboard attached to the computer running the data collection application (referred to as the keyboard.)
- When values are entered by the Keypad / keyboard, the user must click 'ENTER' (in either place) in order to advance to the next prompt or complete the transaction.
Be careful about using alpha characters in Job Numbers if employees will rely on wall mounted clocks or the DC Keypad to input information since these methods are numeric ONLY.
Collection Terminal Defaults
Collection Terminals can be configured to provide a default value for most input requests made by the data collection application; however, care should be taken when deciding which values should be populated.
Keypad
The keypad allows the user to enter numeric values when prompted by clicking on the appropriate "keys" with the mouse attached to the computer running the application.
- Using the keypad located on the keyboard attached to the computer (if present) accomplishes the same thing.
- If a touchscreen monitor is attached, the user can also "press" the buttons directly on the DC Keypad.
Colored Action Buttons
These buttons are used to begin a transaction of some sort.
START JOB
This button is used to begin the process of clocking on to a job. The system looks for the following information when clocking on to a job:
- Employee Number
- Job Number
- Step Number
- Work Center
- Operation
These values can be provided in any of the following ways:
- Bar codes
- Bar code printed on Job Traveler next to desired step provides the following all at one time:
- Job Number
- Step Number
- Work Center
- Operation (OPTIONAL)
- Bar code printed on Job Traveler next to desired step provides the following all at one time:
- Using the 'Search' button to locate the desired values
- Typing the values in using the Keypad or attached keyboard
- From Collection Terminal Defaults
Starting a job automatically clocks the user in if they did not already use the 'Clock In' option.
STOP JOB
This button is used to indicate that the employee has stopped working on a job. The system looks for the following information when clocking off of a job:
- Employee Number
- Setup Hours
- Represents the amount of time spent (in hours) setting the work center up for the work performed
- The system automatically calculates cycle time based on the remaining time spent on the job
- Quantity Good (Pieces Finished)
- Represents the number of pieces the user successfully completed work on during the time spent on the job
- Remaining pieces are not necessarily "bad" - they are just not finished yet
- Quantity Scrapped
- Represents any pieces that were damaged during production to the point they cannot be used
- Quantity values should be entered by the user for each job using the keypad / keyboard.
- Reason Code (CONDITIONAL PROMPT)
- This prompt only displays in the following situation:
- At least one piece has been turned in as "scrapped"
- The Collection Terminal being used is configured to 'Prompt operator for reason code on scrapped parts'
- This prompt only displays in the following situation:
- Comments (CONDITIONAL PROMPT)
- This prompt only displays if the option 'Prompt for comments on Stop Job' has been checked.
- Located on Clock Emulation screen immediately above the 'Colored Action Buttons'
- Must be selected before the user clicks 'Stop Job'
- Must be unchecked in order to prevent the option of entering comments from appearing
- Comments entered display on the Time Tracking Summary
- This prompt only displays if the option 'Prompt for comments on Stop Job' has been checked.
The process of starting and stopping jobs on a specific day provides the details for the time ticket created for the employee that can be viewed / edited in the Shop Floor Control Area of the Shop Application.
- The system populates the Start and End Time fields based on the exact time the employee started / stopped each job.
Stopping a job does NOT automatically act as the 'Clock Out' button since the user may remain in the shop and perform other actions.
CLOCK IN
This button is used to indicate the employee has started working for attendance / payroll purposes. The system looks for the following information when clocking in:
- Employee Number
- Payroll Rate
- Typically provided on the employee code to avoid being prompted when clocking in.
CLOCK OUT
This button is used to indicate the employee has stopped working for attendance / payroll purposes. The system looks for the following information when clocking out:
- Employee Number
The process of clocking and out on a specific day provides the details for the attendance ticket created fro the employee that can be viewed / edited in the Shop Floor Control Area of the Shop Application.
- The system populates the Actual Clock In and Clock Out fields based on the exact time the employee clocked in or out, respectively.
- If rounding rules have been set up in Company Maintenance, it will also apply them to determine the Adjusted Clock In and Clock Out values as well.
Batch
The 'Batch' button provides the ability to enter job related (time ticket) information from the data collection device after the work has been performed. In order to use this feature, the employee's record (located under Tables) has to be configured to allow it.
- General Section - Data Collection Terminal Settings: Allow Use Of Batch Entry
Entering information using the 'Batch' button creates a time ticket in the same manner as creating one directly in Shop Floor Control.
- "Batched" time is entered on the time ticket as being performed ending at the time the batch entry was created and will calculate what the begin time would be accordingly.
- This information can be edited within the time ticket if needed.
For more information see How to Use Batch Entry.
BREAK
This button is used to temporarily suspend time being applied against the employee's attendance ticket as well as any jobs (time ticket) they are currently clocked on to.
An employee can be placed on break automatically by the system given the following:
- The employee's record has the option to process scheduled breaks selected.
- General Section - Data Collection Terminal Settings: Automatically Process Scheduled Breaks
- The employee's record has at least one automatic break configured.
- Schedule Section - AUTOMATIC Break Settings
- The employee is clocked in using Data Collection during the time frame referenced in the Auto Break Settings.
When the conditions above are met, the system will automatically place the employee 'ON BREAK' as of the time provided in the Auto Break Settings and will take them off break (i.e. clock them back in for attendance and job purposes) after the number of minutes provided have passed.
Regardless of how it happens, all breaks (Attendance Code = 'ON BREAK') are unpaid.
POST STOCK
This button allows material to be posted to jobs (from inventory) from the data collection device.
- Material can only be posted from inventory to one job at a time.
- Depends on use of Tag Number, Bin Number, and Lot Number to identify the correct Location / Lot of material to pull from.
In order for this feature to be available, the User ID associated with data collection in Company Maintenance must have security access to Inventory Transfers.
- Company Maintenance - Data Collection Section: Touchscreen User ID
SHUT DOWN
Clicking this button closes the Data Collection Application.
- This has the same effect as logging out of the application.
Data Entry Buttons
These buttons are used to locate information or somehow edit the values entered in the Data Entry Area.
Search
This option can be used to locate a specific record when prompted for input. Common items searched for include:
- Employees (Employee Number / Name)
- Jobs
- Work Centers
- Step Numbers
In addition to searching for values, other common methods of input include
- The use of bar codes (requires scanner)
- Keypad / keyboard
- Use of Collection Terminal Defaults
CLEAR
The 'CLEAR' button removes any value present in the Data Entry Area, allowing the user to enter a different value in its place.
DELETE
The 'DELETE' button acts the same as backspace in that it removes the last character present in the Data Entry Area each time it is clicked.
ENTER
Clicking 'ENTER' submits the information present in the Data Entry Area as the input value to use in response to the prompt provided by the system.
- Clicking 'ENTER' is not required when input values are provided by using the 'Search' option, scanning a bar code, or from a Collection Terminal Default.
VOID
The 'VOID' button clears all values from the current transaction and resets the DC Prompt to the default "Press Colored Action Button" message, making it as though the employee never clicked an Action Button at all.
These features only apply if used before the transaction is completed. For example, if an employee Clocks In and scans their Employee Badge, that transaction cannot be “undone” as the record has already been created. The employee could enter another transaction to provide additional information or the record could be edited within the JobBOSS2 Application if necessary.
Current Logins
The Current Logins option provides an overview of who is currently logged in using a data collection device. Information can be displayed in any of the following modes by selecting the appropriate radio button located at the top of the page:
- Job Detail
- Job Summary
- Attendance
The Current Logins page also houses the Auto Refresh Interval. This feature must be set every time a user navigates to this screen.
Job Detail
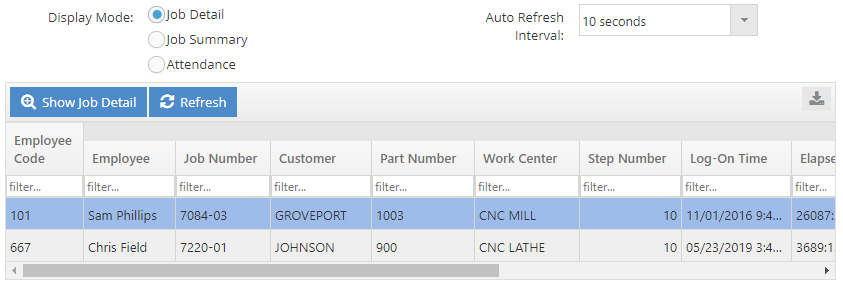
The 'Job Detail' option provides information for each employee currently clocked onto a job, including:
- Job Number
- Customer and Part Number
- Work Center and Step Number
- Amount of time spent on the step / job to date
- Number of pieces expected to be completed on the step
Additional information can be viewed by selecting a line and clicking 'Show Job Detail.'
Information can be updated in real time using the Refresh button.
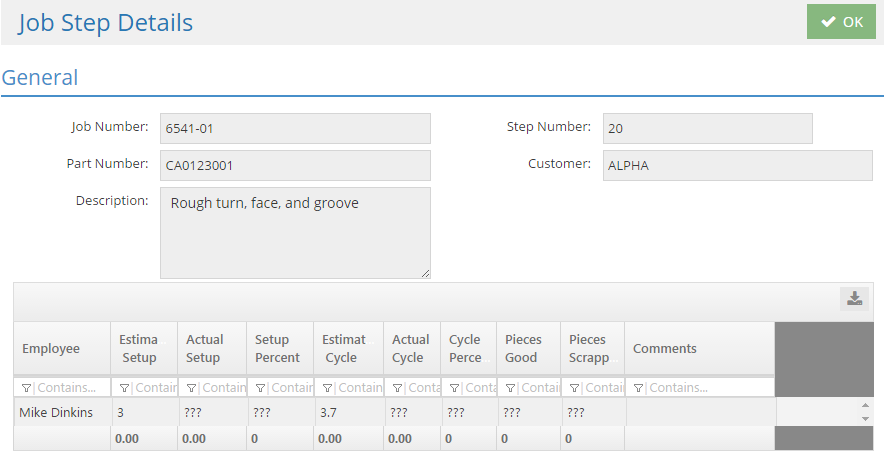
- The "???" references will be replaced with actual values as information is turned in against the job.
Job Summary
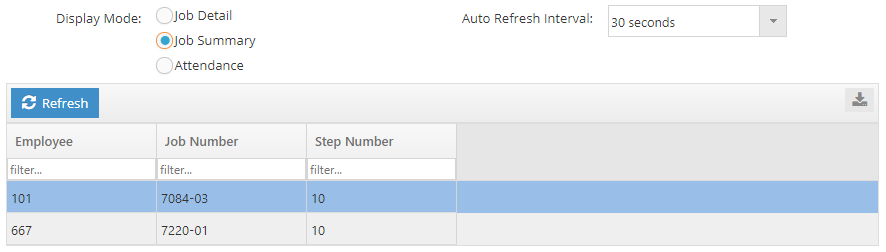
The 'Job Summary' option provides an overview of what each employee is working on that includes the Employee Number, Job Number, and Step Number.
Attendance
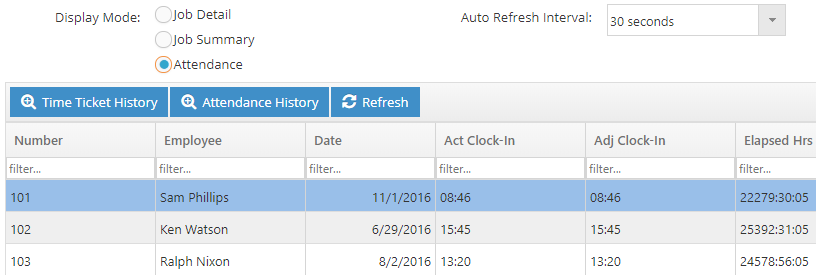
The 'Attendance' option provides details on how long each employee has been logged in for attendance / payroll purposes.
Information can be updated in real time by using the Refresh button.
Work Queue
The Work Queue option uses information from the Scheduling Application to display details about currently scheduled jobs and provide users the ability to clock onto a specific job / step combination without using the Start Job action button.
Users can select to view from the following Display Modes:
-
Employee
-
Department
-
Work Center
Sorting by grid and date selection are available along with the ability to Generate Dispatch Reports.

Documents
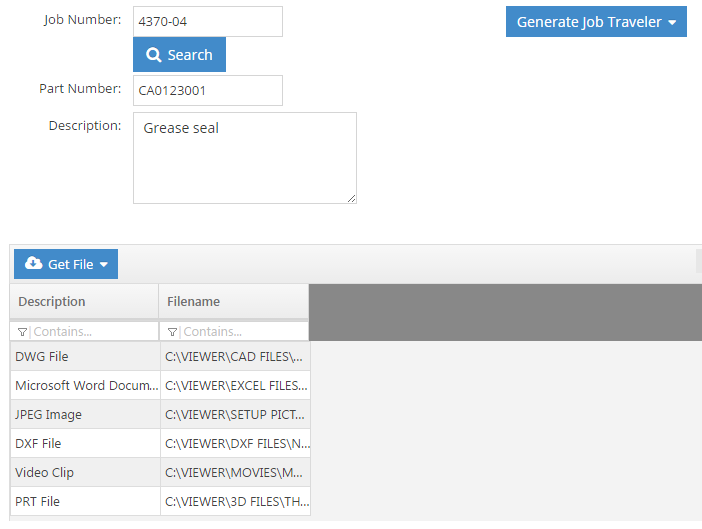
The 'Documents' option displays a list of files attached to the job selected within the page.
Get File (dropdown menu)
This option allows the user to select a file in the Documents Grid and either download it to the PC or to view it (assuming it is a PDF.)
Generate Job Traveler (dropdown menu)
Clicking this dropdown provides the following options (as they relate to the selected job):
- Generate the Job Traveler
- Generate the Job Label
Hot Spots
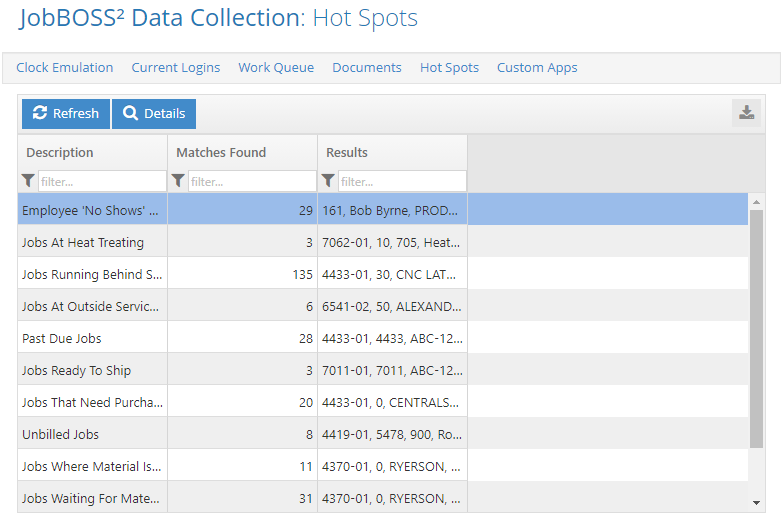
The 'Hot Spots' option allows users of the data collection device (PC) to access and run Hot Spots that have been associated with the User ID associated with data collection in Company Maintenance.
- Company Maintenance - Data Collection Section: Touchscreen User ID
It is recommended to create a User ID for the specific purpose of assigning it to data collection in order to customize security and Hot Spot access. It is strongly recommended that the "SUPERVISOR" or similar User accounts NOT be used since they often have access to Hot Spots that may provide details about vacations, overtime, etc.
Refresh (button)
Clicking this button causes the system to update the list of Hot Spots and the overview information displayed in the Hot Spots Grid.
Details (button)
Clicking this button runs the Hot Spot selected in the grid and provides a list of detailed results.
Hot Spots Grid
Description
This is the description of the Hot Spot.
Matches Found
This indicates the number of instances that currently match the criteria associated with each Hot Spot.
Results
This field displays the first record that matches the Hot Spot criteria. To see the complete list, the user would click 'Details.'
Receiving
Note: To enable Receiving in Data Collection, check the Display Receiving Area check box under Collection Terminal Behavior in Settings > Base Tables > Collection Terminals.
The primary purpose of receivers is to track the arrival of items as they are delivered from an external source. Typical examples include:
- The delivery of material purchased from a vendor
- The delivery of manufactured items as they are returned from an outside service vendor
- The delivery of material provided by a customer for use on their parts
Delivered items can be marked as one of the following:
- Received Good - Items that are in acceptable condition and can be used for their intended purpose
- Costs are captured and items are posted to jobs or inventory (as appropriate) when received as 'Good.'
- Rejected - Items that are returned to the vendor for some reason with the expectation of being replaced
- The purchase order associated with the receiver remains open even if all the items have been delivered.
- It will be used again as the source for the next receiver created when the rejected items are replaced.
- The purchase order associated with the receiver remains open even if all the items have been delivered.
- Cancelled - Items that are returned to the vendor for some reason that do not need to be replaced
- The purchase order associated with the receiver will be closed (assuming all items have been received good or cancelled.)
Receivers can be used as the source for AP invoices and vendor returns.
Where to Start
Before you start creating receivers, it's important to make sure you have defined all the tables you need and that you understand how the system will behave based on the related company preferences and other settings.
Tables Used on Receivers
- Vendor Code
Preferences and Other Related Settings
There are no preferences or related settings that affect the creation of a receiver.
Receiver Details
Every receiver has information regarding the vendor, billing details, and the purchased items. The following links lead to topics that provide reference information for each section of the receiver record.
Go to Receiver Details - General Section
Go to Receiver Details - Details Section
Creating and Editing Receivers
Options for Creating Receivers
Follow the links below for step by step instructions for making a variety of receiver:
- Continue to Create a Receiver From Purchase Order
- Continue to Create a Receiver Without a Purchase Order (Customer Provided Material)
Once the Receiver is Created
There are minimal edits that can be made to receivers once they are processed. However, if you unprocess the record, you can edit the details of the line item(s). Additionally, a prompt will inform you that changes to the receiver may cause the vendor invoice to fall out of balance with the receiver.
Reports, Forms, and Labels
Reports
The following summary report is available for review / generation under the Purchasing Reports dropdown menu:
- Receiving Summary
- Vendor Quality Summary
Forms and Labels
The following reports / forms / labels are available under the Print dropdown menu located in the Receiving Navigator:
- Receiver
- Receivers can have electronic signatures attached. For more information see Attach Electronic Signatures.
- Receiving Label
What Comes Next
If the materials were purchased as a job requirement, the cost of the materials is captured on the job upon creation of the receiver. If you ordered materials for stock, you can now see them in the bin.
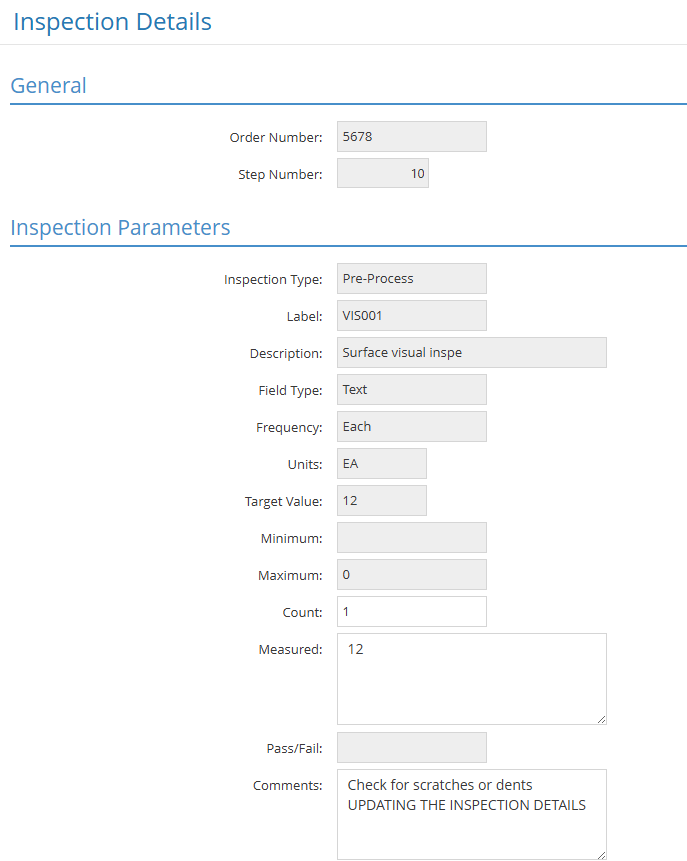
Inspections
In this section, users can view inspection records associated with a job.
-
Find the applicable Job Number, then double click on a row or click the Edit button to open the General and Routing Details associated with that Job Number.
-
In the Routing grid, double click on a Step Number or click the Details button to open the Routing Details and review any associated Inspection details.

-
On the Routing Details page, double click on a line to select an Inspection Type to edit, or select the line and click the details button. Users can edit the Count, Measured and Comments fields: