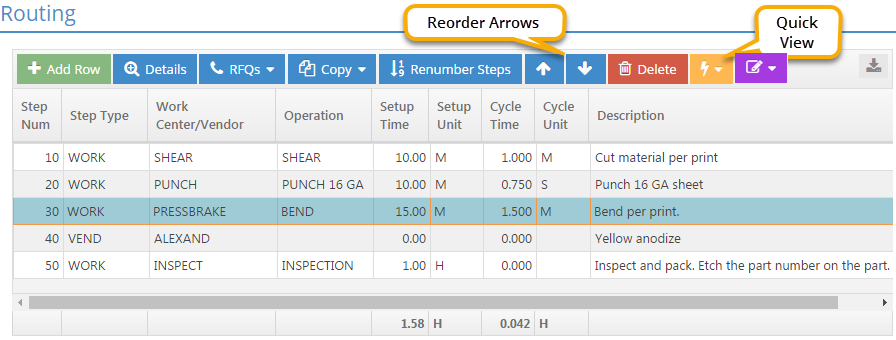
Estimating Details Routing Section
The Routing Section provides a list of processes required to create the selected manufactured part.
Action Buttons
Add Row (button)
This is used to add a new entry to the grid.
- If you use the Add Row button in between routing steps, there is no automatic reordering. Use the Renumber Steps button to reorder or save your steps.
Clicking this button opens the details for the selected step. The information available for review and editing varies depending on the Step Type.
-
Step Type: WORK
- This indicates that the work on the selected step is being performed internally on a designated Work Center
- Click here for more information on Estimating Routing Section Details.
-
Step Type: VEND (Vendor)
- This indicates that the work on the selected step is being performed externally by a designated outside service vendor
Regardless the Step Type, any edits made at this level will be used on any records created from the selected Estimate going forward, but will not affect the underlying source records (such as Work Centers, Operations, Vendors, etc.)
For more information see Estimating Routing Section Details Button.
RFQs (dropdown menu)
This menu can be used to create a new Vendor RFQ for a selected outside service or to analyze existing RFQs for the selected service.
Copy (dropdown menu)
This option can be used to copy routing information from another Estimate (From Part Number) or from an existing job (From Job Number) onto the currently selected Estimate. Options include Merge and Replace regardless the source selected.
- Merge: This option appends the routing information from the source selected within the Copy feature to the routing information of the Estimate that is currently being created or edited.
- Replace: This option deletes the routing information on the Estimate that is currently being created or edited and replaces it with the routing information from the Estimate that is selected within the Copy feature.
- The user can also choose to Cancel the Copy operation, which closes the utility and leaves the routing unchanged.
Renumber Steps (button)
This feature can be used to reset the numbering increment of the routing steps to 10 in instances where steps have been added or deleted as a result of process changes.
Reorder Arrows (buttons)
These buttons can be used to move steps in the Routing Grid. To do so, select a step in the grid and then click either the "Up Arrow" to move the step higher in the grid or the "Down Arrow" to move it lower in the grid.
- Steps moved in this way are automatically renumbered by the system
Delete (button)
This button is used to delete the selected entry from the grid.
Quick View (dropdown menu)
This menu can be used to view information about the Work Center or Vendor associated with a selected step in the Routing Grid.
- Work Center: The Quick View window that contains details about the associated Work Center opens when Step Type = WORK.
- Vendor: The Quick View window that contains details about the associated Vendor opens when Step Type = VEND.
Routing Grid
The Routing Grid provides information regarding the work to be performed, where it will take place, the anticipated order it will be take place in, and how long it is expected to take. In addition, each step also contains details about expected costs, sales values, and scheduling items.
Step Number
This value indicates the anticipated order in which work will be performed.
- Steps are listed in increments of 10 by default but can be edited
- Incrementing by 10 provides room for steps to be added in the future
- Step Numbers must be unique within a given Routing Grid
- Renumber Steps can be used to reset Step Numbers to increments of 10 in instances where steps have been added or deleted
- Steps can be manually renumbered if they need to be placed into a different sequence
- Company Maintenance Settings (for Data Collection) can be used to force employees to perform work in the listed order
Step Type
Step Type indicates whether the work will be performed internally (WORK) or externally (VEND). Step Details vary based on the Type selected.
- Step Type defaults to WORK
For more information see Step Details above.
For more information see Step Details above.
Work Center / Vendor
This field displays the name of the Work Center or Vendor associated with the step depending on the Step Type selected.
- Displays Work Center Code if Step Type = WORK
- Work Center provides values for the following Step Details:
- Labor Account (GL Code)
- Setup Rate
- Cycle Rate
- Burden Rate
- Labor Rate
- Work Centers represent where work will be performed
- Work Center provides values for the following Step Details:
- Displays Vendor Code if Step Type = VEND
- Vendor provides values for the following Step Details:
- Vendor Minimum Order
- Lead Time (Days)
- Markup Percent
- GL Code (used on PO for service)
- Vendor provides values for the following Step Details:
For more information see Step Details above.
For more information see Step Details above.
Operation
Operation Codes can be used to provide details about the type of work being performed on the selected step.
Operations will not display if they are marked to hide on time tickets and routing grids in Company Maintenance. In addition, when visible, the Operation column may display to the far right by default; it has been moved in this example to display next to the Work Center / Vendor column.
- In the Navigation Sidebar, click the Settings button.

- Open the System drop down menu.
- Select Company Maintenance.
- Verify the correct Company is selected in the Company Grid.
- Click Edit (located at the top of the form.)
- Click Time Tickets in the Anchor Bar or scroll down the page to the Time Tickets Section.
- Under the "Hide These Columns In Time Ticket And Routing Grids" setting check (to hide) or uncheck (to display) the Operation Number option.
- Click Save to save the change.
Note that this action affects both the routing grid on orders AND time tickets; however routing grids on estimates are NOT affected.
The Operation column may display to the far right by default; it has been moved in this example to display next to the Work Center / Vendor column.
- Move the mouse over the header of the column to be moived.
- The cursor will change to a "pointing hand" icon.
- Left click on the column header.
- While holding the left mouse button, drag the column header to the left or right as desired.
The system displays black "arrow head" icons at the top and bottom of each column as the header is moved.
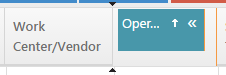
- Release the left mouse button when the column header is in the desired location.
- Populates with Default Operation Code assigned to selected work center if one is present
- Can be changed or selected as needed
- Operation Code provides values for the following work step details:
- Description (Also displayed in routing grid)
- Machines Run By Operator
- Machines Job Being Run On
- Scrap Percent
- Efficiency Percent
- Team Size
- Unattended Operation
For more information see Step Details above.
For more information see Step Details above.
- In addition to these detail values, Operation Codes can also provide default values for the following fields located in the routing grid:
- Setup Time
- Setup Unit
- Cycle Time
- Cycle Unit
Operation Codes are typically associated with Work Centers, but can be used to provide Description information for Vendor Steps as well. If used in this way, make sure the associated Operations do not provide Setup or Cycle Times since outside steps use Lead Time for scheduling purposes.
Setup Time
This value represents the estimated amount of time (in terms of the selected Setup Unit) it will take to prepare the Work Center.
Setup Unit
Setup Unit works in conjunction with Setup Time to define how long it is expected to take to prepare the Work Center.
Options include:
- Hours
- Minutes
- Seconds
Setup Time is a fixed value, regardless of the quantity estimated / worked on.
Cycle Time
This value represents the estimated amount of time (in terms of the selected Unit) it will take to perform the work detailed in the Description for one unit of the manufactured part being edited / created.
The use of Cycle Time in the Routing Grid is different than its use within the Scheduling Application. From a scheduling context, Cycle Time refers to the total real time "clock hours" required to complete a scheduled task for the entire quantity being worked on.
Cycle Unit
Cycle Unit works in conjunction with Cycle Time to define how long it is expected to take to perform the work detailed in the Description on one part.
Options include:
- Hours
- Minutes
- Seconds
- Pieces Per Hour (System uses value to calculate how long it will take to make one unit in terms of an hour)
Regardless of the Unit Selected for estimating purposes, the system will convert all values into terms of hours for calculation and report purposes.
Description (Note: This field is required.)
Information here prints on the Job Traveler (WORK Step Type) or Purchase Order (VEND Step Type) and is intended to provide details needed to complete the work associated with the step.
- Populates by default from the selected Operation but can be edited
- Can be edited here or in the Step Details
Sched Start / Sched End
These fields indicate when the system expects each step to begin and end from a scheduling perspective.
- These values are only populated if the Scheduling Application is in use and the job has been added to the Whiteboard.
- If real time scheduling has been enabled, you can NOT update the Scheduled Start and End dates here; you must use the Edit Job Dates function in the scheduling module.
Actual Start / Actual End
These fields display when work actually began and ended for each step based on information provided by time tickets.
Qty Good / Qty Scrap
These fields display information regarding the number of pieces that have been worked on for each step.
- Quantity Good represents pieces that have been successfully completed and are ready for the next step or to be shipped.
- Quantity Scrap represents pieces that have been turned in as scrapped during the production process.
Scrapping parts on a time ticket does not automatically reduce the quantity open on the job.
Status
Status indicates whether a step has been worked on or not. Options include:
- Current: This indicates the step that is being worked on or should be worked on now.
- This is the default status for the first step of a job when it is created.
- A step's status is set automatically to Current when
- Some, but not all, pieces are turned in against it OR
- When all the pieces have been turned in against the previous step
- Pending: This indicates which step should be worked on next.
- This status is automatically applied to the step that immediately follows the one marked as Current.
- Future: This indicates that the step needs to be worked on at some point in the future. (i.e., it has not been worked on yet but is not the current step or the pending step.)
- Finished: This indicates that all the pieces associated with the job have been turned in and accounted for on the step.
- Turning in pieces as good or scrapped count toward finishing a step.
- This status is automatically applied by the system.
- Closed: This indicates that the step has been manually closed.
- This is the only status that can be selected by the user.
- This status provides the ability to cancel a step if it is not needed.
Status will automatically update only if the Scheduling Application is available and enabled. If not, steps can be manually closed if desired.
Tot Est Hrs
This represents the total number of estimated hours it is expected to take to complete the step.
- Includes both setup and cycle time
Tot Act Hours
This represents the total number of hours it actually took to complete the step based on information turned in on time tickets.
Tot Hrs Left
This is the difference between the estimated and actual hours as long as the step is not finished or closed.
Shift / Employee Information
These fields list the employee selected as the default person to operate the work center associated with the step for each of the three possible shifts. If an employee was not selected, the field will be blank.
- These values can be edited within the Scheduling Application if available.
| Back to Estimating Details - Materials | Return to Estimating | Go to Estimating Details - Comments |