Estimating Routing Section Details Button
Clicking this button opens the details for the selected step. The information available for review and editing varies depending on the Step Type.
 Step Type: Work
This indicates that the work on the selected step is being performed internally on a designated Work Center.
Work Step Details - General Section
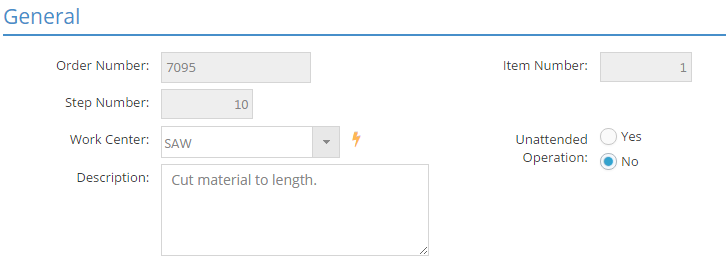
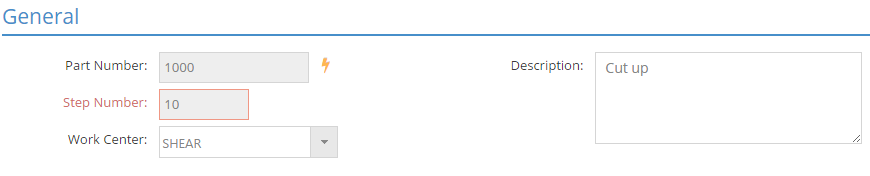
Information here identifies what step the details are for and where the work will be performed.
Part Number
This is the manufactured part the routing is associated with.
- This value cannot be edited here.
Order Number
This is the order that the manufactured part and its associated router is located on.
- This value cannot be edited here.
Item Number
This is the item number associated with the part that is being edited.
- This value cannot be edited here.
Step Number
Simply identifies which step the details were opened for.
- This value cannot be edited here.
Work Center
This represents the personnel, physical area, or equipment being used to perform the listed work.
- Can be selected here or in the Routing Grid
Description
Information here prints on the Job Traveler and is intended to provide the details needed by employees to complete the work associated with the step.
- Populates by default from the selected Operation but can be edited
- Can be edited here or in the Routing Grid
Unattended Operation
This setting indicates whether an employee is expected to be physically present during the estimated amount of cycle time for the selected step / operation.
- Pulls value from selected Operation Code
- When this value is set to "Yes" for a given step it is assumed that no one will be physically present while work is being done on the part(s). The result is:
- Burden costs will be estimated / captured for both setup and cycle times
- Labor costs will be estimated / captured for setup time ONLY
- When this value is set to "No" for a given step it is assumed that someone will be physically present for at least some portion of the time while work is being done on the part(s).
In situations where the employee will be physically present for some, but not all, of the amount of time work is being done on the part(s), the Machines Run By Operator setting can be used to account for how much time the employee is expected to be absent.
Work Step Details - Work Center Details Section
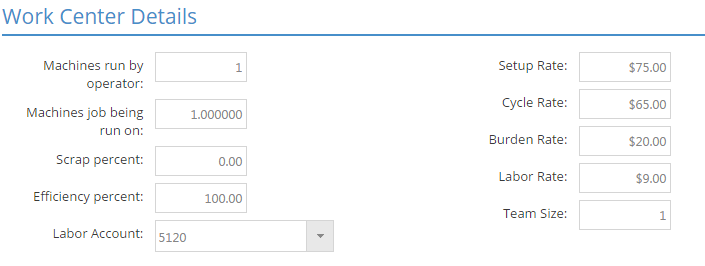
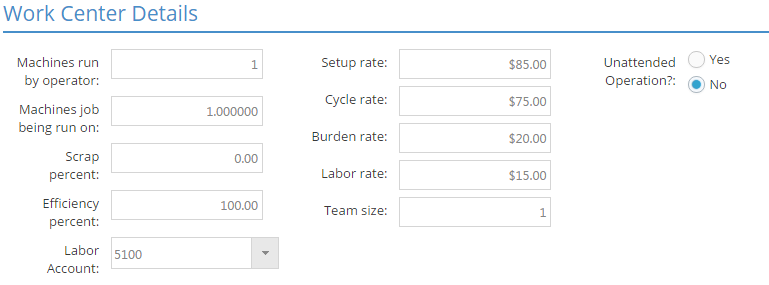
Information here impacts how the step is scheduled, how much it costs, and how much should be charged for the work performed. Any of the values found here can be edited.
Machines Run by Operator
This numeric value represents the number of work centers (machines) the employee performing the work is capable of running at one time for the selected
- Pulls value from selected Operation Code
- The value entered must be a whole number
- If greater than 1, the result is a reduction in estimated labor costs for setup and cycle time
Machines Job Being Run On
This numeric value represents the number of like Work Centers (machines) expected to be used at the same time to perform the work for the selected
- Pulls value from selected Operation Code
- The value entered must be a whole number
- When it is greater than 1:
- Estimated cycle time is decreased since the same number of estimate machine hours are expected to be spread across multiple Work Centers
- Estimated setup time is increased since multiple Work Centers need to be prepped for use
- In order for scheduling to be accurate, the Capacity Factor of Work Centers that are used in this way needs to match the value entered here.
Scrap Percent
Scrap Percentage
This numeric value represents the percentage of manufactured parts that are expected to be scrapped on the selected step / operation.
This numeric value represents the percentage of manufactured parts that are expected to be scrapped during the selected operation.
When entering percentages in JobBOSS2, enter the value as a "standard" number instead of the decimal equivalent. For example, if the value should be five percent, simply enter "5" as opposed to ".05"; the system will automatically convert the value accordingly.
- Pulls value from selected Operation Code
- When greater than zero (0), the system will calculate (when Jobs are processed) how many additional units of the manufactured part need to be made to compensate for the anticipated scrapped pieces
- At a minimum one (1) additional unit will have to be made
- Scrap percentages are cumulative, meaning a 1% Scrap Percent on each of 5 steps will result in a MINIMUM of 5 additional pieces being made since the system is expecting at least one piece to be scrapped on each step.
- It does not matter what step the Scrap Percent is entered on
- Consider placing a single Scrap Percent for the entire routing on a designated step to avoid making more parts than needed during production.
- Given the cumulative nature of scrap percentages, it is recommended to leave the value at 0 on operation codes and assign a single Scrap Percentage for an entire router as they are created.
Efficiency Percent
Percent Efficiency
This numeric value represents how efficiently the work detailed in the Description can be performed on the selected
When entering percentages in JobBOSS2, enter the value as a "standard" number instead of the decimal equivalent. For example, if the value should be five percent, simply enter "5" as opposed to ".05"; the system will automatically convert the value accordingly.
- Pulls value from selected Operation Code
- The value can be a decimal number
- When less than 100%, cycle time (at the Job Level) will be scheduled to take longer to complete than the amount of cycle time estimated here
- EXAMPLE: If Efficiency Percent is set at 80% in the Estimate, scheduled cycle time will be increased by 20% on any Job created for the selected part
- This assumes that Efficiency Percent is not edited at the Job Level, which is an option. In that case, scheduled cycle time will be based on the Efficiency Percent designated there.
Labor Account
This represents the expense account actual labor costs will be accumulated against as Time Tickets are turned in against the selected step for Jobs created from the Estimate.
- Pulls value from selected Work Center
If the Labor Account is left blank at the Job Level, costing reports (Job Cost Summary, WIP Summary, Margin Summary, etc.) will display dollar amounts with no description or a reference of UNKNOWN.
Setup Rate
This dollar value represents the suggested hourly amount to charge for setting up the Work Center associated with the selected step / operation.
- Pulls value from selected Work Center
Cycle Rate
This dollar value represents the suggested hourly amount to charge for the work performed on the selected step / operation.
- Pulls value from selected Work Center
The Setup and Cycle Rates above are referred to collectively as the Billing Rates and are used in the calculation of the overall suggested sales price of the Estimate when the Price Calculation Method under the General Section is set to Billing Rate. The dollar amounts displayed here by default depends on the Billing Rate selected under the Engineering Section.
Burden Rate
This dollar amount represents the estimated hourly (indirect) overhead cost of operating the Work Center associated with the selected step.
- Pulls value from selected Work Center
- This amount is also used as the actual burden cost when time tickets are turned in during production for job cost purposes
Labor Rate
This dollar amount represents the average hourly (direct) labor cost of operating the Work Center associated with the selected step.
- Pulls value from selected Work Center
- This amount is replaced by the pay rate amount of the employee that actually performs the work when time tickets are turned in for job cost purposes
Team Size
This numeric value represents the number of employees it is estimated to take to perform the work detailed in the Description of the selected
- Pulls value from selected Operation Code
- The value entered must be a whole number
- The system multiplies the amount of estimated cycle time by the value entered here
- If greater than 1, the result is an increase in estimated labor costs for cycle time
- Setup time is not affected by this value.
Unattended Operation?
This setting indicates whether an employee is expected to be physically present during the estimated amount of cycle time for the selected step / operation.
- Pulls value from selected Operation Code
- When this value is set to "Yes" for a given step it is assumed that no one will be physically present while work is being done on the part(s). The result is:
- Burden costs will be estimated / captured for both setup and cycle times
- Labor costs will be estimated / captured for setup time ONLY
- When this value is set to "No" for a given step it is assumed that someone will be physically present for at least some portion of the time while work is being done on the part(s).
In situations where the employee will be physically present for some, but not all, of the amount of time work is being done on the part(s), the Machines Run By Operator setting can be used to account for how much time the employee is expected to be absent.
Work Step Details - Sub-Routing Section
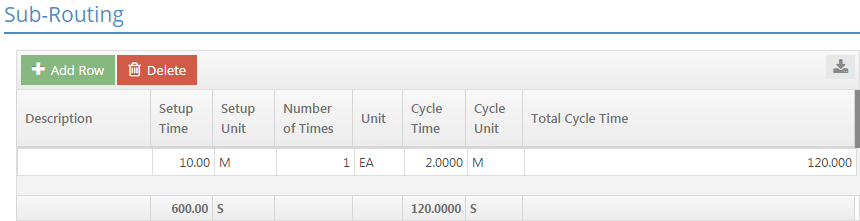
This grid can be used to break down each work step into multiple "sub-steps" for the purpose of providing detailed instructions in situations where a part may need to have repetitive actions taken on each unit. Entering information here is purely optional.
Action Buttons
Add Row (button)
This is used to add a new entry to the grid.
Delete (button)
This button is used to delete the selected entry from the grid.
Sub-Routing Grid
Description
Use this field to provide a description of the various actions the employee should take while the part is at the work center for the selected step.
Setup Time
This value represents the estimated amount of time (in terms of the selected Setup Unit) it will take to prepare the work center.
Setup Unit
Setup Unit works in conjunction with Setup Time to define how long it is expected to take to prepare the work center.
Options include:
- Hours
- Minutes
- Seconds
Setup Time is a fixed value, regardless of the quantity estimated / worked on.
Number of Times
This value can be used to indicate the number of times the listed action should be performed on each part.
Unit
This unit refers to the part itself as opposed to a time reference.
Cycle Time
This value represents the estimated amount of time (in terms of the selected Cycle Unit) it will take to perform the work detailed in the Description one time on the manufactured part being edited / created.
- This value is multiplied by the value entered for Number of Times to determine the Total Cycle Time.
Cycle Unit
Cycle Unit works in conjunction with Cycle Time to define how long it is expected to take to perform the work detailed in the Description on one part.
Options include:
- Hours
- Minutes
- Seconds
- Pieces Per Hour (System uses value to calculate how long it will take to make one unit in terms of an hour)
Please note: If you would like to see an accurate Estimated Time throughout, the System Cycle Time and Cycle Unit need to be defined.
Regardless of the Unit selected for Setup and Cycle Times, the system will convert all values into terms of seconds for calculation purposes at this level.
Total Cycle Time
This represents the total amount of time, in terms of seconds, each part will be worked on.
- This value is determine by multiplying Number of Times by Cycle Time.
- As noted above, this value is converted to seconds regardless of the Cycle Unit selected.
Work Step Details - Inspections Section

In this section, users can enter additional information about performing, recording and acting on quality inspections for jobs and parts directly within the system. Entering information here is purely optional.
Action Buttons
Add Row (button)
This is used to add a new entry to the grid.
Copy (button)
Select a line in the inspection grid and then click the Copy button. The selected row with its values are copied and added to the grid.
Click the Import button to import multiple inspection values from a .CSV file. When importing Inspections, the file must follow this specific column structure:
| Column | Field |
| A | Inspection Type |
| B | Label |
| C | Decription |
| D | Field Type |
| E | Frequency |
| F | Units |
| G | Minimum |
| H | Maximum |
| I | Count |
| J | Measured |
| K | Comments |
Delete (button)
This button is used to delete the selected entry from the grid.
Edit (dropdown arrow)
Select to edit either Measured or Comments fields for Inspections
Inspections Grid
Click in each box under the following headings to enter the user-defined information on inspections in the free-form grid:
-
Inspection Type: maximum 15 characters
-
Label: maximum 15 characters
-
Description: maximum 20 characters
-
Field Type: maximum 15 characters
-
Frequency: maximum 15 characters
-
Units: maximum 6 characters
-
Target value: maximum 6 characters
-
Minimum: maximum 15 characters
-
Maximum: maximum 15 characters
-
Count: maximum 15 characters
-
Measured: maximum 15 characters
-
Pass/Fail: Minimum, Maximum and Measured values are used to auto-calculated this column. If the Measured value falls within the Minimum and Maximum ranges, the inspection passes; if not, the inspection fails.
-
Comments: no character limit
Report Generation
To generate an Inspections Report:
-
In the Navigation Sidebar, click the Reports button.

-
Open the Orders drop down menu.
-
Select Inspections Report from the menu.
-
Use the search fields to locate the applicable job.
-
Click the Generate Report button.
(For additional help, visit Using Report Designer or Report Designer Reference Information pages.)
Note: Users must have permission under User Maintenance > Security to generate a report.
Step Type: Vend
This indicates that the work on the selected step is being performed externally by a designated outside service vendor.
Vendor Step Details - General Section
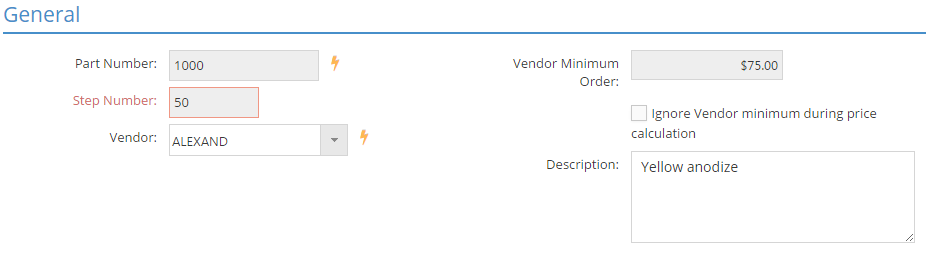
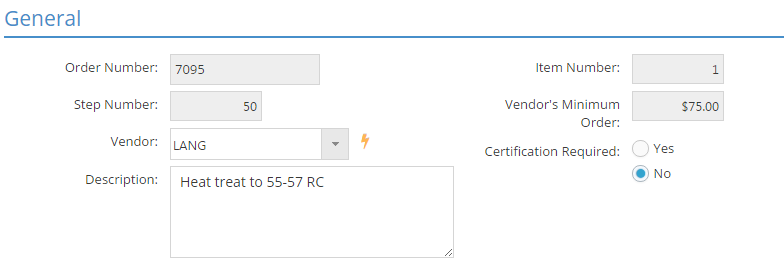
Information here identifies what step the details are for and what vendor will be performing the work.
Part Number
This is the manufactured part the routing is associated with.
- This value cannot be edited here
Order Number
This is the order that the manufactured part and its associated router is located on.
- This value cannot be edited here.
Item Number
This is the item number associated with the part that is being edited.
- This value cannot be edited here.
Step Number
Simply identifies which step the details were opened for.
- This value cannot be edited here.
Vendor
This represents the vendor that will be performing the work detailed in the selected step.
- Can be selected here or in the Routing Grid
Vendor Minimum Order
This dollar value represents the minimum amount allowed when creating a purchase order for the work performed on the selected step.
- Pulls from selected Vendor
- Cannot be edited here
- Can choose to ignore the Minimum Order amount at the purchase order
Ignore Vendor Minimum During Price Calculation
Checking this box allows the system to calculate estimated costs and suggested prices without taking the Vendor Minimum Order into account in situations where it is known it will be ignored at the purchase order.
Certification Required
When this setting is set to "Yes" a notation is made on purchase orders created for the selected service step that a certification is required.
Description
Information here prints on the Purchase Order and is intended to provide details needed by the vendor to complete the work associated with the step.
- Populates by default from the selected Operation but can be edited
- Can be edited here or in the Routing Grid
- Also prints on Job Traveler for reference
Vendor Step Details - Vendor Details Section

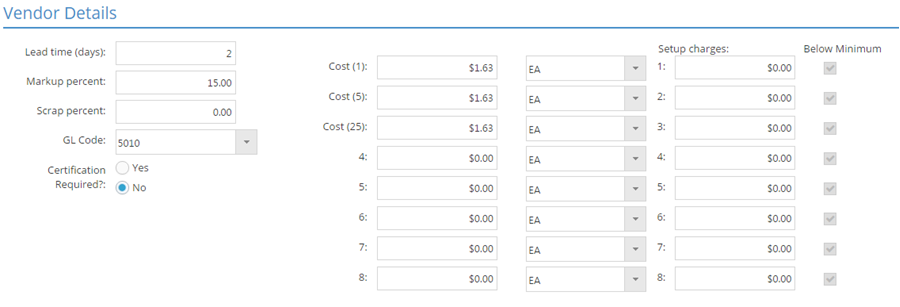
Information here impacts how the step is scheduled, how much it costs, and how much should be charged for the work performed. Any of the values found here can be edited.
Lead Time (Days)
This numeric value represents the expected number of days the manufactured part(s) will be outside the shop for servicing.
- Pulls from selected Vendor
- The value entered must be a whole number
- Used for scheduling purposes when determining when work can be performed on steps that come before and after the selected service step
Markup Percent
This numeric value is multiplied against the costs of the service (covered below) to determine the suggested amount to charge for the selected service step.
When entering percentages in JobBOSS2, enter the value as a "standard" number instead of the decimal equivalent. For example, if the value should be five percent, simply enter "5" as opposed to ".05"; the system will automatically convert the value accordingly.
- Pulls from selected Vendor
- The suggested values generated are used in the calculation of the overall suggested sales price of the Estimate when the Price Calculation Method under the General Section is set to Billing Rate
Scrap Percent
This numeric value represents the percentage of manufactured parts that are expected to be scrapped during outside service process.
When entering percentages in JobBOSS2, enter the value as a "standard" number instead of the decimal equivalent. For example, if the value should be five percent, simply enter "5" as opposed to ".05"; the system will automatically convert the value accordingly.
- Pulls value from Operation Code (if one is selected for the step)
- When it is greater than zero (0), the system will calculate (when Jobs are processed) how many additional units of the manufactured part need to be made to compensate for the anticipated scrapped pieces
- At a minimum one (1) additional unit will have to be made
- Scrap percentages are cumulative, meaning a 1% Scrap Percent on each of 5 steps will result in a MINIMUM of 5 additional pieces being made since the system is expecting at least one piece to be scrapped on each step.
- It does not matter what step the Scrap Percent is entered on
- Consider placing a single Scrap Percent for the entire routing on a designated step to avoid making more parts than needed during production.
GL Code
This GL Code will automatically populate as the expense account on purchase orders created for this service step.
- Pulls from selected Vendor
Certification Required?
When this setting is set to "Yes" a notation is made on purchase orders created for the selected service step that a certification is required.
Quantity Break Cost Information
The remaining fields covered here are used to provide cost related information for the service to be performed based on the quantities listed under the General Section.
- The quantities provided under the General Section display in parenthesis under the caption of "Cost"
- If all eight quantity breaks available under the General Section are not used, the unused quantities will simply display here as a number corresponding to its position on the screen from 1 to 8, going from top to bottom
- Cost related information would only be entered in fields that are associated with a quantity break from the General Section.
These fields are used to provide cost related information for the service to be performed based on the quantity to be made on the selected job.
- The value listed in parentheses represents the total quantity to make and could include both customer and stock releases.
Cost Amount
The first field is used to provide the dollar cost of the service in relation to the associated quantity break.
- How the dollar amount is applied as a cost depends on the unit selected in the second field (see Cost Unit below)
- The dollar amount can be the same or different for each available quantity
Cost Unit
The second field provides a dropdown menu that can be used to select the unit to apply against the dollar amount entered as the cost. The options include:
- EA (Each) - Most commonly used option; Used to apply Cost Amount on a per unit basis
- Impact on Unit Cost of Part (added to other cost components)
- Cost Amount
- Result on Job Requirements / Service Purchase Orders
- Unit Cost = Cost Amount
- Unit = EA
- Cost of Service = Quantity Ordered * Cost Amount
- Impact on Unit Cost of Part (added to other cost components)
- FT (Feet) - Behaves in same manner as EA, with the exception being the use of FT as the Unit on future records
- Impact on Unit Cost of Part (added to other cost components)
- Cost Amount
- Result on Job Requirements / Service Purchase Orders
- Unit Cost = Cost Amount
- Unit = FT
- Cost of service = Quantity Ordered * Unit Cost
- Impact on Unit Cost of Part (added to other cost components)
- LB (Pound) - Can be used when service cost is based on weight, however the quantity on future records must be manually adjusted
- Impact on Unit Cost of Part (added to other cost components)
- Cost Amount * Part Weight
- Result on Job Requirements / Service Purchase Orders
- Unit Cost = Cost Amount
- Unit = LB
- Cost of service = Quantity Ordered * Unit Cost
- When LB is used, the Quantity Required / Quantity Ordered must be manually adjusted to match the total weight that is being serviced in order to match the impact the Service had on the Part Unit Cost.
- Impact on Unit Cost of Part (added to other cost components)
- C (100) - Divides the Cost Amount by 100 to determine applied cost
- Impact on Unit Cost of Part (added to other cost components)
- Cost Amount / 100
- Result on Job Requirements / Service Purchase Orders
- Unit Cost = Cost Amount
- Unit = C
- Cost of Service = Quantity Ordered * (Unit Cost / 100)
- Impact on Unit Cost of Part (added to other cost components)
- M (1000) - Divides the Cost Amount by 1,000 to determine applied cost
- Impact on Unit Cost of Part (added to other cost components)
- Cost Amount / 1,000
- Result on Job Requirements / Service Purchase Orders
- Unit Cost = Cost Amount
- Unit = M
- Cost of Service = Quantity Ordered * (Unit Cost / 1,000)
- Impact on Unit Cost of Part (added to other cost components)
- LOT (Lot) - Uses the Cost Amount as the total charge regardless of the quantity
- Impact on Unit Cost of Part (added to other cost components)
- Cost Amount / Quantity
- Result on Job Requirements / Service Purchase Orders
- Unit Cost = Cost Amount
- Unit = LOT
- Cost of Service = Unit Cost
- Impact on Unit Cost of Part (added to other cost components)
- MIN (Minimum) - Behaves in same manner as LOT, with the exception being the use of MIN as the Unit on future records
- Impact on Unit Cost of Part (added to other cost components)
- Cost Amount / Quantity
- Result on Job Requirements / Service Purchase Orders
- Unit Cost = Cost Amount
- Unit = MIN
- Cost of Service = Unit Cost
- Impact on Unit Cost of Part (added to other cost components)
Setup Charges
A setup charge can be associated with a quantity break to account for any quantity-independent fees charged by the vendor for the service.
- Setup charges can be different for each quantity break
- When the Setup Charge is greater than $0.00, the cost is included in the Unit Cost of the part by spreading it across that quantity
- EXAMPLE: Assume a $100.00 Setup Charge
- For a Quantity Break of 10, $10.00 would be added to the Unit Cost (100 / 10)
- For a Quantity Break of 20, $5.00 would be added to the Unit Cost (100 / 20)
- Etc.
The amount entered as the Setup Charge for a Quantity Break is the same for all values within that break. For example, in the above illustration, $10 would be added to each value from 10 to 19 when entered on a quote or an order. Likewise, $5 would be added to each value from 20 and above, or until the next Quantity Break value (if one is present.)
Below Minimum
These check boxes are automatically populated by the system if the calculated total cost for the listed Quantity Break would be below the Vendor Minimum Order value displayed under the General Section.
This check box is automatically populated by the system if the calculated total cost is below the Vendor Minimum Order value displayed under the General Section.
Regardless the Step Type, any edits made at this level will be used on any records created from the selected Estimate going forward, but will not affect the underlying source records (such as Work Centers, Operations, Vendors, etc.)