Global Use; Features > Quickview - SCHEDULING
Scheduling in Quickview
This document discusses the features and concepts of this application in JobBOSS2. The document explains the fields and buttons as they appear in the software, beginning at the top of the page and working down to the bottom. If you need any additional information on process or implementation, see the Additional Topics links to the right.
About Quickview Scheduling
The Scheduling feature in Quickview is a great tool that allows you to get an idea of what is happening on the shop floor and what work is coming down the pipeline. Quickview Scheduling is only accessible through the Quickview product selected at the login screen; you cannot access Quickview Schedule once you have logged into the Main product.
Action Buttons

The Schedule page has a series of Action Buttons that operate similarly to the ones found on the Scheduling Whiteboard outside of Quickview. These functions generate reports to display the data in other formats, but they do not allow you to make changes to the information on the schedule.
Search
This button allows you to search the schedule based on a Part Number, Description, Customer, Work Code, Product Code, Cust. P.O. Number, Job Number, or Job Notes.
Global Reschedule
This button open up the Global Reschedule utility, but the ability to process a Global Reschedule only exists in the Scheduling module itself.
For more information see Global Reschedule Utility.
Scheduling Advisor
This button displays a list of scheduling related items that provide an overview of how things stand and point out potential problems spots.
For more information see Scheduling Advisor.
Generate Report
This button generates a Scheduling Summary based on the information currently displayed in the Whiteboard Grid. Menu options include:
- View / Print - Information displays to the screen and can be printed from there.
- Export - Information can be exported to a .csv file or an Excel spreadsheet.
- Email - A PDF version of the report can be sent to the selected recipient.
For more information see Generating Reports in JobBOSS2.
Close
This button closes the Quickview Scheduling page.
Grid Views

There are multiple ways to view the Scheduling Whiteboard and the associated information to ensure you are getting the representation you need. Select between a Job Gantt chart, the What If scenario, or customized settings.
Job Gantt
The Job Gantt Screen provides a way to view scheduling estimates in a Gantt Chart format. Unlike the Whiteboard Screen, estimated start and end dates cannot be adjusted here.
For more information see Scheduling Whiteboard.
What If
What If Scheduling provides the ability to see how potential jobs would impact the schedule before accepting the work or providing estimated completion dates to a customer.
For more information see Scheduling Whiteboard.
Settings
The Settings Screen is the first place to go when setting up scheduling since this is where the Scheduling Engine is "turned on" for daily use. Additional features located here include:
- The ability to set work center defaults and availability from one screen as opposed to editing each work center individually.
- 'Common Settings' that determine what information displays in the Whiteboard.
- 'Scheduling Defaults' that determine how and when jobs get added to the schedule and defaults used during a Global Reschedule.
In Quickview, the settings are reference only; changes must be made within the Scheduling module.
For more information see Scheduling Whiteboard.
Whiteboard Options

The Whiteboard Options give you the ability to customize the Whiteboard grid displayed on the page. The following options are available:
- Date Range - the Date Range provides a starting value for the whiteboard.
- Whiteboard View - the Whiteboard View determines how the information on the schedule is categorized. The category options are:
- Work Centers
- Employee
- Department
- Job Number
- Bucket Size - the Bucket Size determines the amount of time displayed on the schedule, following the date selected as the Date Range. The amounts available are:
- Day
- Week
- Month
For more information see Scheduling Whiteboard.
Scheduling Whiteboard
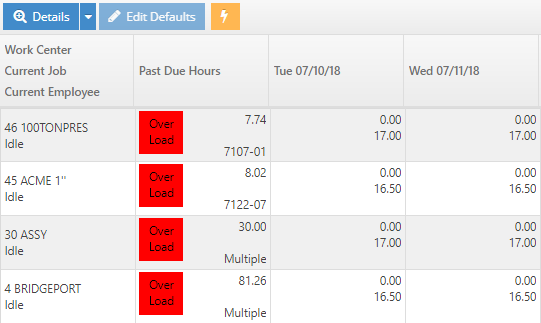
The Scheduling Whiteboard grid displays all of the time scheduled on either the work centers, employees, departments, or job numbers (depending on the view selected above) for the selected date range. The information breaks down as follows:
- The first column lists the Whiteboard View and all of the items that fall into that category and are part of production during the selected date range.
- The second column lists the Past Due Hours at the current time.
- The rest of the columns are dates, depending on the Bucket Size selected, that list the number of hours that correspond with the items in the Whiteboard View column.
There are also a couple buttons associated with the grid:
- Details - select any item in the grid, and the Details button will drill down into that section to provide more information, such as the jobs, customers, parts, etc. related to the line item.
- Within the Details section, edits can be made to the schedule. You can move items on the list, edit job dates, go further into the details on each of these line items.
- Edit Defaults - this button is "grayed out" because this is a reference page; edits must be made in the Scheduling module.
- Quickview Lightning Bolt - this button opens a Quickview page for the item in Whiteboard View column that corresponds with the row you clicked in.
For more information see Scheduling Whiteboard.