Payroll Interface; QB Connector; QB Sync; Synchronize;
Install and Configure the QuickBooks (QB) Desktop Sync Interface
This topic provides information on how to install and / or configure the various components required to use the QB Sync Interface and assumes that the appropriate QuickBooks (QB) product is already installed on the computer used to complete the sync process.
In order to work, the QuickBooks interface requires the following:
- The use of QuickBooks Pro or higher.
- This includes Enterprise Silver.
- JobBOSS2 does not interface with the "Standard" version of QuickBooks.
- The version of QuickBooks being used must be within the current two years to be supported.
- Older versions may work, but there is no guarantee and they may stop working if there are changes to newer versions of the QB product.
- Only one version of QuickBooks can be installed on the computer being used to synchronize information with JobBOSS2.
The interface CANNOT be used via a VPN or Terminal Services.
This example uses QuickBooks Pro for reference information; it is possible some option locations may vary between products.
For more information see Using the QB Sync Interface.
 Install the QB Sync Interface
The QB Sync Interface is an application provided by Shoptech that is used to indicate what information should be synchronized with the selected QuickBooks company. Once installed, the QB Sync can be used for any of the following:
- Create AR Invoices in QuickBooks
- Create AP Invoices in QuickBooks
- Provide payroll related information to QuickBooks
- If the JobBOSS2 Accounting Application is being used, payroll information can be imported back from QuickBooks in the form of a Journal Entry.
***
- Click the 'Help' option in the Quick Access Toolbar (located at the top-right of the screen.)
- Click 'Client Downloads.'
- Click 'Quickbooks Sync.'
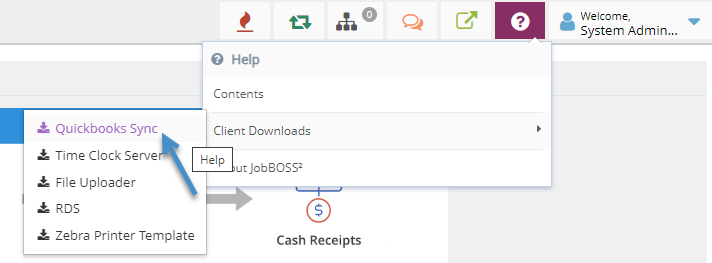
- Run the 'JobBOSS2 QB Sync.exe' file downloaded by the system.
- Files are saved in the Downloads directory by default.
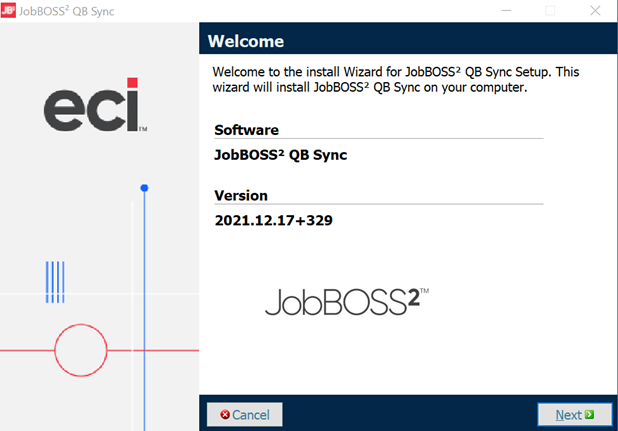
- Answer 'Yes' to the prompt to allow the program to make changes (if one is provided.)
- Click 'Next' on the Welcome screen of the installer to continue.
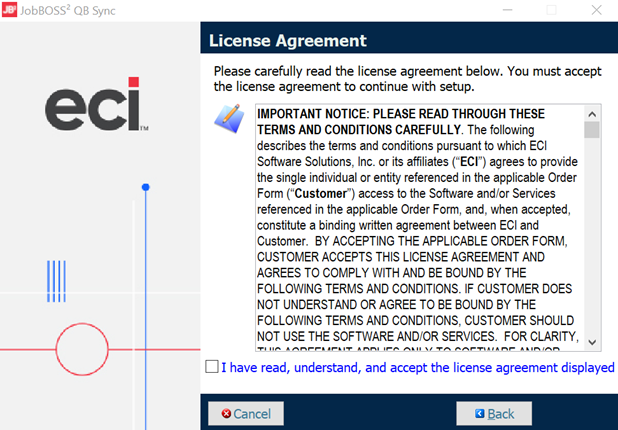
- Click the check box to indicate acceptance of the license agreement.
- Click 'Next' to continue.
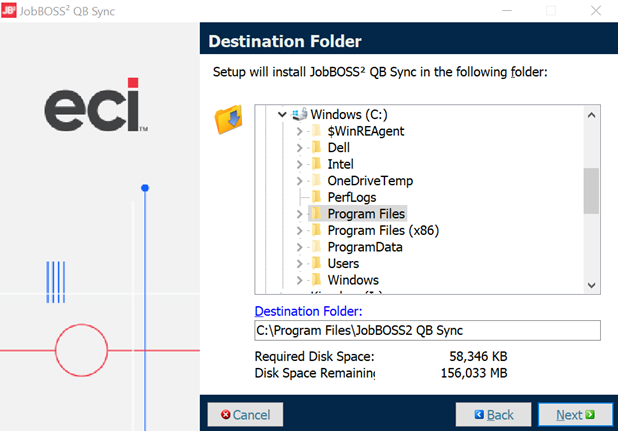
- Verify the destination folder for the installer file and click 'Next' to continue.
- Select a different folder before continuing to save to another location.
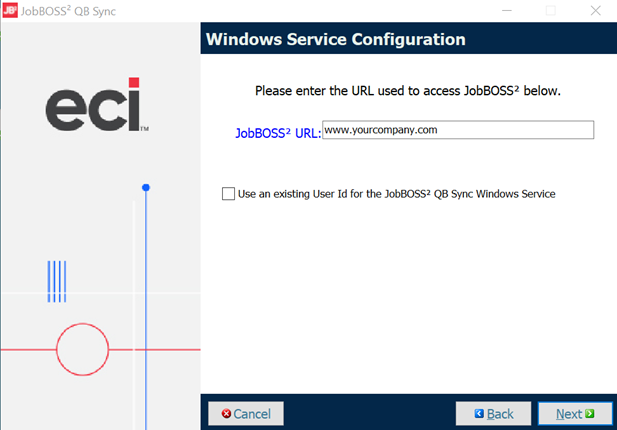
- Enter the name of the server where JobBOSS2 is running.
- This can easily be populated by copying the url from the browser window running JobBOSS2 and pasting it into the installer window.
- When pasting the path, remove any extensions at the end such as 'Dashboard', 'Navigator', etc.
- (OPTIONAL) Click the check box to use an existing User ID (within Computer Management) for the purpose of accessing the QB Sync Windows Service.
- If this option is selected, a Service Username and Password must be provided.
- The User MUST have Administrator and 'Sign on as a Service' privileges.
- If a User is entered that has a password that changes or expires, the credentials for the QB Sync Windows Service will have to be updated to match.
- If this option is left blank, the installer will create a User ID and configure it accordingly.
- The default User will be QBSYNC.
- The default Password will be QbSync#1.
- Unless there is an overriding reason not to do so, it is recommended to allow the installer to create the User and Password automatically to avoid conflicts with existing users logging on to the network.
- If this option is selected, a Service Username and Password must be provided.
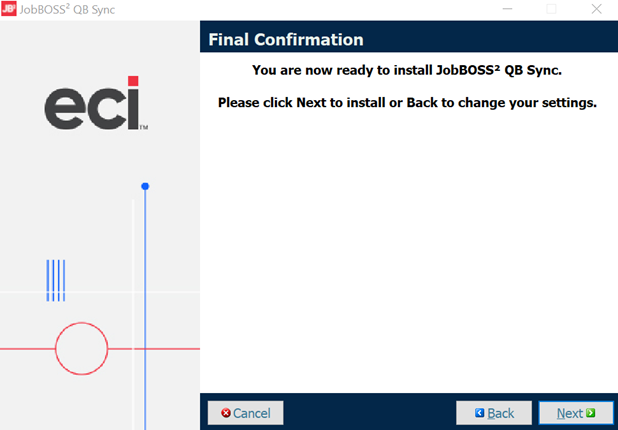
- Click 'Next' to continue.
- Click 'Next' to confirm the selections and install the QB Sync.
- The 'Back' button can be used to review previous screens and make changes.
- The installer indicates the QB Sync is being installed and provides a progress indicator.
If a 1057 Error appears at the completion of Processing, please see How to Fix a 1057 Error when Installing QuickBooks.
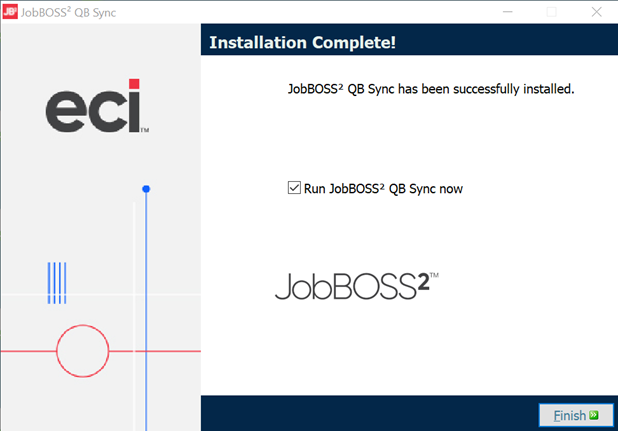
- Click 'Finish' to close the installer.
- By default the option to 'Run Shoptech JobBOSS2 QB Sync now' is checked, meaning the interface will launch automatically upon closing the window.
- Remove the check to prevent the Sync Interface from opening.
- Assuming the option to launch the Sync was left checked, the QB Sync Login window appears.
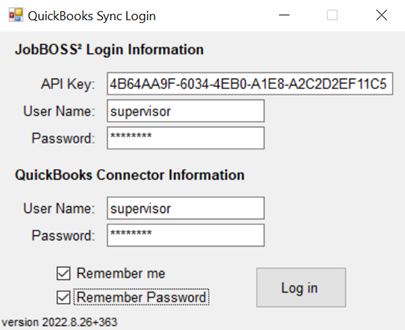
- If the API Key does not automatically populate, copy and paste the value located in Company Maintenance in the API Key field.
- The API Key is located specifically under System > Company Maintenance > Edit.
- If the User Name and / or Password are edited at this time, make sure to use the values entered here when configuring the QB Connector and the default QB User in JobBOSS2.
- If the QB Connector file has been installed and configured, clicking 'Log in' will open the Sync Interface; otherwise the system will provide a prompt to 'run the QB Connector tool.'
- By default the installer creates a shortcut titled JobBOSS2 Desktop that can be used to open the QuickBooks Sync Login screen in the future.
If desired, right clicking on the shortcut / icon provides the ability to rename it to something else, such as 'QB Sync'.
- If the API Key does not automatically populate, copy and paste the value located in Company Maintenance in the API Key field.
Install the QB Connector
The QB Connector is a third party application that allows JobBOSS2 to communicate with QuickBooks and pass information back and forth.
- On the PC that will be used to run the QB Sync Interface, navigate to C:\Program Files (x86)\JobBOSS2 QB Sync\QBConnector.
- Right click on 'QBConnector.exe.'
- Click 'Run as administrator.'
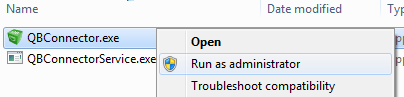
- The QB Connector must always be 'run as administrator' due to access privilege requirements.
- Answer 'Yes' to the prompt to allow the program to make changes (if one is provided.)
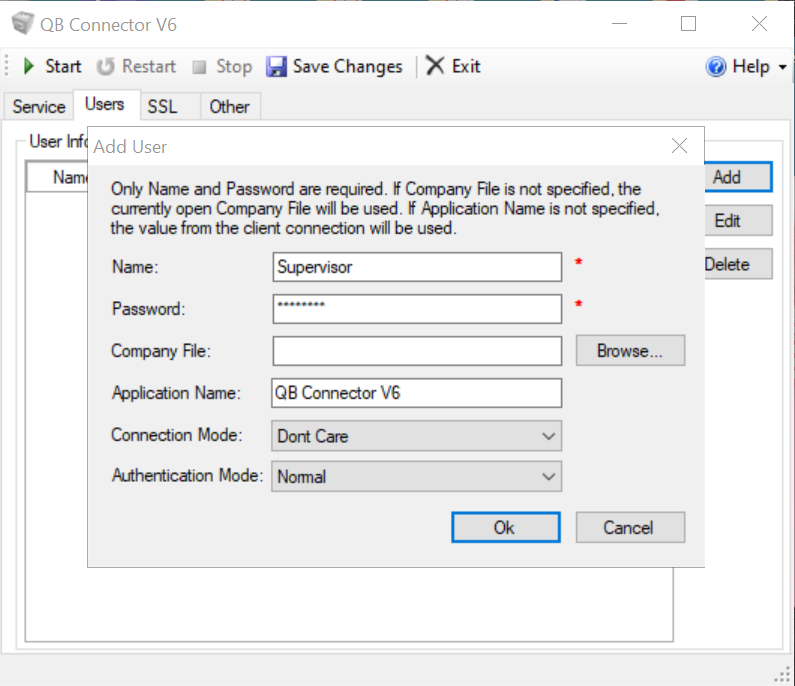
- On the QB Connector window that opens, click the 'Users' tab.
- Click 'Add.'
- Enter the name used during the installation of the QB Sync Interface.
- Enter the password used during the installation of the QB Sync Interface.
- The values for Name and Password MUST match the values entered in the QB Sync Interface and the JobBOSS2 User.
- Click 'Browse' located next to the 'Company File' field.
- By default this opens the 'Company Files' directory that holds the QuickBooks company files used.
- Select the appropriate .qbw file and click 'Open.'
- Leave the Connection Mode and Authentication Mode fields set to their default values.
- Click 'OK.'
- Click 'Start.'
- If prompted, save changes.
- Minimize the QB Connector to the system tray.
The QB Connector must remain open and running as a service on the computer used to synchronize information between JobBOSS2 and QuickBooks in order for the interface to function.
Create User JobBOSS2 (IF NEEDED)
If the installer was allowed to create the QB Sync User, this information needs to be added to JobBOSS2 as a User ID as well. If an existing User was entered during installation of the Sync Interface, that information must exist as an JobBOSS2 User as well as a network User.
This example assumes the installer was allowed to create the user and password automatically.
- In JobBOSS2, go to System > User Maintenance.
- Click 'New.'
- Enter the following:
- User ID = E2QBSYNC
- Name = E2QBSYNC
- New Password = E2QbSync#1
- Confirm Password = E2QbSync#1
- If the User Name and / or Password were edited during installation of the QB Sync interface, make sure the information entered here matches the values used there and in the QB Connector.
- Enter an Email Address for the user.
- This does not have to be a valid email address, but a value must be entered since it is a required field.
- Verify the 'View Only User' check box is selected.
- This will prevent a JobBOSS2 license from being taken up when this User is selected.
- Allow access to the JobBOSS2 Company that is going to connect to the .qbw file selected when installing and setting up the QB Connector.
- Click 'OK' to save any changes made to the User Code.
Authorize the Sync Function
Once the various components of have been installed and configured, including QuickBooks, the following steps need to be taken to complete the process and to finalize the sync functionality between JobBOSS2 and QuickBooks.
- Open QuickBooks using the 'Run as administrator' option.
- This can be done by right clicking on the QuickBooks icon or the appropriate .exe file and selecting 'Run as administrator.'
- Answer 'Yes' to the prompt to allow the program to make changes (if one is provided.)
- Open the QuickBooks Sync Login screen using the 'Run as administrator' option.
- This can be done by right clicking on the 'JobBOSS2 Desktop' (or otherwise renamed) icon or the E2SSShop.Desktop.exe file (located under 'C:\Program Files (x86)\JobBOSS2 QB Sync' by default) and selecting 'Run as administrator.'
- Answer 'Yes' to the prompt to allow the program to make changes (if one is provided.)
- Values should already be entered as a result of the QB Syn Interface installation process, but they can be edited if needed.
- In the QuickBooks Sync Login screen, click 'Log in.'
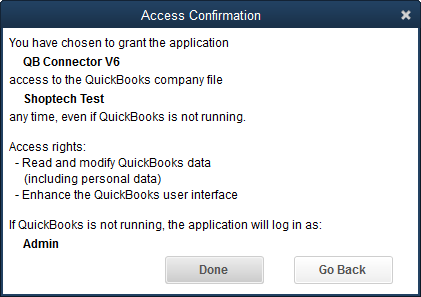
- The QuickBooks Application Certificate page should appear (see image below.) Select the following:
- 'Yes, always; allow access even if QuickBooks is not running.' (Radio button)
- 'Allow this application to access personal data such as Social Security Numbers and customer credit card information.' (Check box)
- Select 'Admin' as the user to 'Login as' from the dropdown menu provided.
- Click 'Continue.'
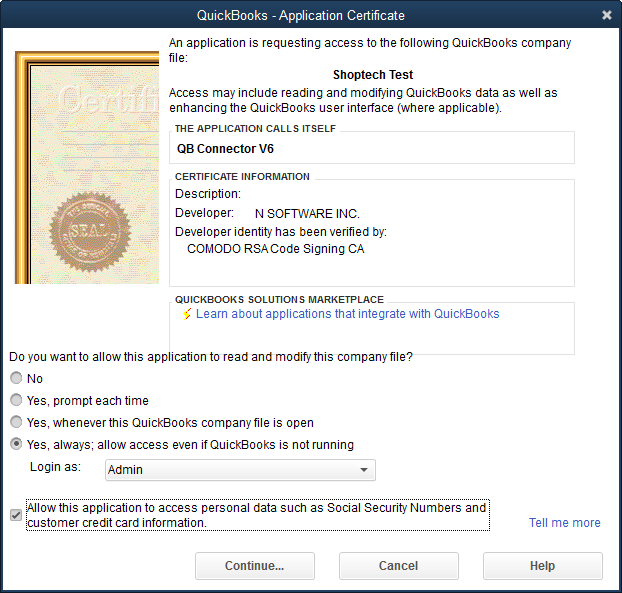
- Click 'Done' to accept the selections made.
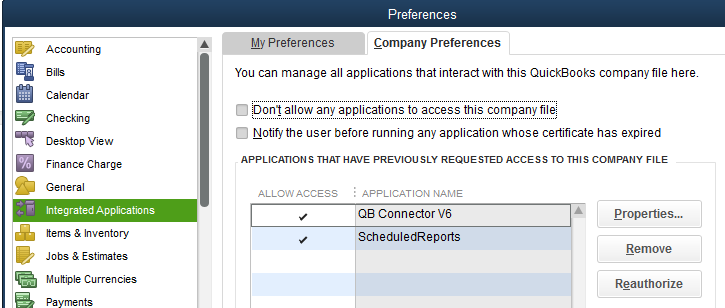
- Verify that the QB Connector is an authorized application in QuickBooks.
- In QuickBooks, go to Edit > Preferences > Integrated Applications.
- Click the 'Company Preferences' tab.
- Verify QB Connector is listed as an authorized application.
- Once configured and authorized as an application, the QB Sync Interface will automatically connect to the selected QuickBooks company and allow the user to perform the following functions:
- Create AR Invoices in QB by syncing selected information from JobBOSS2.
- Create AP Invoices in QB by syncing selected information from JobBOSS2.
- Send Time and Attendance information to QB for payroll purposes.
Verify Settings In JobBOSS2 And QuickBooks
Before using the interface, verify the following settings in each program to ensure information will synchronize correctly.
Spaces and "special characters" such as dashes, dots, etc., must be included in the count when considering character limits for fields in both JobBOSS2 and QuickBooks.
Required For All Items
These settings and preferences need to be confirmed before using the QB Sync Interface regardless of which options are used.
In JobBOSS2
Settings and Preferences
- Go to System > Company Maintenance.
- Click 'Edit.'
- Make sure the company that will be synchronized with QuickBooks is the one that is currently open and being edited.
- Click 'Defaults.'
- Under the 'Interfaces and Documents' section, verify the following:
- 'QuickBooks Interface (Direct Connect Method)' must be selected.
Setting QuickBooks as the interface causes the following behavior JobBOSS2:
- Part Numbers are limited to 31 characters
- Customer Codes display an additional required field labeled 'Quickbooks Customer Code.'
- Vendor Codes display an additional required field labeled 'Quickbooks Vendor Code.'
- 'Sales ID' becomes a required field on Customer Codes.
- GL Codes are limited to 7 characters.
GL Accounts*
GL Codes used in JobBOSS2 need to exist in QuickBooks in order to have accurate financial information.
- Go to Tables > GL Accounts.
- Select a GL Account from the list.
- Click 'Edit.'
- Verify the following:
- GL Code
- This value must match the 'Number' field for Accounts in QB.
- GL Codes can be up to 12 characters IF the Quickbooks Interface is not selected in Company Maintenance.
- Once the Quickbooks Interface is selected, GL Codes are limited to 7 characters.
- Description
- This information corresponds to the 'Account Name' field in QB.
- GL Code
- Repeat for as many GL Codes as necessary.
- Go to Tables > GL Accounts.
- Click 'Print.'
- Select 'Table' from the dropdown menu.
- Click 'Generate Report.'
- 'GL Codes' will be selected by default under Table Listings.
- Select the desired destination for the report from the dropdown menu.
- This would typically be 'View / Print' which provides the option to view information on the screen and then print to hard copy.
***
Items marked with an asterisk (*) would be created automatically if a QuickBooks conversion was used to create the JobBOSS2 Company.
In QuickBooks
Settings and Preferences
- Go to Edit > Preferences > Integrated Applications.
- Click the 'Company Preferences' tab.
- Verify QB Connector is listed as an authorized application.
- There should be a check mark in the 'ALLOW ACCESS' column next to the QB Connector listing that would have been set when the interface was first authorized; however authorization can be removed.
- If this option is not checked, click in the 'ALLOW ACCESS' field and click 'Reauthorize.'
- With QB Connector selected, click 'Properties...'
- Verify the following settings are selected:
- 'Allow this application to read and modify this company file'
- 'Allow this application to login automatically'
- 'Login as: Admin' (dropdown menu)
- 'Allow this application to access Social Security Numbers, customers credit card information, and other personal data'
- Required for payroll purposes
- Click 'OK' to exit properties.
- Select 'Accounting' from the list on the left.
- Under 'ACCOUNTS verify the following':
- 'Use account numbers' must be selected.
- 'Show lowest subaccount only' must be left blank (NOT selected.)
GL Accounts*
GL Codes used in QuickBooks need to exist in JobBOSS2 in order to have accurate financial information.
- Go to Lists > Chart of Accounts.
- Select an account from the list.
- Click 'Account' (dropdown menu located at the bottom of the Chart of Accounts window.)
- Select 'Edit Account.'
- Verify the following:
- 'Number'
- This value must match the 'GL Code' field JobBOSS2.
- This value has a limit of 7 characters.
- 'Account Name'
- This information corresponds to the 'Description' field JobBOSS2.
- 'Number'
- Repeat for as many accounts as necessary.
NOTE
If the interface has been used at least one time, the following accounts will be listed in the QB Chart of Accounts but not JobBOSS2:
- PartAssetAcct
- PartCOGSAcct
- PartIncomeAcct
- FreightAcct
- salesTaxAcct
If (new) synchronized parts are not configured JobBOSS2 to provide information required by QuickBooks, the interface will use these "generic" accounts to ensure the parts can be successfully created and saved. Once the parts are created, these accounts can be edited as desired and will not be changed during future syncs, even if the part is not configured JobBOSS2.
See "Parts" in the "Required For Synchronizing AR And AP Invoices" section for additional information about these accounts.
- Go to Lists > Chart of Accounts.
- Click 'Reports' (located at the bottom of the Chart of Accounts window.)
- Select 'Account Listing' from the dropdown menu.
- Click 'Print' (located at the top of the Account Listing window.)
- Select the desired option from the dropdown menu.
***
Items marked with an asterisk (*) will be created by the interface the first time it is present on a source record JobBOSS2 (assuming it is added JobBOSS2 but not in QuickBooks) or can be created by using the 'Tables Only' option in the QB Sync Interface.
Required For Synchronizing AR and AP Invoices
In addition to the settings "Required For All Items", these settings and preferences need to be confirmed if the QB Sync Interface will be used to create AR and AP Invoices in QuickBooks using information pulled from JobBOSS2.
In JobBOSS2
Settings & Preferences
- Go to System > Company Maintenance.
- Click 'Edit.'
- Make sure the company that will be synchronized with QuickBooks is the one that is currently open and being edited.
- Click 'Defaults.'
- Under the 'General Ledgers' section, verify the following:
- Each required field (listed in red) must have a GL Account provided.
- The interface will look to this area for default values for AP Invoices that it cannot get from the invoice itself.
Parts*
Both manufactured and purchased parts should be present in QuickBooks for billing and inventory valuation purposes.
The items listed here represent the minimum settings used for the QB Sync to function properly and should not be considered as sufficient information for costing purposes JobBOSS2 itself.
- Go to Inventory > Inventory Items.
- For purposes of this review, all parts can be edited within Inventory Items, including manufactured parts (which would typically edited under Estimating.)
- Select a part that is / will be included in QuickBooks.
- Click 'Edit.'
- In the General Section, verify the following:
- Part Number
- This must match the 'Item Name/Number' field in QB.
- This field has a limit of 31 characters JobBOSS2 when QuickBooks is selected as the interface.
- Part Numbers can be up to 50 characters if QuickBooks is not selected as the interface, so be aware of Part Number lengths if implementing QuickBooks AFTER JobBOSS2.
- Description
- This information is used to populate the 'Description on Purchase Transactions' field of the part created in QB.
- Product Code (OPTIONAL)
- 'Product Code' (specifically, the 'Sales Account') provides the 'Income Account' on any new part added to QuickBooks through the interface as an Inventory or Service Item.
- The interface looks to the Product Code for this information regardless of how the "Customer Billing Driven By" setting is configured in Company Maintenance.
- If Product Code is not present, the interface will assign the "generic" PartIncomeAcct it creates in QuickBooks instead.
- 'Product Code' (specifically, the 'Sales Account') provides the 'Income Account' on any new part added to QuickBooks through the interface as an Inventory or Service Item.
Additional Information On Product CodesThe use of Product Codes is not required, however their use is recommended as a way to pass along the Sales Account for new parts added to QuickBooks when synchronizing information.
Set Customer Billing Option
- Go to System > Company Maintenance.
- Click 'Edit.'
- Make sure the company that will be synchronized with QuickBooks is the one that is currently open and being edited.
- Click 'Defaults.'
- In the 'Customer' section (located near the top of the page), verify / select the 'Customer Billing GL Coding Driven By' radio button is set to 'Product Code.'

- Click 'OK' to exit Defaults.
- Click 'OK' once more to exit Company Maintenance and save any changes made.
Create / Verify Product Codes
- Go to Base Tables > Product Codes.
- Select a Product Code that will be used to provide information to QuickBooks.
- Click 'Edit.'
- If needed, click 'New' and create one or more Product Codes.
- Verify / edit / enter the GL Code that represents the 'Sales Account' to be passed on to QuickBooks.
- Even though the Sales Account is the only value the QB Sync will use, GL Codes must be provided for all the accounts present in order to save the Product Code.
- Save any changes and repeat for as many Product Codes as needed.
- At a minimum it would be typical to have at least one Product Code for purchased parts and at least one for manufactured parts.
Assign Product Codes to Parts
- Go to Inventory > Inventory Items.
- For convenience sake, all Parts can be edited under Inventory Items for this purpose, including manufactured ones.
- Edit each Part and verify they have the correct Product Code assigned.
- Inventory GL Code (OPTIONAL)
- This value provides the 'Asset Account' on any new part added to QuickBooks through the interface as an Inventory Item.
- If Inventory GL Code is not present, the interface will assign the "generic" PartAssetAcct it creates in QuickBooks instead.
- Part Number
- In the Purchasing Section, verify the following:
- Purchasing GL Code (OPTIONAL)
- This value provides the 'COGS Account' on any new part added to QuickBooks through the interface as an Inventory Item.
- If Purchasing GL Code is not present, the interface will assign the "generic" PartCOGSAcct it creates in QuickBooks instead.
- Purchasing GL Code (OPTIONAL)
- Repeat for as many Parts as necessary.
Once a Part has been added to QuickBooks, editing any of these values JobBOSS2 (other than Part Number) will have no effect in QB during future sync processes; values would need to be manually edited in QB directly.
Taxes*
Tax Codes are always required on AR and AP Invoices JobBOSS2.
- Go to Base Tables > Tax Codes.
- Select a Tax Code that will be used in QuickBooks.
- Click 'Edit.'
- Verify the following:
- Tax Code
- This value must match the 'Sales Tax Name' field in the corresponding Sales Tax Item in QB.
- Tax Code has a limit of 12 characters.
- Tax Code
- Repeat for as many Tax Codes as necessary.
Terms*
Terms Codes are always required on AR and AP Invoices JobBOSS2.
- Go to Base Tables > Terms Codes.
- Select a Terms Code that will be used in QuickBooks.
- Click 'Edit.'
- Verify the following:
- Terms Code
- This value must match the 'Terms' field in the corresponding Term in QB.
- Tax Code has a limit of 12 characters.
- Terms Code
- Repeat for as many Terms Codes as necessary.
Sales Personnel*
Salesmen are required on Customer Codes when the Quickbooks Interface is selected in Company Maintenance.
- Go to Tables > Salesmen.
- Select a sales person in the list.
- Click 'Edit.'
- Verify the following:
- Sales ID
- This value must match the 'Sales Rep Initials' of the corresponding Sales Rep in QB.
- Sales ID has a limit of 12 characters.
- Sales ID
- Repeat for as many Salesmen as necessary.
Customers*
- Go to Tables > Customers.
- Select a Customer from the Customer Navigator.
- Click 'Edit.'
- In the General Section, verify the following:
- 'Quickbooks Customer Code.'
- This must match the 'Customer Name' field on the corresponding Customer in QB.
- Quickbooks Customer Code has a limit of 41 characters.
- This defaults to the value present in the 'Customer Name' field when the QuickBooks interface is selected but can be edited.
- If the QuickBooks Customer Code is edited, the Customer Name field should be edited to match to avoid issues when synchronizing AR Invoices in the future. In addition, if the QuickBooks Customer Code is edited AFTER Customers have been created and configured in QuickBooks, be aware that the interface will create a new Customer in QuickBooks to match the edited value JobBOSS2.
- Sales ID
- This matches the 'REP' field on the corresponding Customer in QuickBooks.
- If this was blank prior to selecting QuickBooks as the interface, a sales person will have to be assigned before the record can be saved.
- If a specific sales person is not assigned to the Customer, create a "HOUSE" (or something similar) Sales ID to assign.
- Phone Number
- Quickbooks will only allow 21 characters to sync. If your customer has a phone number longer than 21 characters, JobBOSS2 will only sync the first 21 characters and a validation box will appear.
- 'Quickbooks Customer Code.'
- Repeat for as many Customers as necessary.
Vendors*
- Go to Tables > Vendors.
- Select a Vendor from the Vendor Navigator.
- Click 'Edit.'
- Verify the following:
- Quickbooks Vendor Code
- This must match the 'Vendor Name' field on the corresponding Vendor in QB.
- Quickbooks Vendor Code has a limit of 41 characters.
- This defaults to the value present in the 'Vendor Name' field when the QuickBooks interface is selected but can be edited.
- If the QuickBooks Vendor Code is edited, the Vendor Name field should be edited to match to avoid issues when synchronizing AP Invoices in the future. In addition, if the QuickBooks Vendor Code is edited AFTER Vendors have been created and configured in QuickBooks, be aware that the interface will create a new Vendor in QuickBooks to match the edited value JobBOSS2.
- Quickbooks Vendor Code
- Repeat for as many Vendors as necessary.
***
Items marked with an asterisk (*) would be created automatically if a QuickBooks conversion was used to create the JobBOSS2 Company.
Address Formatting
All of your addresses must be 2 lines or less to properly format in Quickbooks. In addition, Quickbooks only accepts 41 characters per line.
In QuickBooks
Settings & Preferences
- Go to Edit > Preferences.
- Click the 'Company Preferences' tab.
- Select 'Sales Tax' from the list on the left.
- Verify the following:
- 'Do you charge sales tax?' must be set to 'Yes.'
- If this was previously set to 'No,' at least one Sales Tax Item will need to be created.
- This would typically be an "EXEMPT" item with a rate of 0.00%.
- If this was previously set to 'No,' at least one Sales Tax Item will need to be created.
- 'Do you charge sales tax?' must be set to 'Yes.'
Parts*
Parts are included in the Item List and can have a 'Type' of 'Inventory Part', 'Non-Inventory Part', or 'Service.'
- Go to Lists > Item List.
- Select a Part that is / will be included JobBOSS2.
- "Double click" the part to open it for editing and viewing.
- Verify the following:
- Item Name/Number
- This must match the 'Part Number' field JobBOSS2.
- This field has a limit of 31 characters in QB.
- COGS Account (Under 'PURCHASE INFORMATION')
- This value populates from the 'Purchasing GL Code' field located under the Purchasing Section of the Part JobBOSS2.
- If Purchasing GL Code is not present, the interface will assign the "generic" PartCOGSAcct it creates in QuickBooks instead.
- Income Account (Under 'SALES INFORMATION')
- This value populates from the 'Sales Account' field located on the Product Code associated with the Part JobBOSS2.
- If Product Code is not present, the interface will assign the "generic" PartIncomeAcct it creates in QuickBooks instead.
- Asset Account (Under 'INVENTORY INFORMATION')
- This value populates from the 'Inventory GL Code' field located under the General Section of the Part JobBOSS2.
- If Inventory GL Code is not present, the interface will assign the "generic" PartAssetAcct it creates in QuickBooks instead.
- Item Name/Number
- Repeat for as many Items as needed.
Once a Part has been added to QuickBooks, editing any of these values in QB (other than Item Name/Number) will have no effect during future sync processes.
Taxes*
Since Tax Codes are required on all invoices JobBOSS2, Sales Tax must be enabled in QuickBooks and Tax Codes must be assigned to invoices.
- Go to Lists > Item List.
- Select a Sales Tax Item from the list and "double click' it to open it for editing / viewing.
- Verify the following:
- Sales Tax Name
- This must match the 'Tax Code' field in the corresponding Tax Code JobBOSS2.
- Sales Tax Name has a limit of 31 characters.
- Tax Rate (%)
- Depending on how the Sales Tax Item was created, this value may have been populated from JobBOSS2 or entered manually and should be verified.
- Sales Tax Name
- Repeat for as many Sales Tax Items as necessary.
If a Sales Tax Item is added to QB as a result of the interface, the system will assign the default 'TaxVendor' as the 'Tax Agency' option in order to allow the item to be created and should be edited afterwards.
Terms*
Since Terms Codes are required on all invoices JobBOSS2, Terms must be set up and match in QB.
- Go to Lists > Customer & Vendor Profile Lists > Terms List.
- Select a Term from the list and "double click' it to open it for editing / viewing.
- Verify the following:
- Terms
- This must match the 'Terms Code' field in the corresponding Terms Code JobBOSS2.
- Terms has a limit of 31 characters.
- Remaining values
- Depending on how the Term was created, these values may have been populated from JobBOSS2 or entered manually and should be verified.
- Terms
- Repeat for as many Terms as necessary.
Sales Personnel*
Sales Reps are required on Customers in QB for syncing purposes.
- Go to Lists > Customer & Vendor Profile Lists > Sales Rep List.
- Select a Sales Rep from the list and "double click" on it to open it for editing / viewing.
- Verify the following:
- Sales Rep Initials
- This value must match the 'Sales ID' of the corresponding Salesmen (Code) JobBOSS2.
- Sales Rep Initials
- Repeat for as many Sales Reps as necessary.
Additional Considerations
- If the JobBOSS2 Company was created by converting an existing QB Company and there was no "HOUSE" (or similar) sales person set up, both a 'HOUSE' Sales Rep AND Employee will need to be created in QB.
- This would be required since Customer Codes JobBOSS2 require a Sales ID to be associated and the use of a 'HOUSE' (or similar) account is the way to deal with zero percent commissions.
- The interface will do this automatically if the HOUSE account is created JobBOSS2 but not in QB. (See next item.)
- If a new Salesmen Code (Sales ID) is created JobBOSS2 that does not yet have a corresponding Sales Rep in QB, the interface will create both the Sales Rep and the related Employee to accommodate it.
- If the Sales Rep was created as a result of adding a 'HOUSE' account, leave both the Employee and Sales Rep as is.
- If the Sales Rep actually represents an Employee that already exists in QB,
- Edit the Sales Rep and select the correct Employee in the 'Sales Rep Name' field.
- Edit the 'Sales Rep Initials' to match the 'Sales ID' JobBOSS2.
- The "duplicate" Employee created by the interface can be deleted.
Customers*
- Go to Customers > Customer Center.
- Select a Customer from the list provided on the Customers & Jobs tab.
- Open the Customer for editing.
- This can be done by "double clicking" the Customer or clicking the "edit" icon
 located to the right of the 'Customer Information' header.
 - The 'Address Info' tab displays by default.
- This can be done by "double clicking" the Customer or clicking the "edit" icon
- Verify the following:
- Customer Name
- This must match the 'QuickBooks Customer Code' field for the corresponding Customer Code JobBOSS2.
- Customer Name has a limit of 41 characters.
- Customer Name
- Click the 'Additional Info' tab.
- Verify / select an Employee as the 'REP' associated with the Customer.
- If a specific sales person is not assigned to the Customer, an Employee record will need to be created in QuickBooks to match the "HOUSE" (or similar) Sales ID used JobBOSS2.
- Repeat for any Customer that will have information synchronized from JobBOSS2.
Vendors*
- Go to Vendors > Vendor Center.
- Select a Vendor from the list provided on the Vendors tab.
- Open the Vendor for editing.
- This can be done by "double clicking" the Customer or clicking the "edit" icon
 located to the right of the 'Vendor Information' header.
 - The 'Address Info' tab displays by default.
- This can be done by "double clicking" the Customer or clicking the "edit" icon
- Verify the following:
- Vendor Name
- This must match the 'QuickBooks Vendor Code' field for the corresponding Vendor Code JobBOSS2.
- Vendor Name has a limit of 41 characters.
- Vendor Name
- Click the 'Payment Settings' tab.
- Verify / select a Payment Terms option.
- Click 'OK' to close the Vendor and save any changes made (if prompted.)
- Repeat for any Vendor that will have information synchronized from JobBOSS2.
***
Items marked with an asterisk (*) will be created by the interface the first time it is present on a source record JobBOSS2 (assuming it is added JobBOSS2 but not in QuickBooks) or can be created by using the 'Tables Only' option in the QB Sync Interface.
Required For Payroll Interface
In addition to the settings "Required For All Items", these settings and preferences need to be confirmed if the QB Sync Interface will be used to create payroll records in QuickBooks using information pulled from JobBOSS2. If JobBOSS2 Accounting is being used (as opposed to QuickBooks,) these settings are also necessary to allow payroll information to be imported back in to JobBOSS2 for the purpose of creating journal entries.
In JobBOSS2
Settings and Preferences
- Go to System > Company Maintenance.
- Click 'Edit.'
- Make sure the company that will be synchronized with QuickBooks is the one that is currently open and being edited.
- Verify the following:
- Under 'Payroll Rate Descriptions'
- The values entered here must match the Payroll Items defined in QuickBooks.
- Under 'Payroll Rate Descriptions'
A Payroll Rate for overtime does not need to exist JobBOSS2; having the 'Overtime' check box selected on the Attendance Ticket is all that is needed.
Employees*
Employees must be present in QuickBooks and JobBOSS2 in order to allocate time correctly.
- Go to Tables > Employees.
- Select an Employee that will have attendance information synchronized with QB.
- Click 'Edit.'
- In the 'General' section, verify the following:
- 'Name' must match the combination of the 'First', 'M.I.', and 'Last' (name) fields of the corresponding Employee in QB.
- The 'Name' field has a limit of 30 characters.
This is the only information that must match on Employee records in order for the QB Sync to work; however, Payroll amounts (at a minimum) need to be populated to allow for accurate job costing JobBOSS2.
***
Items marked with an asterisk (*) would be created automatically if a QuickBooks conversion was used to create the JobBOSS2 Company.
In QuickBooks
Settings and Preferences
- Go to Edit > Preferences.
- Click the 'Company Preferences' tab.
- Select 'Payroll & Employees' from the list on the left.
- Verify the following:
- Under 'QUICKBOOKS DESKTOP PAYROLL FEATURES'
- 'Full Payroll' must be selected.
- Under 'DISPLAY EMPLOYEE LIST BY'
- 'First Name' must be selected.
- Under 'QUICKBOOKS DESKTOP PAYROLL FEATURES'
- Click 'Employee Defaults.'
- Verify the following:
- 'Use time data to create paychecks' must be selected.
- This setting will affect new Employee's added to QB.
- 'Use time data to create paychecks' must be selected.
- Click 'OK' to exit Employee Defaults.
- Select 'Time & Expenses' from the list on the left.
- Verify the following:
- Under 'TIME TRACKING'
- 'Do you track time?' must be set to 'Yes.'
- Under 'TIME TRACKING'
Payroll Items (Relate to Payroll Descriptions JobBOSS2)
There must be a Payroll Item for each Payroll Rate used on Attendance Tickets sent from JobBOSS2 in order for the payroll portion of the interface to work.
EXCEPTION: There MUST be a Payroll Item named 'Overtime Pay' in QB to allow for the synchronizing of overtime hours from JobBOSS2 even though there does not need to be a corresponding Payroll Rate Description JobBOSS2 for overtime.
- Go to Lists > Payroll Item List.
- Verify that there are Payroll Items that match the Payroll Descriptions JobBOSS2. If not, edit existing ones or add new ones as appropriate.
- Whether editing or adding, QuickBooks provides a series of on screen instructions that will walk the user through the process.
- QB recommends using the 'EZ Setup' option if adding a new Payroll Item.
- When prompted, verify the 'Name' of the Payroll Item matches the 'Payroll Rate Descriptions' defined JobBOSS2 Company Maintenance.
- Provide the remaining details as needed (if adding a new Item) and close the "Interview" window.
Payroll Items can (and should) be assigned to Employees, however this is not required in order for the interface to work.
Employees*
Employees must be present in QuickBooks and JobBOSS2 in order to allocate time correctly.
- Go to Employees > Employee Center.
- Select an Employee and "double click" on it to open it for editing / viewing.
- On the 'Personal' tab, verify the following:
- The combination of the 'First', 'M.I.', and 'Last' (name) fields must match the 'Name' field of the corresponding Employee JobBOSS2.
- The 'First' field has a limit of 25 characters.
- The 'M.I.' field has a limit of 5 characters.
- The 'Last' field has a limit of 25 characters.
- HOWEVER - The total length of the name cannot exceed 38 characters.
- Click the 'Payroll Info' tab.
- Under 'EARNINGS', verify the following:
- Each Payroll Item used to sync information from JobBOSS2 should be listed in the grid along with the appropriate 'RATE' (dollar amount paid.)
- A Payroll Item named 'Overtime Pay' must be used to properly sync overtime pay from JobBOSS2.
- Though Payroll Items do not need to be assigned to Employees in order for the QB Sync to work, payroll values in QuickBooks will not be correct without this information.
Refer to QuickBooks documentation for information regarding how to configure the remaining values for payroll purposes.
***
Items marked with an asterisk (*) will be created by the interface the first time it is present on a source record JobBOSS2 (assuming it is added JobBOSS2 but not in QuickBooks) or can be created by using the 'Tables Only' option in the QB Sync Interface.