Payroll Interface; QB Connector; QB Sync; Synchronize;
Use the QuickBooks® (QB) Sync Interface
This topic provides information on how to use the QB Sync Interface for the following purposes:
- Creating AR and AP Invoices in QuickBooks
- Creating time records in QuickBooks for payroll purposes
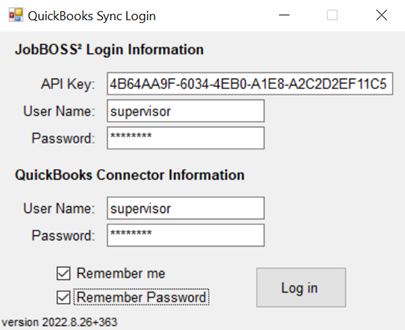
Before it can be used, the interface and the related QB Connector application must be installed and authorized for use with the desired QuickBooks Company. In addition, the QB Connector must remain open and running as a service on the computer used to sync information between JobBOSS2 and QuickBooks.
The interface CANNOT be used via a VPN or Terminal Services.
For more information see Installing and Configuring the QB Desktop Sync Interface.
Verify Interface Settings
- Open the QB Sync Interface.
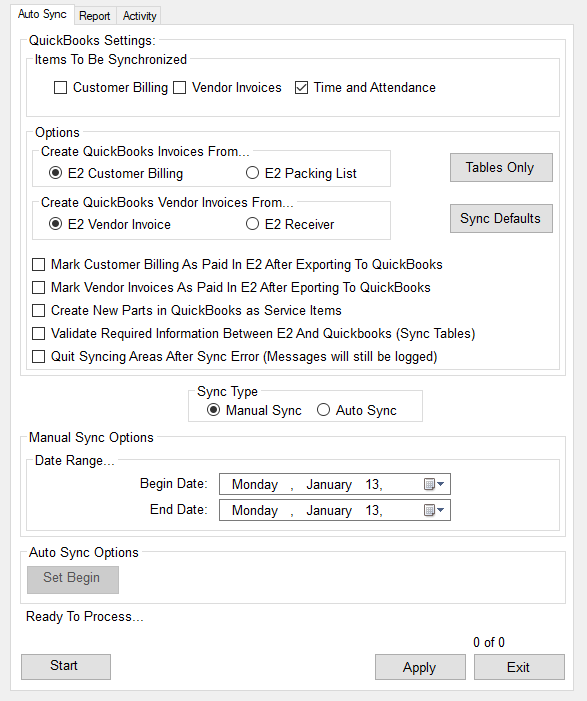
- Select what items to sync with QuickBooks.
- Under 'QuickBooks Settings'
- 'Items To Be Synchronized'
- 'Customer Billing' - When selected, AR invoices that fall within the selected date range and are not marked as exported will be synchronized with QuickBooks when the interface is run.
- 'Vendor Invoices' - When selected, AP invoices that fall within the selected date range and are not marked as exported will be synchronized with QuickBooks when the interface is run.
- It is possible to sync only one of these two items by leaving the check box blank, but this would typically not happen.
- 'Time and Attendance' - When selected, Time and Attendance Tickets that fall within the selected date range and are not marked as exported will be synchronized with QuickBooks when the interface is run.
- Time Tickets are NOT exported to QuickBooks.
- 'Items To Be Synchronized'
- Under 'QuickBooks Settings'
- Select the source of information to sync with QuickBooks.
- Under 'Options' > 'Create QuickBooks Invoices From' (only one option can be selected)
- 'JobBOSS2 Customer Billing' - When selected, the interface will pull information from AR (Customer) Invoices created in JobBOSS2 to populate the Customer Invoices it will create in QuickBooks.
- 'JobBOSS2 Packing List' - When selected, the interface will pull information from Packing Lists created in JobBOSS2 to populate the Customer Invoices it will create in QuickBooks.
- Under 'Options' > 'Create QuickBooks Vendor Invoices From' (only one option can be selected)
- 'JobBOSS2 Vendor Invoice' - When selected, the interface will pull information from AP (Vendor) Invoices created in JobBOSS2 to populate the Vendor Invoices it will create in QuickBooks.
- 'JobBOSS2 Receiver' - When selected, the interface will pull information from Receivers created in JobBOSS2 to populate the Vendor Invoices it will create in QuickBooks.
- The Sync Defaults button
- The first time a user goes to sync, the Sync Default button needs to be clicked so the default accounts are created.
It is recommended to use JobBOSS2 Customer and JobBOSS2 Vendor Invoices as the source of information in order to maximize the amount of information available in JobBOSS2 for reporting purposes.
- Under 'Options' > 'Create QuickBooks Invoices From' (only one option can be selected)
- Select the "behavioral" settings for the interface. (These settings determine what actions the interface takes beyond the creation of the invoices in QB.)
- Under 'Options' (multiple options can be selected)
- 'Update QuickBooks Online After Each Edit' - When selected, this option will automatically check the Update QuickBooks Online After Each Edit default setting on existing records that interface with your QB Online company.
- 'Mark Customer Billing As Paid In JobBOSS2 After Exporting To QuickBooks' - When selected, the interface will automatically mark exported AR Invoices as 'Paid' in JobBOSS2.
- 'Mark Vendor Invoices As Paid in JobBOSS2 After Exporting To QuickBooks' - When selected, the interface will automatically mark exported AP Invoices as 'Paid' in JobBOSS2.
- If either of these options is left blank, the respective list of unpaid invoices will continuously grow since they will never be paid within JobBOSS2.
- 'Create New Parts in QuickBooks as Service Items' - When selected, NEW parts created in JobBOSS2 will be added to QuickBooks as Service Items.
- If left blank, new parts will be added as Inventory Items in QuickBooks.
- Regardless the choice made, new parts will be added to QB the first time the interface is used after the parts are entered in JobBOSS2.
- 'Validate Required Information Between JobBOSS2 And QuickBooks (Sync Tables)' - When selected, the interface will review all values "shared" between the two programs and will add any new information entered in JobBOSS2 to QuickBooks regardless of whether the new value is on an item being synchronized (such as an AR Invoice) or not.
- If left blank, only new values that are present on items being synchronized will be added to QuickBooks.
- 'Quit Syncing Areas After Sync Error Message (Message will still be logged)' - When selected, the interface will stop synchronizing information from a source (such as AR Invoices) as soon as an error is encountered in that area. Any un-synchronized items can be synced later, once the issue has been fixed.
- When left blank, the interface will continue to sync remaining items to QuickBooks, leaving only the item(s) with errors un-synchronized.
- Under 'Options' (multiple options can be selected)
- Select when / how frequently information will be sent to QuickBooks.
- Under 'Sync Type' (only one option can be selected)
- 'Manual Sync' - When selected, the interface will only send information to QuickBooks when the user clicks 'Start' based on the 'Manual Sync Options' selected.
- 'Manual Sync Options' (Available only if 'Manual Sync' is selected)
- 'Date Range' - The Begin and End Dates selected determine the time frame the interface will look in for information to sync.
- Records that fall outside this range will not be synchronized with QB, even if they are new.
- 'Date Range' - The Begin and End Dates selected determine the time frame the interface will look in for information to sync.
- 'Manual Sync Options' (Available only if 'Manual Sync' is selected)
- 'Auto Sync' - When selected, the interface will automatically send information to QuickBooks based on the 'Auto Sync Options' selected.
- 'Auto Sync Options' (Available only if 'Auto Sync' is selected)
- 'Sync Interval' (in seconds) - This value determines how frequently (in terms of seconds) the interface will look for new records to sync with QuickBooks.
- It is recommended that the option to 'Validate Required Information' not be selected if Auto Sync is used due to the fact the interface reviews ALL possible tables, including parts, every time a sync is performed.
- 'Set Begin' - Click this button and select the date the interface should begin automatically synchronizing with QuickBooks.
- Records with a date prior to the one selected will automatically be marked as exported to prevent duplicating information.
- This does not apply to tables and base tables, only records such as Invoices and Attendance Tickets.
- 'Sync Interval' (in seconds) - This value determines how frequently (in terms of seconds) the interface will look for new records to sync with QuickBooks.
- 'Auto Sync Options' (Available only if 'Auto Sync' is selected)
- 'Manual Sync' - When selected, the interface will only send information to QuickBooks when the user clicks 'Start' based on the 'Manual Sync Options' selected.
- Under 'Sync Type' (only one option can be selected)
- Begin the Sync Process.
- Under 'Ready To Process...'
- 'Start' - Clicking this button produces different results based on the 'Sync Type' selected.
- When 'Manual Sync' is selected, clicking this button launches the sync process at that moment and only synchronizes un-exported records that fall within the stated date range.
- Once completed the interface will not sync additional records until the 'Start' button is clicked again.
- This option provides the user control over when information is synchronized with QuickBooks.
- Records will be synchronized even if the QB Company is not open at the time.
- When 'Auto Sync' is selected, clicking the 'Start' button launches the sync process which remains open and continuously synchronizes new records with QuickBooks based on the 'Sync Interval' provided.
- The interface will continue to monitor for and sync new records until the 'Stop' button is clicked.
- Records will be synchronized even if the QB Company is not open at the time.
- When 'Manual Sync' is selected, clicking this button launches the sync process at that moment and only synchronizes un-exported records that fall within the stated date range.
- 'Start' - Clicking this button produces different results based on the 'Sync Type' selected.
- Under 'Ready To Process...'
- Review the Sync Report. (Manual Sync only)
- Once completed, the interface will display a report (on screen) with the results of the sync.
- The report will indicate what records were created or list any errors that may have been encountered.
- The information displayed is controlled by selections made on the 'Report' tab of the interface.
- When the 'Auto Sync' method is used, the interface does NOT display a report after every "X" second interval; however information can be found in the Audit Trail in JobBOSS2.