Tables
Vendors
System Location: Settings > Tables > Vendors
Vendor Codes provide the means to store contact, purchasing, and credit information for businesses that parts and / or services are purchased from. Particularly they are used to store the following:
- Business level contact information such as addresses, phone numbers, and website (URL)
- Contact information for specific people within the business
- Purchasing details related to the vendor's availability and additional charges
- Credit related details such as the terms provided for invoicing
Information from Vendor Codes is used on purchasing related transactions such as Vendor RFQs, Purchase Orders, Receivers, AP Invoices, and Cash Disbursements.
If you are setting up a 1099 Vendor, make sure to provide the necessary information in the Credit Section of the Vendor Code.
Related Tables
The following Tables and / or Base Tables are used on Vendor Codes (an asterisk [*] indicates it is a required field on this Table):
- Vendor Type
- *Currency Codes
- Shipping Codes
- Employee Codes
- GL Codes
- Tax Codes
- Terms Codes
Associated Reports
Vendor Codes contain the following Sections (clicking a Section Title will take you to that portion of the help topic):
| General | Contacts | Addresses | Comments | Purchasing | Credit | User-Defined | Vendor History |
 Record Header - Vendor Code
The Record Header located at the top of the page indicates which specific record has been selected and for what purpose (new, edit, quick view)
For more information see User Interface.

Action Buttons
Documents (button)
This feature allows for external documents to be attached to the selected Vendor Code for reference and review.
Documents Button Details
This feature allows for external documents to be attached to the selected record for reference and review.
- Any kind of file can be uploaded to the Repository Manager, however only PDFs can be selected to print with records in JobBOSS2
- User Groups are used to administer access and security rights within the Repository Manager
Only PDF documents can be selected to print with E2 records such as Job Travelers and Purchase Orders.
For more information see Repository Manager, Documents, and Images.
Audit Trail (button)
This option displays information regarding activity that has taken place on the selected Vendor Code.
Audit Trail Button Details
This option displays information regarding activity that has taken place on the selected record.
- Provides the following information:
- User: Indicates who performed the Action
- Action: Indicates what the User did
- NEW: Used when the record is created
- EDIT: Used when the record is closed by clicking OK - even if nothing was changed on the record
- VIEW: Used when the record is closed by clicking Cancel
- Date: Indicates when the Action took place
- Information can only be viewed, not edited or deleted
- An Audit Trail Summary can be printed by going to Reports > G/L > Audit Trail Summary within the system.
For more information see Audit Trail.
Save (button)
Save Button Details
This button is used to close the record and save any changes that have been made while it was open. In addition, the dropdown button allows you to Save and:
- Close - close the open record.
- New - open a new blank record.
- Print - print any of the reports related to the open record.
Cancel (button)
Cancel Button Details
This button is used to close the record without saving any changes that may have been made while it was open. If this button is used after a change has been made to the record, the system prompts to verify whether the record should be closed without saving the changes.
Answering "Yes" to the prompt closes the record without saving the changes.
Answering "No" to the prompt leaves the record open.
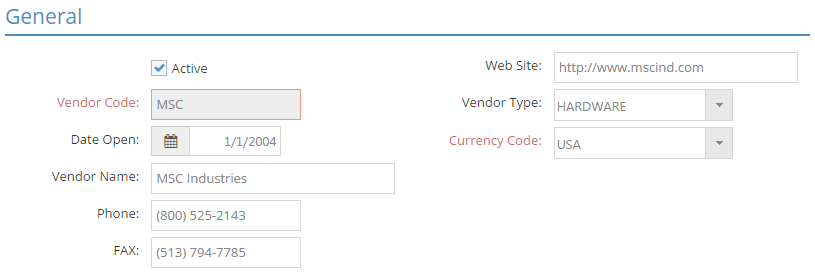
General Section
The General Section contains identifying values for the vendor in addition to information on how they are grouped with other vendors.
An asterisk [*] indicates a required field.
Active
Checking this box indicates the vendor should be considered as an active account.
- Searches for "ALL" records include only active vendors by default
- Can be used as a search filter
- Remove check for vendors that you no longer do business with
- Remain in system as table records, but do not appear in search results unless specifically filtered to do so
- Will no longer display as an option on purchasing related records such as Purchase Orders
*Vendor Code
This value is the "short name" assigned to the vendor.
- Can be up to 12 alpha-numeric characters
- Must be unique for each vendor
Vendor Name
This is the "long name" for the vendor that appears on printed forms such as Purchase Orders.
- Can be up to 50 alpha-numeric characters
- Does not need to be unique
Date Open
This is the date your company started doing business with the vendor.
- Defaults to the date the Vendor Code was entered into JobBOSS2
- Can be changed
Phone Number
The main phone number used to contact the vendor.
- Automatically populates as the phone number for contacts associated with the Vendor Code (see Contacts Section below)
- Can be changed for each contact
- If this number is changed, JobBOSS2 provides the option to update all contacts and shipping addresses with the new value
FAX Number
The main FAX number for the vendor.
- Automatically populates as the FAX Number for contacts associated with the Vendor Code (see Contacts Section below)
- Can be changed for each contact
- If this number is changed, JobBOSS2 provides the option to update all contacts and shipping addresses with the new value
Web Site
This is the URL associated with the vendor's web site.
- Reference purposes only
Vendor Type
This value is used to group vendors together that provide similar material or services.
- Provides the GL Expense Account located in the Credit Section if one is present on the Vendor Type selected
*Currency Code
This determines the currency used on financial related transactions for the vendor.
- Selected from Currency Code Base Table entries
- If set to a foreign currency, this will provide a default value for sell and buy rates on financial transactions created for the vendor
Currency Code should represent the currency used in financial transactions with the vendor, which may not necessarily be the currency of the vendor's country of origin. For example, many companies outside the United States have accounts in U.S. dollars for the purpose of doing business in the states.
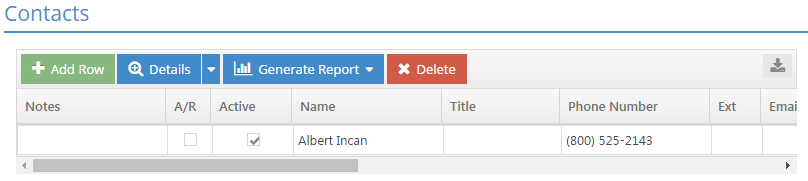
Contacts Section
Use the Contacts Grid to keep a list of specific individuals within the vendor's company that are dealt with on a regular basis.
Action Buttons
An asterisk [*] indicates a required field.
Add Row (button)
This is used to add a new entry to the grid.
Details (dropdown menu)
This is used to open details related to the entries in the grid. Detail options are for the Contact and for Comments.
To enter a new contact in Details as opposed to doing so directly in the grid, click Add Row, enter the contact's Name, and then use the Contact Details option.
- Information displayed is for the contact selected in the grid when the Details option is used
- Information displays for first entry in the grid if one is not otherwise selected
- Contact Details provides information on the values listed in the Contacts Grid for the selected contact
- Values that are present in both the grid and the details can be entered or edited in either location
- This is also where WebView settings can be changed for a specific person if they should be different than the default values listed in the Table Record Toolbar
- Comment Details displays a list of all Comments that have been entered for the selected contact.
- Comments need to be entered using the Comments Details option to display in the list
Generate Report (dropdown menu)
This option is used to print, export, or email a report containing all the Details for the line items in the grid.
Delete (button)
This button is used to delete the selected entry from the grid.
Deleting a contact that is referenced on any purchasing related transactions will cause the Contact field to be "blanked out" on all those transactions.
- The system provides a prompt warning this will happen and provides the opportunity to continue with the delete or to cancel it and leave the contact information in place
- Comments associated with a deleted contact would remain in the system and will still appear on the Comments Detail report
- Consider marking the contact as Inactive as opposed to deleting their information altogether in order to maintain a record
Contacts Grid
Enter as many contacts as necessary in the Contacts Grid.
Notes
This field indicates whether their are Comments associated with a particular contact or not.
- The presence of the Notes Icon
 indicates that there is at least one comment present for the contact.
 - Comments are entered by using the Comments Details option (located in the Details drop down)
A/R
Marking an entry as an A/R (Accounts Receivable) Contact will cause that person's name and contact information to appear on the A/P Aging Summary for invoices to the selected vendor.
Active (check box)
This indicates whether the contact is someone that should be considered a current (i.e. active) contact for the vendor or not.
*Name
Enter the contact's name here.
- The Name field is required when entering a new contact
- Names do not need to be entered in a particular format, but it is strongly suggested that they be entered in a consistent manner
Title
Enter the contact's title here.
Phone Number / Ext / Fax Number
These represent numbers used to reach the designated contact.
- Populate by default with the values provided for the vendor in the General Section but can be edited
Cell Phone Number
Enter the contact's cell number here.
Email Address
Enter the contact's email address here for use throughout JobBOSS2.
- Contacts that have an email address provided will be available to select from Contacts when emailing forms and reports from within JobBOSS2
Mobile Email Address
This field can be used to enter a second email address for the contact.
- Will not display when using Contacts to select recipients for forms and reports emailed from within JobBOSS2
Conferencing Server / Conferencing Address
These fields may be required for sending emails from within JobBOSS2 depending on the service used.
Consult your IT personnel or contact the Hardware Specialists at ECI Software Solutions, Inc. if you have questions regarding the use of these settings.
- These settings work in conjunction with the Email Settings present in User Maintenance
- Email Settings in User Maintenance must be configured properly in order to be able to send emails from within JobBOSS2
Comments
Use this field to enter comments for the selected contact that do not need to appear in the Comments Details.
- Same as entering comments in Contact Details - Comments field
- Not the same as entering a comment within the Comments Details
- Information will not be included in the Comments Details Report
Opted Out
Use this field to track which of your vendor contacts have opted out of communication with you.
- Selecting this button does NOT prevent you from emailing the vendor contact.
- Result can be filtered based on the Opted Out field when generating or exporting the Vendor Contact List report.
Addresses Section
Each Vendor Code can have a Shipping Address, Purchasing Address, and Remittance Address associated with it.
Shipping Address: Location manufactured parts are sent to for servicing
Purchasing Address: Location material is purchased from
Remittance Address: Location cash disbursements are sent to
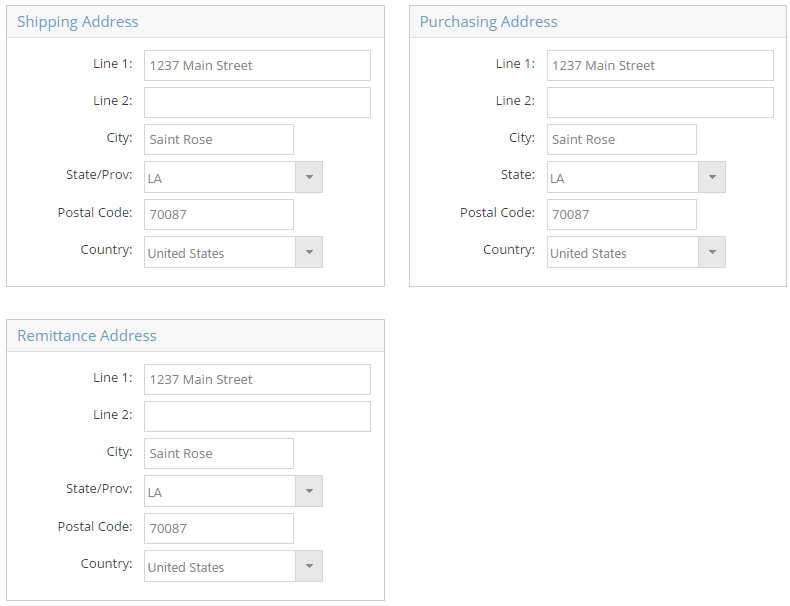
Shipping Address
Line 1 / Line 2
Use these fields to indicate the street location and any additional information such as suite number as needed.
- Can be up to 30 alpha-numeric characters in length
ZIP / Postal Code
Enter a valid postal code for the United States or Canada in this field and then click the Tab key to have the system automatically populate City, State/Province, and Country.
- Are only auto populated the first time a postal code is entered
- Can be manually populated as needed
The Purchasing and Remittance Address areas will automatically populate with the information provided in the Shipping Address area by default, but can be edited as needed. Note that entering a Postal Code for an address that is already present does not automatically populate the remaining fields; they will all need to be edited accordingly.
Comments Section
The Comments Section provides the opportunity to store comments that are unique to each vendor that can be used over and over. Information entered under this header will remain in use until they are removed or edited.

Comments To Vendor
Information entered here will display on documents sent to the vendor such as Purchase Orders.
- If a large amount of information is entered , consider the space that will be taken up on forms
- Comments will be visible to the public
Do not confuse this with Comments About Vendor!
Comments About Vendor
Information entered here is intended for internal use and will not appear on any vendor documents.
- Comments can be seen here and in QuickView when viewing vendor details
Purchasing Section
Information under the Purchasing Section is used to track availability and delivery details for the vendor along with indicating whether they provide services and if they charge additional fees.
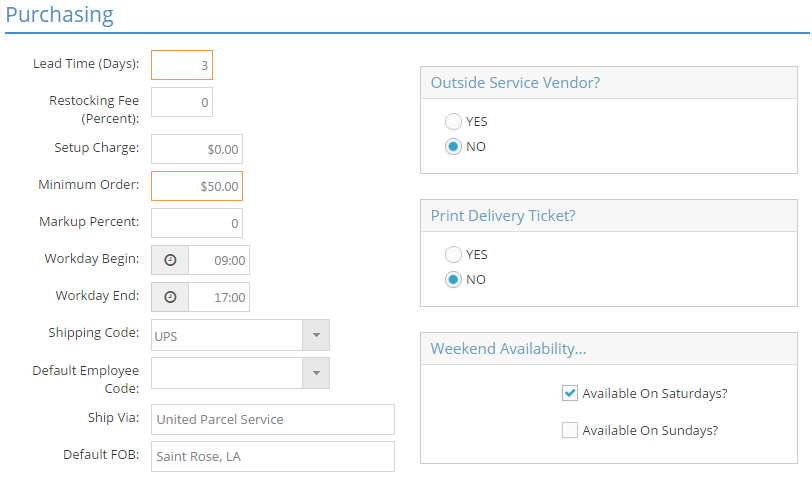
Lead Time (Days)
This represents the number of days it is expected to take to receive items from the vendor.
- Used in scheduling to help determine when work can begin based on the availability of material
Restocking Fee (Percent)
This value is used to determine the amount of any charges that will be assessed by the vendor for material that is returned that is still usable and will be placed back into inventory.
When entering percentages in JobBOSS2, enter the value as a "standard" number instead of the decimal equivalent. For example, if the value should be five percent, simply enter "5" as opposed to ".05"; the system will automatically convert the value accordingly.
Setup Charge
This dollar amount is used as the default setup charge on vendor (routing) steps on estimates if the vendor is an Outside Service Vendor and is selected to perform the work on the estimate.
- Can be edited on the routing step
Minimum Order
Enter a dollar value that should be used as the minimum amount allowed when creating a purchase order for the selected vendor.
- System will prompt if purchase order total is less than the amount listed here
- Can choose to ignore the minimum purchase order amount
Markup Percent
This value is used as the default markup assigned to vendor (routing) steps on estimates if the vendor is an Outside Service Vendor and is selected to perform the work on the estimate.
When entering percentages in JobBOSS2, enter the value as a "standard" number instead of the decimal equivalent. For example, if the value should be five percent, simply enter "5" as opposed to ".05"; the system will automatically convert the value accordingly.
- Can be edited on the routing step
- Used to help determine suggested sales price when using the Billing Rate Method
Workday Begin / End
These times indicate when the vendor opens and closes for business.
Shipping Code
This represents the method the vendor is expected to use when shipping items to your business.
- Populates purchase orders by default but can be edited
Default Employee Code
If selected, this employee will populate the Purchased By field on purchase orders created for the vendor.
- Useful if there is a specific person that creates purchase orders
Ship Via
Used for reference to identify the expected means of delivery of items.
- Does not populate from Shipping Code selected
Default FOB
Indicates the default Freight On Board location for items being shipped to your business.
- Populates on purchase orders but can be edited
Outside Service Vendor?
This radio button identifies whether the vendors provides an outside service or not.
- Yes = Vendor provides outside services
- No = Vendor does not provide outside services
Vendors marked as service providers use values assigned to the Markup Percent and Setup Charge fields and can have delivery tickets created (see below).
Print Delivery Ticket?
This radio button determines whether a delivery ticket will be printed to accompany items sent to an outside vendor.
- Yes = Delivery ticket will automatically print with purchase orders marked as an outside service created for vendor
- No = Delivery tickets will not be printed
Weekend Availability
Use these checkboxes to indicate whether the vendor is open for business on Saturday and / or Sunday.
- This can impact scheduling since it is considered when calculating the delivery date of items based on the Lead Time provided
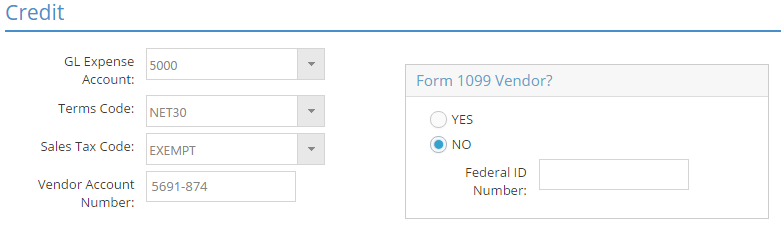
Credit Section
Information under the Credit Section will be used when creating purchasing related transactions for the vendor from purchase orders to invoices.
An asterisk [*] indicates a required field.
GL Expense Account
This GL Code will automatically populate as the expense account on purchase orders created for this vendor.
- Populates with value from Vendor Type selected in the General Section but can be edited
Terms Code (drop down)
This code determines what discount, if any, the selected vendor offers if their invoices are paid within the defined terms.
- Applied by default to all purchasing related transactions for the vendor but can be changed
- Required on AP invoices
Sales Tax Code (drop down)
Represents the tax percent to apply against purchasing related transactions for the selected vendor.
- Applied by default to all purchasing related transactions for the vendor but can be changed
- Required on AP invoices
It is recommended to create an EXEMPT (or similarly named) Tax Code for use with Vendors to whom you do not have to pay sales tax.
Vendor Account Number
This value is listed for reference purposes.
Form 1099 Vendor?
This radio button determines whether the system should include payments made to the vendor on the 1099 form that can be generated under Miscellaneous Utilities.
- Yes = Include payments made to the vendor in the 1099 report
- Payments will only be included in 1099 totals that were created from an AP invoice and were created AFTER you selected the Yes radio button.
- No = Payments made to the vendor will not be included in the 1099 report
User-Defined Section
User-Defined fields can be configured to track information that is unique to your business.
For more information see User Defined Fields.
The User-Defined Section and related information will only be available if the User has been granted adequate permissions within User Maintenance.
Vendor History
This information is system generated and provides several bits of useful information regarding purchasing related transactions with the selected vendor.
