Time Records; Real Time Data Collection; Touchscreen
Start and Stop Jobs Using Data Collection (Create Time Tickets)
System Location: Data Collection Application > Clock Emulation
This topic provides details on how to create a time ticket by clocking on and off of one or more jobs using the Data Collection Application.
Though the process will be very similar regardless the type of data collection device used, this topic assumes the use of a PC that is configured as a 'Touchscreen Collection Terminal' (referred to as PC Data Collection or as a Touchscreen Terminal) and that the Data Collection Application is already running on the PC.
For more information see Collection Terminals.
For more information see Data Collection.

 Additional Assumptions
The process provided below assumes the collection terminal being used is configured as follows:
- The option labeled 'Terminal work center / operation defaults override bar codes on traveler' left blank.
- A default 'Operation Code' has been selected.
- A default 'Payroll Rate' has been selected (for job costing purposes.)
- Only employees marked 'Data Collection User' will be attempting to access the module.
On the Clock Emulation Screen:
- Click 'Start Job.'
- Provide the Employee Number when prompted.
- Scan a bar coded Employee Badge
- Use the 'Search' button to locate the appropriate Employee (Number)
- Enter the value using the Data Collection Keypad (Keypad) or the keyboard attached to the PC running the application (keyboard.)
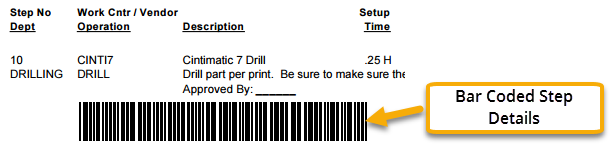
- When prompted for Job Number, scan the bar code displayed with the step about to be worked on (see image above.)
- Scanning the appropriate step bar code provides the following information:
- Job Number
- Step Number
- Work Center
- Operation Code (if provided)
- Bar coded Job Travelers do not display bar codes for Outside Service vendor steps. If you would like to have Outside Service vendor steps displayed as bar codes, you can modify the report in the Report Designer.
- Repeat steps 1-3 to clock on to additional jobs as needed IF ALLOWED TO DO SO.
- An employee can log on to multiple jobs at one time only if the collection terminal has the option 'Allow operator to clock on to more than one job' selected.
Optional - Verify Login - PC Data Collection Only
- Click 'Current Logins' (located above the DC Prompt.)
- Select 'Job Details' or 'Job Summary' radio button for 'Display Mode' if one of them is not already selected.
- System displays a list of all employees that are currently clocked onto jobs along with the appropriate level of details based on the 'Display Mode' selected.
If the employee has not already clocked in for attendance purposes, starting a job will create both a time ticket and an attendance ticket.
For more information see Clock In and Out Using Data Collection.
Additional Assumptions
The process provided below assumes the collection terminal being used is configured as follows:
- A default 'Operation Code' has been selected.
- A default 'Payroll Rate' has been selected (for job costing purposes.)
- No other default values are provided for information required when starting a job.
- Click 'Start Job.'
- Provide the Employee Number when prompted.
- Scan a bar coded Employee Badge.
- Use the 'Search' button to locate the appropriate Employee (Number.)
- Enter the value using the Data Collection Keypad (Keypad) or the keyboard attached to the PC running the application (keyboard.)
- Provide the Job Number when prompted.
- Scan the bar code located at the TOP of the traveler (if available.)
- Use the 'Search' button to locate the appropriate Job (Number.)
- Use the Keypad / keyboard to enter the value.
- The employee can clock on to a closed job if the collection terminal has the option 'Allow operator to clock on to a closed job' selected.
- Provide the Step Number when prompted.
- Use the 'Search' button to locate the appropriate Step (Number.)
- Only steps associated with the selected job will display.
- Use the Keypad / keyboard to enter the value.
- Use this method if the step being clocked onto is an unrouted step.
- Use "0" (zero) for an unrouted step.
- Provide the Work Center Number when prompted.
- Use the 'Search' button to locate the appropriate Work Center (Number.)
- All work centers will be displayed to allow for changes in assumed work flows.
- Use the Keypad / keyboard to enter the value.
- San the appropriate value from a bar coded list of work centers (if available.)
If a default 'Operation' is not provided on the collection terminal, the system will prompt for that value as well.
- Repeat steps 1-5 to clock on to additional jobs as needed IF ALLOWED TO DO SO.
- An employee can log on to multiple jobs at one time only if the collection terminal has the option 'Allow operator to clock on to more than one job' selected.
Optional - Verify Login - PC Data Collection Only
- Click 'Current Logins' (located above the DC Prompt.)
- Select 'Job Details' or 'Job Summary' radio button for 'Display Mode' if one of them is not already selected.
- System displays a list of all employees that are currently clocked onto jobs along with the appropriate level of details based on the 'Display Mode' selected.
If the employee has not already clocked in for attendance purposes, starting a job will create both a time ticket and an attendance ticket.
For more information see Clock In and Out Using Data Collection.
Start the Break
- Click 'Break.'
- Provide the Employee Number when prompted.
- The system stops capturing time against all time records (including attendance tickets) currently open for the employee.
Stop the Break
- Click 'Break.'
- Provide the Employee Number when prompted.
- The system starts capturing time against all time records (including attendance tickets) currently open for the employee once again.
Auto Breaks
If the employee's record is configured to do so, the system will automatically clock the employee out and back in at the designated times without needing to click the 'Break' button.
If auto breaks are being used, the employee SHOULD NOT click the 'Break' button.
Additional Assumptions
The process provided below assumes the collection terminal being used is configured as follows:
- The option 'Prompt operator for reason codes on scrapped parts' is selected.
- There are no default values provided for information required when stopping a job.
On the Clock Emulation Screen:
- Click 'Stop Job.'
- Provide the Employee Number when prompted.
- (CONDITIONAL PROMPT) Provide the Job Number if the employee is clocked on to multiple jobs.
- Enter the amount of time spent setting up the work center when prompted ('Enter Setup Hours.')
- If NO TIME was spent setting up the work center, enter zero "0."
- If the ENTIRE TIME was spent setting up the work center, enter "999."
- In these instances, the system applies all time to setup and bypasses any additional prompts.
- If SOME (but not all) time was spent setting up the work center, enter it in terms of hours spent.
- Example: 15 minutes = 0.25; 30 minutes = 0.5, etc.)
- In instances where not all time was spent setting up the work center, the system automatically applies the remaining time as 'Cycle Time' and provides the remaining prompts as listed.
- Enter the number of pieces successfully completed when prompted ('Enter Quantity Good.')
- Entering a value less than the quantity available to work on does not imply the remaining pieces are "bad" - just not completed.
- Enter the number of pieces damaged during production to the point they cannot be used when prompted ('Enter Quantity Scrapped.')
- Entering a value here does indicate that there were "bad" or damaged parts.
- (CONDITIONAL PROMPT) Provide a Reason Code IF prompted. The system will only provide this prompt in the following scenario:
- At least 1 piece was turned in as "scrapped."
- The collection terminal is configured to prompt for a reason code.
- When prompted, reason codes can be provided in the following ways:
- Use the 'Search' button to locate the appropriate Reason (Code.)
- Use the Keypad / keyboard to enter the value.
- Scan the appropriate option from a bar coded Reason Code List.
Once closed, the completed time ticket can be viewed / edited in the Shop Floor Control Area of the Shop Application.
Clocking off of a job does not close the employee's attendance ticket, even if it is the only job they are logged on to.