Line Items Section
The Line Items Section is where Jobs are added to the Order and details about each Job can be found.
There is a limit of 500 manufactured jobs on the Order grid.
Action Buttons
Add Row (button)
This is used to add a new entry to the grid.
Search (button)
This option is used to search for parts that are defined in JobBOSS2 as Inventory Items to add to the grid.
- Each part added to the Order will receive its own Job Number
- A part can be selected multiple times
- Orders typically list manufactured parts but can also list purchased parts if they are re-sold as is
New Part (dropdown menu)
This option can be used to create a new part in JobBOSS2 that will automatically be added to the Order.
- Selecting Purchased Part opens the Add Inventory Item screen
- Selecting Manufactured Part opens the Add Estimate screen
- When the new part is saved it is automatically added to the Order as a line item
Details (dropdown menu)
This option can be used to see information about documents associated with parts or to view / edit manufacturing information for the selected line item.
If you want to discard the changes you've made in the details section, be sure to use the Cancel button to return to the main order screen.
Documents (Details)
Selecting Documents opens the Documents form where users are able to manage files that are attached to the selected job.
For more information see Repository Manager, Documents, and Images.
Line Items (Details)
Selecting Line Items opens the Order Line Item Detail form, which is where the manufacturing related details for the line item are located. For more information see Order Details - Line Items Detail Button.
Simply clicking the Details button itself opens the Line Item Details for the selected job by default.
Split Job (Utility)
This option can be used to split off a designated quantity of the selected job in order to create a new job altogether.
- This is typically used to speed up work on a portion of an existing job if customer requests an expedited delivery for a partial amount.
- The job being split may be a sub-assembly job, but cannot be a top level, or "parent", job.
- The new job is added to the order that is currently being edited.
For more information see Use the Split Job Utility.
Delete (button)
This button is used to delete the selected entry from the grid.
Quick View (dropdown menu)
This menu can be used to view information about the selected line item based on the Quick View option used.
- Part Number: This opens the Quick View window that contains details about the part that has been ordered.
- Job Number: This opens the Quick View window that contains details about the job where the parts are being made.
- Master Job Number: This opens the Quick View window that contains details about the top level, or master, job if the selected part is a subassembly item.
- This option will not display any results if the part is not a subassembly.
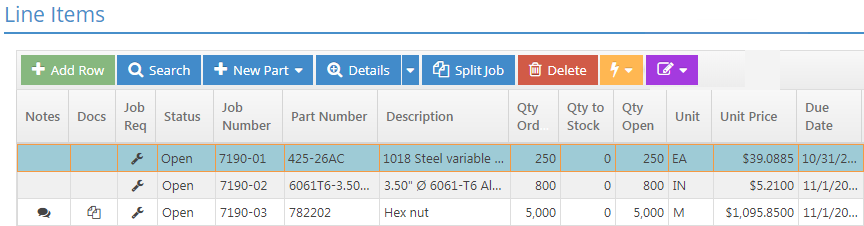
Line Items Grid
Notes
The presence of the "notes" icon ![]() indicates that there are job notes present in the line item details.
indicates that there are job notes present in the line item details.
Docs
The presence of the "documents" icon![]() indicates that there is at least one file attached to the part listed on the job.
indicates that there is at least one file attached to the part listed on the job.
- To access the file(s), select the line item and open the Document Details using the Details dropdown menu.
Job Req
The presence of the "notes" icon ![]() indicates that there are job requirements present in the line item details.
indicates that there are job requirements present in the line item details.
Part Number
This is the part being made on the job.
- Can be populated by selecting a quote item, an estimate, or entered as a freeform part.
- Can be up to 50 alpha-numeric characters
-
Once you start typing in the text box, a dropdown full of auto-suggested parts appears based on the characters you've typed. You may select from the list or continue typing your part.
The term "freeform part" refers to values entered as Part Numbers in various areas of JobBOSS2 without having a defined part table record associated with it. On a job, this means entering a value by typing it directly into the Part Number field and then providing the desired production related details since the system has no underlying record to pull from.
Description
This information is used to provide details about the part being made, such as dimensions, material used, etc.
- Prints along with Part Number on almost any report or form generated where Part Number is listed
- Can be edited
Status
Status indicates whether the job is currently open or not. Options include:
- Open: Indicates the job is open and able to be worked on.
- Closed: Indicates the job is no longer open.
- Typically indicates the job has been completed and shipped
- Jobs that have had all open releases canceled also show a status of closed
Qty Ordered
Represents the number of parts ordered by and expected to be shipped to the customer when finished.
- Display as Customer Releases in release details
Qty to Stock
Represents the number of parts expected to be placed into inventory when finished.
- Display as Stock Releases in release details
- Subassembly jobs will display as stock quantities since they are being made for the purpose of filling a material requirement.
Quantity values must be edited in line item release details once a job number has been assigned.
Qty Open
This value represents the number of parts that have not been shipped or placed into inventory.
- Includes both customer and stock releases
- System calculated; cannot be edited
Unit
Unit indicates how the Unit Price is applied to the job.
- Pulls from Inventory Defaults in Company Maintenance if a quote or estimate is not used
- If LOT is used, the value entered in the Price Break field is the amount that will be used for the TOTAL amount for the job regardless of the quantity ordered
- If C or M is used, the system behaves as follows:
- C: Divides listed Unit Price by 100
- M: Divides listed Unit Price by 1,000
- When C or M is used as the Pricing Unit, the quantity ordered must be set to at least 100 or 1,000 (respectively) in order for the calculations to work correctly as they pull forward from an estimate.
Unit Price
This is the dollar amount being charged for each unit being made.
- See information on Unit above for possible exceptions
Due Date
This is the date the parts are expected to be completed and delivered by.
- If multiple releases are present, this displays the delivery date of the first release.
- The due date displayed on the Order Navigator screen is the earliest release of all the jobs on the order.
- The system assumes all parts are made at the same time regardless the number of releases.
If all the parts ordered are not going to be made at the same time, consider creating multiple jobs with different due dates to better accommodate the actual production schedule.
Job Number
This is the unique identifier for the production run created for the purpose of making the needed number of parts.
- Typically automatically assigned by JobBOSS2, but can be manually provided
- Every job number must be unique
- Can contain alpha characters, but be aware this can cause issues if wall mounted clocks are used without scan guns
Unless there is a reason to do otherwise, it is highly recommended to use the "Job + Item Number" method for assigning Job Numbers.
Work Code
Work codes provide a means to group jobs by a common value associated with the customer.
- Populates from quote if one used
- Populates from customer selected if no quote used or if this value is not present
- For more information see Work Codes.
Product Code
Product codes provide a means to group jobs by a common value associated with the part.
- Populates from quote if one used
- Populates from part selected if no quote used or if this value is not present
- For more information see Product Codes.
Master Job Number
This field is populated on subassembly jobs to identify what other job the parts being made will be used / consumed on.
- This value is typically assigned by the system during job processing
- Can be manually assigned
Master Step Number
When populated, this field indicates that the subassembly job is not needed on the listed Master Job until the step designated here.
- Impacts scheduling assumptions
- Step number is assigned on BOM of master job
Priority
Priority is used to indicate the relative importance of the job.
- The higher the number, the more important it is seen to be
- Impacts scheduling assumptions and allocation assumptions when using Fill Job Requirements utility
- Defaults to priority assigned to customer, but can be edited
- Each job can be assigned its own priority for scheduling purposes within the Scheduling Application
- For more information see Scheduling JobBOSS2.
Comm Pct
This is the commission percent that will be used to determine the dollar amount of commission to provide to the sales person associated with the job.
Disc Pct
When greater than 0, the system will use this value to calculate the reduced sales prices that will display on order related documents and any customer invoices associated with the job.
- Discounted price does not show on the job in JobBOSS2, only on printed forms
- Original price does not display on printed forms, only on the job in JobBOSS2
When entering percentages in JobBOSS2, enter the value as a "standard" number instead of the decimal equivalent. For example, if the value should be five percent, simply enter "5" as opposed to ".05"; the system will automatically convert the value accordingly.
Revision
Revision can be used to identify different "generations" of a part.
- Not a required field
- Multiple estimates cannot share the same Part Number even if the Revision is different
Item Number
This is the numeric value assigned and used by the system to track each line item and its related details.
- Can be edited
- Can be up to 5 numeric characters in length
- Must be unique
| Back to Order Details - General Section | Return to Order Entry | Go to Order Details - Header |