Interfaces; Paychex;
Paychex Interface
This document explains the purpose and steps of this application in JobBOSS2. There is a breakdown of the concepts and functionality as well as specific instructions for using the application.
About the Paychex Interface
Paychex is a payroll interface that integrates with JobBOSS2. The following instructions help you set up the system in order to export the proper information for Paychex.
Turn on Paychex Interface
- Go to the red Settings tab, open the System dropdown menu, and select Company Maintenance.
- Select Edit on the Company Maintenance Navigator.
- Select Defaults.
- Go to the Interfaces section.
- Select Paychex Payroll.
- Click OK.
- Click Save to save your settings and exit the Company Maintenance edit screen.
Setup
The following details are critical in order for the information to be properly shared between the two systems.
Integration
In order for proper integration, there are a series of codes that must match between JobBOSS2 and Paychex. Please review the codes and the recommended character limits based on the what works for both systems:
- Employee - 4 numeric characters
- Paychex allows for 6 alphanumeric characters, but JobBOSS2 only allows for 4 numeric characters.
- Department - 6 alphanumeric characters
- JobBOSS2 allows for 12 alphanumeric characters, but Paychex only allows for 6 alphanumeric characters.
- Attendance - no code limitations
- Ensure that the attendance codes in JobBOSS2 match the codes used in Paychex.
Overtime
The overtime settings are important because JobBOSS2 calculates overtime to capture costs, while Paychex calculates overtime for payroll. Establish the proper overtime format in order to ensure the proper calculations take place.
- Overtime (Time and a Half)
- If you have an Overtime payroll rate and description, set the dollar amount to be the same dollar amount as your Regular payroll rate.
- JobBOSS2 will calculate the time and half overtime through the Overtime settings and Pay Rate Factor established in the Time and Attendance section of Company Maintenance. For more information see Company Maintenance.
- Paychex will receive the Overtime payroll rate and automatically calculate the time and a half for the employee.
- If you set the Overtime payroll rate as the time and a half dollar amount, both JobBOSS2 and Paychex will calculate that figure again, skewing your results. The Overtime rate is only necessary to identify to Paychex that your employee needs overtime calculated, so leave the Overtime rate as the same dollar amount as your Regular payroll rate.
- If you have an Overtime payroll rate and description, set the dollar amount to be the same dollar amount as your Regular payroll rate.
- Double-Time Rate
- Create a payroll rate and description for Double Time and set the dollar amount as double the amount of the Regular payroll rate.
- On the employee's Time and Attendance Ticket, ensure that there is a line item with the Double Time payroll rate for the double time hours and mark the Overtime column to N (no).
- If you leave the Overtime column checked to Y (yes), Paychex will apply a 1.5 rate to your Double Time rate. This is wrong since the Double Time rate already has a double time dollar amount. Be sure to change the Overtime column to N to ensure proper rates.
- In JobBOSS2, you must run the California OT utility to have double time rates factored into job costing. For more information see Using the California OT Utility.
Exporting from JobBOSS2
Once you've selected Paychex as your interface within Company Maintenance and established matching codes between JobBOSS2 and Paychex, you are ready to export your information from JobBOSS2. The following instructions will guide you through the export process.
- Go to the blue Data Entry tab, open the Shop Floor Control tab, and select Time and Attendance.
- Click Export.
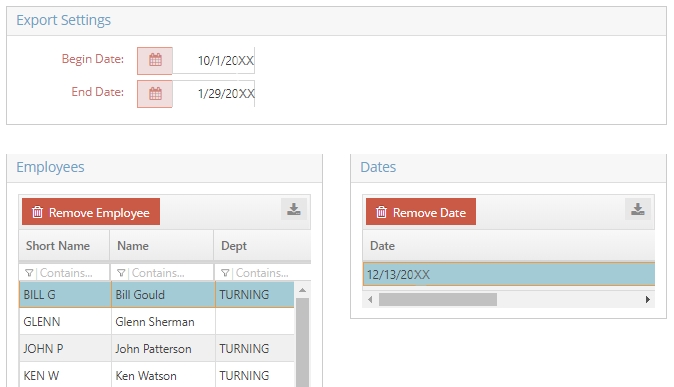
- Select a Begin Date.
- Select an End Date.
- Click Preview to see all of the results.
- (Optional) Click Remove Employee to remove all time tickets for the selected employee.
- (Optional) Click Remove Date to remove the selected time ticket for the employee selected on the employee grid.
- Click Export to your information to a text file.
- Save the text file in a designated location on your personal computer.
Importing to JobBOSS2
Once you've created your checks in Paychex, it's time to set your information up so that you can import it back into JobBOSS2. The import process will create journal entries within JobBOSS2 one of two ways:
- If you have Paychex print your bank account number on the checks, each check will be brought over as a journal entry that includes the employee's deductions as well as the employer's deductions.
- If you send one debit to Paychex to cover your payroll and Paychex generates your payroll, your import will be brought in as one journal entry for the entire payroll amount as well as all your deductions.
Establishing Proper Format in Paychex
In order to import information back into JobBOSS2 as journal entries, you will have to establish the following settings within Paychex to create an export file that will integrate properly with JobBOSS2. These settings differ depending on whether you want the information to come back as multiple journal entries for multiple checks or one journal entry for the entire payroll transaction.
- Formatting for Individual Checks
- Select the Peachtree option as your file format
- GL transaction date must be set as the Check Date
- Level of Detail must be set as Detail (by check) with employee name
- Select Yes to distribute tax expenses and payroll expenses by department
- Select Yes to receive an email notification when your file is ready
- Formatting for Single Journal Entry
- Select the Peachtree option as your file format
- GL transaction date must be set as the Check Date
- Level of Detail must be set as Detail (by check) with employee name and EFT totals
- Select Yes to distribute tax expenses and payroll expenses by department
- Select Yes to receive an email notification when your file is ready
How to Import into JobBOSS2
- Go to the blue Data Entry tab, open the G / L dropdown menu, and select Journals.
- Click Import from the row of action buttons.
- Click Upload Payroll File to open a file search window and select your payroll file.
- Select a Bank Code.
- Click OK to import the file.
Once you complete the file import process and see your journal entry / entries in the grid on the navigation screen, open each record to ensure that the balance equals 0. If that is not the case, delete the record, contact Paychex to locate and correct the error, and repeat the import process.