Xero Sync; Synchronize;
Configuration and Features of the Xero™ Online Interface
The Xero Interface allows you to automatically synchronize information between JobBOSS2 and the selected Xero Company for the purpose of creating AR and AP invoices in Xero.
Prerequisite:
A Xero Custom API Connection is required to use this integration. The Custom API Connection can be purchased from Xero at https://connect.xero.com/custom. Once the Custom API Connection has been purchased the Custom API Connection can be configured here https://developer.xero.com/app/manage. This configuration allows the user to create the custom app, Client ID and Client Secret required to connect JobBOSS2 to Xero.
During the Custom API Connection configuration:
-
When setting up your connection, select all 'Scopes' from the authorization configuration.
-
Use the Redirect URL https://manage.integrations.ecimanufacturing.com/connect/oauth the "Company or Application URL."
-
Once you have obtained your custom connection Client ID and Client Secret credentials, please enter them when prompted during Connect to Xero process outlined later in this help document.
This topic provides information on how to configure the various components required to use the Xero Interface and assumes the user has an active Xero account and credentials.
Before using the interface, verify the following settings in each program to ensure information will synchronize correctly. Also, before using the interface, please read the page that outlines which fields are synced by JobBOSS2 to Xero.
Configuration
Settings and Preferences
- In the Navigation Sidebar, click the Settings button.

- Open the System drop down menu.
- Select Company Maintenance.
- Click Edit and then click Defaults.
- Go to the Interfaces Section.
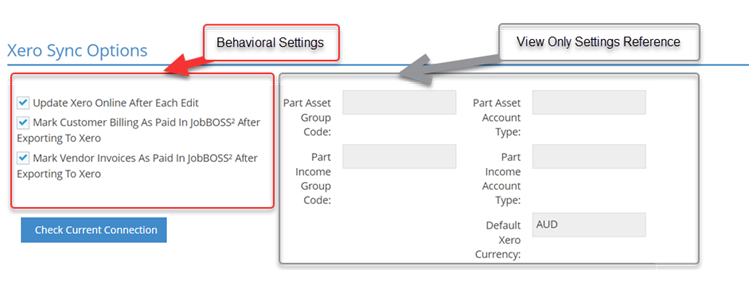
- Select the Xero Interface radio button. The Xero Sync Options section appears:
- Selecting this option also limits GL Codes in JobBOSS2 to 12 characters. Spaces and special characters (@, #, %, *, etc.) must be included in the count when considering character limits for fields in both JobBOSS2 and Xero.
- Use the check boxes provided to determine the following interface behaviors:
- Update Xero Online After Each Edit: This option determines the default setting on existing records that interface with your Xero company.
- When this option is selected, the Save to Xero? check box located on existing records that sync with Xero is automatically selected.
- When this option is left unchecked, the Save to Xero? check box on existing records that sync with Xero is automatically left blank.
- The ‘Save to Xero?’ option is always selected by default when creating new records that sync with your Xero company regardless of this maintenance setting.
- If the 'Save to Xero?' option is selected, any changes you make to a record will automatically sync and update within your Xero company.
- Mark Customer Billing As Paid In JobBOSS2 After Exporting To Xero: When selected, the interface automatically marks exported AR Invoices as 'Paid' in JobBOSS2.
- Mark Vendor Invoices As Paid In JobBOSS2 After Exporting To Xero :When selected, the interface automatically marks exported AP Invoices as 'Paid' in JobBOSS2.
- If either of these options is left blank, the respective list of unpaid invoices will continuously grow since they will never be paid within JobBOSS2.
- Check Current Connection button: This option validates the connection between JobBOSS2 and the Xero company.
- Click Cancel to return to Company Maintenance.
- Update Xero Online After Each Edit: This option determines the default setting on existing records that interface with your Xero company.
- Settings are not saved until you completely exit Company Maintenance.
Setting References
The values listed in this portion of the Xero Sync section are displayed for reference purposes only and will likely be blank the first time you select the Xero Online Sync Interface. These values are entered / edited when you connect to your Xero company.
 Edit Currency Codes
Edit Tax Codes
Edit Group Codes
Parts
Sync with Zero
Generic JobBOSS2 Accounts Created in Xero
The first time you exit a record that syncs with Xero (such as a GL Code) after setting the Interface option to Xero Online, the system displays the Xero Online page.

This information is required to allow the interface to send values to your Xero company correctly with regards to the following generic accounts created in the Xero Chart of Accounts and in JobBOSS2 (but not active):
- JB2PAsst
- JB2PInc
If (new) synchronized parts are not configured in JobBOSS2 to provide information required by Xero, the interface uses these generic accounts to ensure the parts can be successfully created and saved.