QB Sync; Synchronize;
Configuration and Features of the QuickBooks® (QB) Online Interface
The QuickBooks (QB) Online Interface allows you to automatically synchronize information between JobBOSS2 and the selected QB Company for the purpose of creating AR and AP invoices in QuickBooks.
QuickBooks does not currently allow for the synchronizing of payroll related information from outside sources for their Online option.
This topic provides information on how to configure the various components required to use the QB Online Interface and assumes that the appropriate QuickBooks product is already in place.
If you interface with a QB Company using the Accountants Version of QB Online, be aware information only synchronizes with the QB company you sign into.
For more information see Use the QB Online Interface For The First Time.
Before using the interface, verify the following settings in each program to ensure information will synchronize correctly.
Spaces and "special characters" such as dashes, dots, etc., must be included in the count when considering character limits for fields in both JobBOSS2 and QuickBooks.
Configuration
Settings and Preferences
- Go to System > Company Maintenance.
- Click Edit.
- Make sure the company that will be synchronized with QuickBooks is the one that is currently open and being edited.
- Click Defaults.
- Under the Interfaces section, verify QuickBooks Interface (Online Connect Method) is selected.
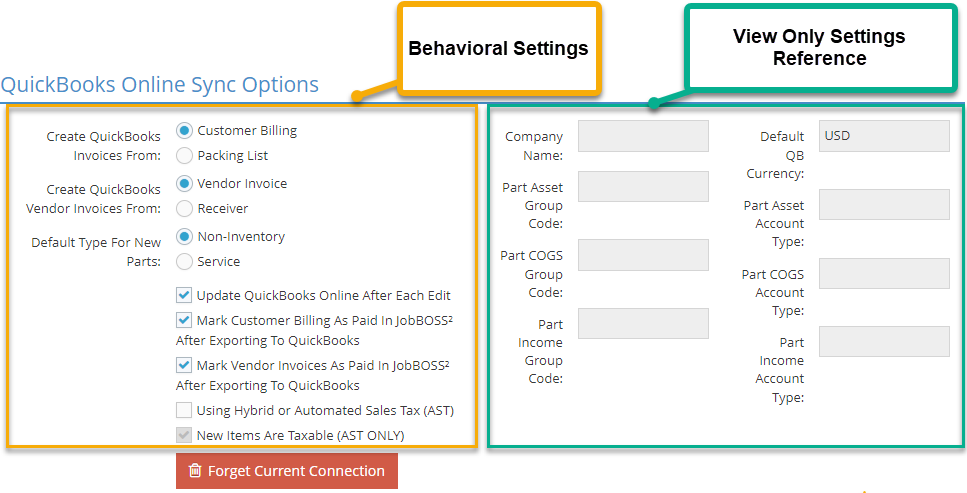
- The Quick Books Online Sync Options section appears:
- Selecting this option also limits GL Codes in JobBOSS2 to 7 characters.
- The Quick Books Online Sync Options section appears:
- Use the radio buttons and check boxes provided to determine the following interface behaviors:
- Create QuickBooks Invoices From: Select whether customer invoices created in QuickBooks will use customer invoices or packing lists in JobBOSS2 as their source of information.
- Create QuickBooks Vendor Invoices From: Select whether vendor invoices created in QuickBooks will use vendor invoices or receivers in JobBOSS2 as their source of information.
- There must be an associated purchase order in JobBOSS2 in order to use a receiver as the source of the QB vendor invoice.
- Default Type For New Parts: Select whether the new parts created in QuickBooks will be categorized as Non-Inventory parts or Service parts.
- Update QuickBooks Online After Each Save: This option determines the default setting on existing records that interface with your QB Online company.
- When this option is selected, the Save to QuickBooks? check box located on existing records that sync with your QB Online company is automatically selected .
- When this option is left blank, the Save to QuickBooks? check box on existing records that sync with your QB Online company is automatically left blank.
- The ‘Save to QuickBooks?’ option is always selected by default when creating new records that sync with your QB Online company regardless of this maintenance setting.
- If the 'Save to QuickBooks?' option is selected, any changes you make to a record will automatically sync and update within your QB Online company. If that record is attached to another record in your QB Online company, such as an invoice attached to a cash receipt, a validation box will appear to inform you.
- Mark Customer Billing As Paid In JobBOSS2 After Exporting To QuickBooks: When selected, the interface automatically marks exported AR Invoices as 'Paid' in JobBOSS2.
- Mark Vendor Invoices As Paid In JobBOSS2 After Exporting To QuickBooks :When selected, the interface automatically marks exported AP Invoices as 'Paid' in JobBOSS2.
- If either of these options is left blank, the respective list of unpaid invoices will continuously grow since they will never be paid within JobBOSS2.
- Using Automatic Sales Tax (AST): Select this check box if your QuickBooks company utilizes the Automated Sales Tax feature.
- Selecting this check box will stop JobBOSS2 from calculating tax; QuickBooks will do all of the tax calculations.
- An option to mark a part as taxable or not exists on estimates, line items on quotes, and inventory items.
- New Items Are Taxable (AST ONLY): When selected, new parts created in JobBOSS2 will have a check in the "Is Taxable" box.
- The box may be de-selected on the part.
- This default may also change per line item.
- Forget Current Connection: This option causes the interface to detach from the QB company it is currently connected to and forces you to re-establish a connection with a QB company before any additional information can be synced.
- You cannot use this option to detach from one QB company and re-establish connection with another QB company. There may only be one QB company per JobBOSS2 Company.
- Quickbooks requires a re-certification every 6 months, and this will disconnect your QB company from your JobBOSS2 Company. Simply re-establish the connection to continue syncing information.
Setting References
The values listed in this portion of the Online Sync Section are displayed for reference purposes only and will likely be blank the first time you select the QB Online Sync Interface. These values, including the Company Name, are entered / edited when you connect to your QB company.
If you need to change these settings click Forget Connection and make the appropriate changes. Once you have completed them, connect back to the same QB company.
For additional information about the Group Codes displayed, see the GL Accounts section located in this topic.
For additional information about connecting to your QB company, see Using the QuickBooks® (QB) Online Interface For The First Time.
 GL Group Codes
GL Accounts
- Go to Tables > GL Accounts.
- Click 'Print.'
- Select 'Table' from the dropdown menu.
- Click 'Generate Report.'
- 'GL Codes' will be selected by default under Table Listings.
- Select the desired destination for the report from the dropdown menu.
- This would typically be 'View / Print' which provides the option to view information on the screen and then print to hard copy.
“Generic” JobBOSS2 Accounts Created in QuickBooks
The first time you exit a record that syncs with QB (such as a GL Code) after setting the Interface option to QuickBooks Online, the system displays the Quick Books Online Setup page.
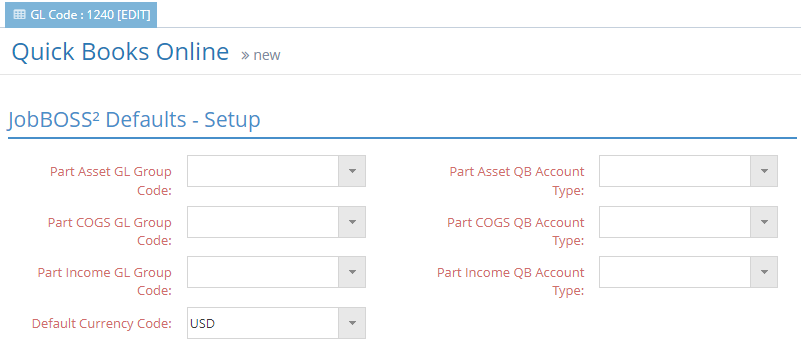
This information is required to allow the interface to send values to your QB company correctly with regards to the following “generic” accounts created in the QB Chart of Accounts but not in JobBOSS2:
- PartAssetAcct
- PartCOGSAcct
- PartIncomeAcct
- DeliveryChargesAcct
This information will need to be re-entered any time you click Forget Current Connection (in Company Maintenance) or every six months as required by QuickBooks.
If (new) synchronized parts are not configured in JobBOSS2 to provide information required by QuickBooks, the interface will use these "generic" accounts to ensure the parts can be successfully created and saved. Once the parts are created, these accounts can be edited as desired and will not be changed during future syncs, even if the part is not configured in JobBOSS2.
Parts
Features
Get Rate
The Get Rate button is a feature specifically for QuickBooks Online that is found next to the Exchange Rate fields throughout the software. You can use the Get Rate button to pull the exact exchange rate from QuickBooks based on the date assigned to the record in JobBOSS2.
- If you click Get Rate while the Show Currency box is checked, the home currency will be adjusted.
- If you click Get Rate without the Show Currency box checked, the foreign currency will be adjusted.
- The Packing List does not have a Get Rate button because it uses the same exchange rate as the Order.
Save To QuickBooks?
Once QuickBooks Online is selected as the interface in Company Maintenance, a "Save To QuickBooks?" check box appears throughout the system on various records. When checked, the "Save To QuickBooks?" feature will automatically sync the record to QuickBooks anytime a change is saved in JobBOSS2.
- The default setting is found in Company Maintenance Defaults under the QuickBooks Online Sync Options.
- The default setting is called Update QuickBooks Online After Each Edit.