System
Using Pricing Tiers
System Location: Settings > System > Company Maintenance > Defaults
This topic provides an example on how to setup Pricing Tiers to determine the price charged to each customer.
For more information see Company Maintenance Defaults.
Turn Pricing Tiers On
- Click the Settings button.

- Open the System dropdown menu.
- Select Company Maintenance.
- Select the desired company from the grid and click Edit (located at the top of the page.)
- Click Defaults (located at the top of the page.)

- Go to the Inventory Section.
- Place a check in the Use Pricing Tiers Instead Of Quantity Breaks box.
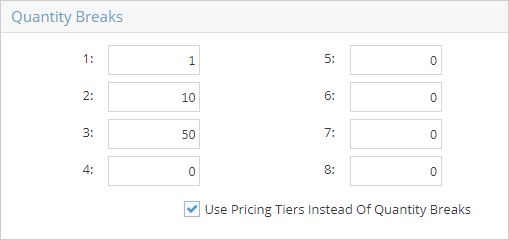
- It does not matter what values are entered in the Quantity Break fields; the system automatically assumes there are 8 Pricing Tiers available for use.
- Click OK to close the Defaults page.
- Click OK to close Company Maintenance and save the changes you made.
Assign Tiers To Customers
- Still in the Settings area, open the Tables dropdown menu.
- Select Customers.
- Select the desired customer and click Edit.
- In the General Section, select the desired tier from the Pricing Tier dropdown menu.
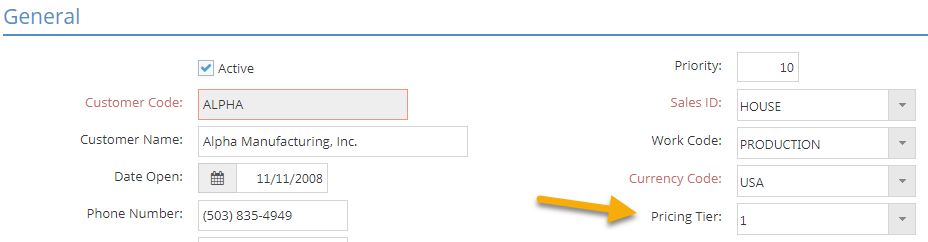
- The Pricing Tier field only displays when the option to Use Pricing Tiers is selected in Company Maintenance Defaults.
- When present, this value defaults to Pricing Tier 1.
- The Pricing Tier field only displays when the option to Use Pricing Tiers is selected in Company Maintenance Defaults.
- Click OK to close the Customer Code and save any changes.
- Edit as many customers as needed.
- Only edit customers that will not be in Tier 1 since that is the default assignment once this option is enabled.
- For customers that are not in Tier 1, assign them to Tier 2 through 8 as desired.
Set Tier Prices
- Click the Data Entry button.

- Open the Quoting dropdown menu and select Estimating.
- Select a part and click Edit.
- Enter the price to charge each Tier in the Price Break Grid in the General Section.
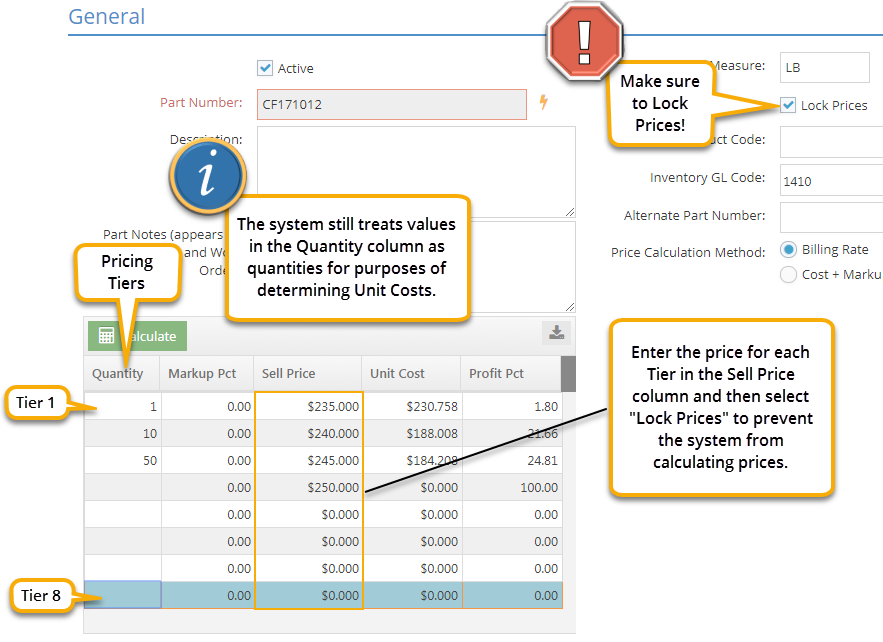
- Place a check in the Lock Prices box.
- The system will calculate and overwrite the Sell Price values entered if "Lock Prices" is not selected.
- Click OK to close the Estimate and save any changes.
- Repeat for each estimate.
- You can also edit parts in the same way under the Inventory Items menu, which provides the ability to set prices for purchased parts that are resold in addition to manufactured parts.
Once all your parts have been edited, the system assigns the sales prices on quotes, orders, and invoices based on the Customer Code selected.