Auto PO Utility; Reorder Levels; Job Requirements
Use the Auto PO Utility to Create Multiple Purchase Orders
System Location: Data Entry > Purchasing > Purchase Orders
This topic provides details on how to create multiple purchase orders (P.O.s) at one time by using the Automatic Purchase Orders Utility. Based on the criteria selected, the utility can create P.O.s for service requirements, material requirements, or inventory replenishment.
For more information see Purchase Orders.

- Go to the blue Data Entry tab, open the Purchasing dropdown menu, and select Purchase Orders.
- Click Auto (located at the top of the page.)
 Select Eligible Items to Create Purchase Orders For
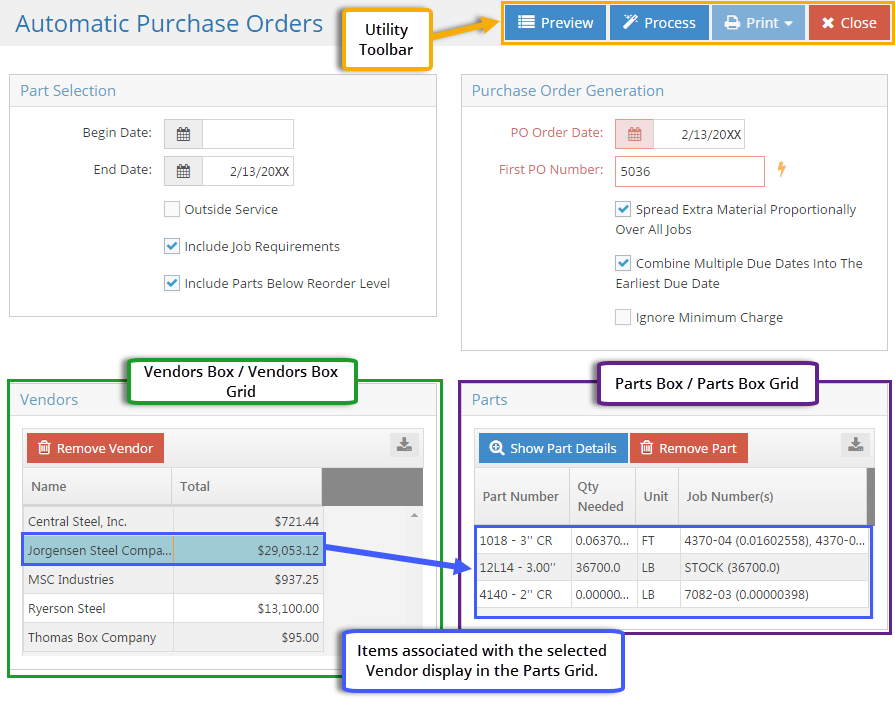
Part Selection Box
- Select the Begin Date.
- This represents the earliest order by date the utility will consider when looking for eligible requirements.
- Blank by default, but can be changed.
- When left blank, the utility looks at all requirements with an order by date prior to the current date.
- Does not impact the utility with regard to parts below reorder levels.
- Select the End Date.
- This represents the latest order by date the utility will consider when looking for eligible requirements.
- Defaults to the current date, but can be changed.
- Does not impact the utility with regard to parts below reorder levels.
- Select the source(s) the utility should look at to determine what information to display.
- Outside Service (Requirements): When selected, the utility will provide a list of outside service requirements that can be used to create one or more purchase orders.
- Only service requirements that have due dates that fall within the selected dates will be displayed.
- This option MUST be used in conjunction with the Include Job Requirements button in order to yield results.
- This option CANNOT be used in conjunction with the Include Parts Below Reorder Level button.
- Include Job Requirements (Material): When exclusively selected, the utility will provide a list of material requirements that can be used to create one or more purchase orders.
- Only material requirements that have due dates that fall within the selected dates will be displayed.
- This option can be used in conjunction with the option to 'Include Parts Below Reorder Level' to yield results for both options.
- If this option is selected in conjunction with Outside Requirements, it will only yield outside requirements.
- Include Parts Below Reorder Level: When selected, the utility will provide a list of inventory items that have an on hand quantity that is less than the value listed as the 'Reorder Level.'
- Items with a Reorder Level of zero are not considered by the utility.
- The 'Begin Date' and 'End Date' fields do not impact whether items display for this option.
- This option can be used in conjunction with the option to 'Include Job Requirements.'
- This option can NOT be used in conjunction with the option 'Outside Services'; no results are yielded for Parts Below Reorder Level.
- If the same part is being purchased from the same vendor for both material requirements and inventory replenishment, the entire quantity will be listed on one P.O. with the Line Item Details indicating how many go to jobs and how many go to inventory.
- Outside Service (Requirements): When selected, the utility will provide a list of outside service requirements that can be used to create one or more purchase orders.
- Click Preview (located in Utility Toolbar at the top of the screen.)
- This populates the Vendors and Parts Grids with items that meet the selected criteria.
Remove Items From Utility (OPTIONAL)
The following features provide the ability to prevent selected items from being included on a purchase order.
To remove a vendor and all related parts:
- Select a vendor in the Vendors Box Grid.
- Click Remove Vendor (located above Vendors Box Grid.)
- This removes the vendor and all parts associated with the vendor (that were displayed in the Parts Box Grid) from the utility at the same time.
To remove specific parts:
- Select a vendor in the Vendors Box Grid.
- Select the associated part to remove in the Parts Box Grid.
- Click Remove Part (located above Parts Box Grid.)
- This removes the specified part from the utility but leaves the remaining parts associated with the vendor.
To remove parts for specific jobs:
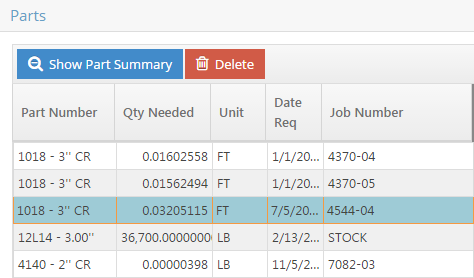
- Select a vendor in the Vendors Box Grid.
- Click Show Part Details (located above Parts Box Grid.)
- Select the specific part / job combination to remove in the Parts Box Grid.
- Click Delete (located above Parts Box Grid.)
- This removes the specified part for the specified job (or 'STOCK') from the utility but leaves the remaining requirements / inventory items for the same part in place.
- Items must be selected and removed one at a time.
- When items are removed from the utility, the associated requirements or reorder level alerts are left in place and are not considered to be satisfied since they were not included on any of the purchase orders created by the utility.
Create Purchase Orders
Once the list of items has been finalized, the user can create the purchase orders based on some additional selections.
Purchase Order Generation Box
- Select the PO Order Date.
- This required field will be used as the date for each P.O. created by the utility.
- Designate the First PO Number.
- This required numeric value represents the number assigned to the first purchase order created by the utility.
- The value will be increased by an increment of 1 for each additional purchase order created.
- Each P.O. Number generated must be unique.
- Select which remaining options should be selected or left blank:
- Spread Extra Material Proportionally Over All Jobs
- For this setting, assume the following for purposes of clarification:
- Part "STEEL BAR" is both stocked and purchased by the BAR and has existing material requirements equal to 5.5 BARs.
- Since purchase orders cannot be created for partial quantities (in terms of Purchasing Units), the quantity included on the P.O. is rounded to 6 BARs, resulting in 0.5 "extra" BARs
- "STEEL BAR" is being purchased for three jobs with the following requirements:
- "Job 1" requires 2.75 BARs (or 50% of the required quantity)
- "Jobs 2 and 3" each require 1.375 BARs (or 25% of the required quantity)
- When this option is selected, the utility will take any material purchased in excess of the quantity required and distribute it across all the jobs that require it in proportion to the amount each one originally needed it. In relation to the assumptions above, the result would be:
- Job 1 would be assigned 3 BARs (the original 2.75 it required PLUS 50% of the extra, which in this case is 0.25)
- Jobs 1 and 2 would both be assigned 1.5 BARs (the original 1.375 they required PLUS 25% of the extra, which in this case is 0.125)
- When this option is left blank, the utility will attempt to place any extra material into inventory. In relation to the assumptions above, the result would be:
- Each Job would be assigned the quantity required (2.75, 1.375, and 1.375, respectively)
- The additional 0.5 BARs would be listed with a 'Job Number' of 'STOCK.'
- Since material cannot be stocked in decimal quantities, this extra amount of material would not be placed into inventory nor would it be costed to any of the listed jobs.
- Material cannot be stocked in decimal quantities in terms of its Stocking Unit, so be mindful of how much extra material is being purchased and where it is going.
- For this setting, assume the following for purposes of clarification:
- Combine Multiple Due Dates Into The Earliest Due Date
- When this option is selected, the utility behaves as follows:
- It looks at each item being ordered for each vendor selected.
- On each P.O. created, it creates a single release for each part.
- The Due Date used for the single release is the earliest one found for any of that part.
- The result is that each part on the P.O. will have only one release, but the due date for each part may be different.
- When this option is left blank, the utility will assign multiple due dates / releases for each part as appropriate.
- When this option is selected, the utility behaves as follows:
- Ignore Minimum Charge
- When this option is selected, the utility will create the P.O. for the actual calculated amount if it is below vendor's listed minimum charge amount (if one is designated.)
- When this option is left blank, the utility will increase the amount of any P.O. to match the listed minimum charge amount for a vendor as needed.
- Every purchase order created by the utility will use the same settings selected here. If some P.O.s require different settings, edit the list of included records and run the utility again as needed.
- Spread Extra Material Proportionally Over All Jobs
- Click Process.
- It is likely the utility will display prompts regarding differences between the quantities / costs on the P.O.s being created and the Inventory Items / Estimates defined in the system.
- It is strongly suggested to answer 'No' to these prompts to avoid overwriting existing quantity breaks and related estimated costs on the part files referenced. If the user answers 'Yes', the utility will replace existing breaks with a single break and the cost located on the purchase order being created.
- Once processed, you can go back and create additional line items. This unprocesses the P.O., and it must be processed again before you can receive anything in. Outside of that, most of a P.O. cannot be edited. The ability to unprocess a P.O. depends on whether it has been received or not
- (OPTIONAL) Click Print once the utility has finished processing.
- This opens the Purchase Order Print Spool, allowing the user to generate the P.O.s just created as hard copies, e-mails, etc.
- The Print option is not available until the utility has been processed.
- It is recommended that the Print Spool be cleared before using the utility to make it easier to identify the records just created and to avoid generating duplicates.
- Click Close to close the utility.
- Purchase orders created by the utility can be edited on a case by case basis as needed.
To edit the details of a P.O. Line Item:
- Select the desired item.
- Click 'Details.'
The following information is available for review and / or editing for each Line Item.
General Section - Details
Reference Only - Cannot be Edited
- P.O. Number
- Part Number
- Purchasing Factor
- Only displays if Purchasing and Stocking units are different
- Step Number
Available for Editing
Purchase Orders must be unprocessed in order to be edited.
- GL Code - Indicates whether the line item will be treated as an expense or an asset purchase
- Used to populated AP invoice(s) created from receiver(s) associated with the P.O.
- Product Code
- Miscellaneous Tooling Charge and Description - Appears on P.O. as a separate charge next to the selected part
- Markup Percentage
- Revision
- FOB
- Certification Required (Yes / No)
- Taxable (Yes / No)
Comments - Details
Comments entered here do not print on the P.O.
Quantity / Job Number Splits Section - Details
The grid located here displays how the selected item is being distributed and when each quantity is expected to arrive.
Edit Expected Quantity - Existing Item
- Click on either 'Qty' field.
- Displays two fields only if Purchasing and Stocking units are different; otherwise only one 'Qty' field is present.
- If two are listed, note whether the Stocking or Purchasing Unit value is being edited.
- If there is a difference in Purchasing and Stocking units, the stocking quantity field will not calculate the purchasing factor until you Process or OK out of the P.O.
- Enter the new value (in terms of the Unit selected.)
- Quantities can be increased or decreased.
- If the item is going to a job, the new quantity and related cost will be reflected in the job costs once it is received.
- If the quantity is decreased on material going to a job as a result of job requirements, the unordered quantity will remain as an open requirement.
- If the item is going to inventory, the on hand quantity and valuation will be updated once it is received.
Add New Split / Destination
- Click 'Add Row.'
- Enter the destination of the new split in 'Job Number' field.
- Manually type the job number the extra material should be posted to when received.
- Material purchased for a job outside of 'Job Requirements' will still satisfy any open requirements that exist for the selected part / job combination.
- If the material is going to inventory, type 'STOCK' as the 'Job Number.'
- Material purchased to inventory outside the use of the 'Reorder Level' option on the Auto PO Utility will still satisfy the need to replenish inventory levels for the selected part.
- Manually type the job number the extra material should be posted to when received.
- Enter the amount of material being ordered in either 'Qty' field.
- Displays two fields only if Purchasing and Stocking units are different; otherwise only one 'Qty' field is present.
- If two are listed, note whether the Stocking or Purchasing Unit value is being edited.
- Edit the Due Date (Date Required) if needed.
- The Due Date of any line item can be edited.
When adding new splits or editing existing ones, keep the following in mind:
- When material is going to a job, quantity does not matter on a specific line item so long as the Total Quantity Ordered of the selected item is a whole value in terms of the Purchasing unit.
- When material is going to inventory (i.e. assigned to 'STOCK'), the quantity must be a whole value in terms of the Stocking Unit.
Receiving Section - Details
Provided for reference purposes only to display details about when the selected line item was received.
For additional information regarding editing P.O.s, see System Location: Data Entry > Purchasing > Purchase Orders and / or System Location: Data Entry > Purchasing > Purchase Orders