Orders; Order Entry
Create a Blanket Order
System Location: Data Entry > Orders > Orders
This topic covers the basic concepts of creating multiple orders for the purpose of handling a customer's long term demand for parts. The process is provided in sequence below.
For more information see Order Entry.
 Create the Customer Order
The process begins with the creation of the Customer Demand Order which represents the total quantity ordered by the customer. All finished goods will be shipped from this order.
- Go to the blue Data Entry tab, open the Orders dropdown menu, and select Orders.
- Click New (located at the top of the page).
Populate the Order
General Section
- Select the Customer Code.
- Populates the Customer Name and multiple fields in the Header Section
- Verify / provide information for the following fields:
- Order Number
- Order Date
- Default Line Item Due Date: Used to populate Due Date for line items / jobs as they are entered
- Individual Due Dates can be changed
- P.O. Number
Line Items Section
- Select one or more parts to add to the Line Items Grid.
- Click Search.

- Use the search options provided on the Part Search screen to populate the Selection Grid.
- Simply clicking Search populates the grid with all defined parts by default
- Select one or more parts from the selection grid.
- Use the CTL or SHIFT keys to select multiple records
- Click OK.
- Click Search.
- Verify / provide information for the following fields for each line item present:
- Part Number
- If a part was selected by accident, it can be deleted
- Comm Pct (Commission Percent)
- Work Code and Product Code
- Part Number
- Edit Line Item Details
- Select the line item / part that needs to be edited.
- Click Details.

- Go to the Releases Section.
- Enter the total quantity to manufacture over the life of the blanket order contract period in Release Qty.
- This would be the full quantity from the customer's P.O.
- Set the date to the contract end date.
- Go to the Routing Section.
- Delete ALL routing steps.
- All manufacturing is done on the stock order
- Click OK to return to the main order screen.
Header Section
- Verify / provide information for the following fields:
- Sales ID
- Terms Code
- Tax Code
Terms Code and Tax Code is optional on the order but are required on customer invoices.
Process the Order
For additional details on processing and unprocessing an order, see the Process / Unprocess Button information in Order Entry.
For more detailed step by step instructions on processing, see Process the Order.
The following scenario assumes the "Automatically Post Material" option is selected in Company Maintenance.
- Click Process.

- The Line Item Quantity Specification screen displays, giving the user the chance to post items from inventory if they are available.
- Reduce the value in the Post From Stock and / or Post From Stock Job fields (displayed under the Quantity Section) to 0 if they are anything else.
- It is assumed in this example that the demand for parts is in the future and any parts that are already available will be used at a later date.
- Delete all items listed in the Materials Grid (displayed under the Materials Section.)
- The Demand Job should not have any requirements associated with it.
- Click OK.
- Repeat steps 2 through 4 for as many jobs as present on the order.
- May be multiple jobs present if the blanket order is covering more than one part for the customer
- Once all jobs are processed and have Job Numbers, edit job details and remove any vendor steps if present.
- The Demand Job should not have any requirements associated with it.
If the option to Automatically Post Parts is not selected, all Job Requirements will have to be removed once Job Numbers have been assigned.
Create the Stock Order
The process continues with the creation of the Production Order which will be used to create the parts for the blanket order.
- Go to the blue Data Entry tab, open the Orders dropdown menu, and select Orders.
- Click New (located at the top of the page).
Populate the Order
General Section
- Select the Customer Code.
- Populates the Customer Name and multiple fields in the Header Section
- Verify / provide information for the following fields:
- Order Number
- Order Date
- Defaults to current days date but can be changed
- P.O. Number
Line Items Section
- Select the parts to add to the Line Items Grid.
- Click Search.
- Use the search options provided on the Part Search screen to populate the Selection Grid.
- Select the same parts that were entered on the Demand Order.
- Use the CTL or SHIFT keys to select multiple records
- If a part requires the creation of subassembly jobs, consider creating multiple orders to make the production information easier to follow.
- Click OK.
- Click Search.
- Verify / provide information for the following fields for each line item present:
- Part Number
- If a part was selected by accident, it can be deleted
- Comm Pct (Commission Percent)
- Work Code and Product Code
- Part Number
- Edit Line Item Details
- Select the line item / part that needs to be edited.
- Click Details.
- Go to the Releases Section.
- Change Release Type to STOCK.
- Enter the total quantity to be made on this job in Release Qty.
- Set the Due Date to the date of the earliest release the parts are being made for at the time.
- It is possible that the total quantity ordered by the customer will not be made at the same time depending on the quantity and time frame involved. In those cases, the Release Quantity and Due Date would correspond with the partial amount being made and additional production runs would be entered in the future.
- Click OK to return to the main order screen.
Process the Order
For additional details on processing and unprocessing an order, see the Order Processing page.
For more detailed step by step instructions on processing, see Process the Order.
The following scenario assumes the "Automatically Post Material" option is selected in Company Maintenance.
- Click Process.
- The Line Item Quantity Specification screen displays, giving the user the chance to post items from inventory if they are available.
- The system does not attempt to post the part being made from inventory or from an existing stock job regardless of availability and system settings for quantities marked as a Stock Release.
- Determine whether material requirements can / should be posted from inventory. (Displayed under the Material Section)
- Determine whether to review posting assumptions for any additional jobs that will be processed or not.
- Job processing will continue if there are additional line items on the order that have not been reviewed or if there is a need to create a subassembly job as a result of the material calculations in step 2.
- The user has two options on how to proceed with processing: OK or OK All (buttons located at the top of the screen).
- Clicking OK closes the Line Item Quantity Specification screen for the current part listed on the order and displays the same options for the next part (if there is one.)
- The user will have the ability to make the same decisions as listed above and would go through the same steps for each part so long as they click OK and there are more line items to process.
- Clicking OK All closes the Line Item Quantity Specification screen for the current part listed on the order and automatically decides how material will be posted for any remaining items.
- The user will not have the ability to decide whether material should be posted or not or to edit where it comes from for any remaining line items.
- Clicking OK closes the Line Item Quantity Specification screen for the current part listed on the order and displays the same options for the next part (if there is one.)
- Once all line items have been dealt with the system closes the order form and displays the Order Navigator screen.
Place Finished Parts Into Inventory
The finished goods from the Production Order are next placed into inventory by creating a packing slip.
- Go to the blue Data Entry tab, open the Orders dropdown menu, and select Shipments.
- Click New (located at the top of the page.)
- Select the Production Order with the finished parts.
- Select the job(s) that are completed and have pieces that are ready to be placed into inventory.
- Process the packing list.
Ship Parts to Customer
One or more packing lists can now be made for the original Customer Demand Order for the release quantity needed.
- Go to the blue Data Entry tab, open the Orders dropdown menu, and select Shipments.
- Click New (located at the top of the page.)
- Select the Customer Demand Order.
- Select the job(s) for the parts being shipped to the customer.
- Select a part in the Line Items Grid.
- Click Details.
- Enter the number of parts being shipped to the customer in the Qty To Customer field.
- When the packing list is processed, this will reduce the original quantity entered on the job, leaving the remaining quantity as open.
- Click OK.
- Click Bins (dropdown menu.)
- Select From Stock.
- Enter the number used in step 8 in the Qty To Transfer field here.
- Enter the value for the Bin Location where the parts were placed from the Production Order previously.
- This posts the parts placed in inventory to the Demand Job, reducing inventory and capturing costs for the job.
- Click OK.
- Assuming the quantity being shipped was 125, the Line Items Grid would look something like this:
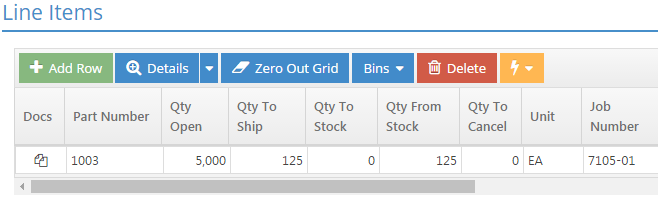
- Process the packing list.
Once processed, the Release Details for the job on the Demand Order would something like this:
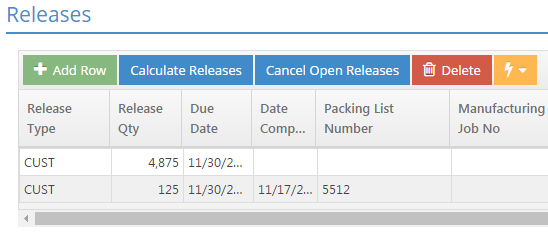
This process would be repeated until the original quantity ordered has been manufactured and shipped.