Payroll Interface; Sage 50; Peachtree
How to Configure and Use Sage 50 USA for Payroll
System Location: Settings > System > Company Maintenance
This document takes you step by step through the use of this application JobBOSS2. The scenario uses sample data when necessary and portrays a standard use of the application. If you need any additional information on this application, see the Additional Topics links to the right.
The Sage 50 USA accounting program integrates with JobBOSS2 and can be used in place of the JobBOSS2 accounting application. This document explains how to set Sage 50 USA as your interface and import payroll data into JobBOSS2 from Sage 50 USA, and it assumes the appropriate Sage product is already installed on the computer.
Payroll information cannot be exported from JobBOSS2 into Sage 50 USA. All payroll information must be manually entered into Sage 50 USA.
Setting Sage 50 USA as your Interface
- In Company Maintenance, select the company you want to integrate and click Edit.
- Click Defaults.
- Go to the Interfaces section and select Export CSV.
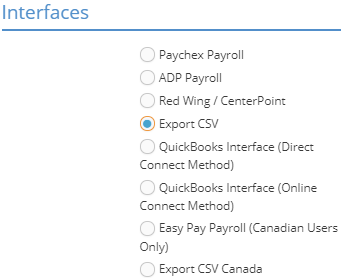
- Click OK to exit the page and save your changes.
Configure Sage 50 USA Payroll
- Open Sage 50 USA.
- Enter the master files, such as employees, using the EXACT same values as you set up in JobBOSS2.
- If the values are different between JobBOSS2 and Sage 50 USA, the import will still occur, but the data will be skewed. For example, if the G / L codes do not match, the check will still be added, but the G / L accounts will be incorrect in JobBOSS2, preventing you from posting your month.
Creating the Export File in Sage 50 USA
- In Sage 50, open the File dropdown and select Select Import/Export.
- Select Payroll from the options on the left, and then select the Payroll Journal file.
- Click Export.
- Under the Fields tab, place a check next to the following boxes, as well as uncheck any boxes that are not on this list:
Employee ID
Employee Name Check Number Check Date Cash GL Acct Cash Amount Pay Period End Weeks in Pay Period Hours 1/Salary 1 Amt Hours 2/Salary 2 Amt Hours 3/Salary 3 Amt Hours 4/Salary 4 Amt Hours 5/Salary 5 Amt Hours 6/Salary 6 Amt Hours 7/Salary 7 Amt Hours 8/Salary 8 Amt Hours 9/Salary 9 Amt Hours 10/Salary 10 Amt Beginning Balance Flag Date Cleared Flag Number of Distributions Pay Field-Number Pay Field-Account Pay Field-Expense Acct Pay Field-Amount Pay Field-Memo Amount # of Labor Distributions Job Pay Field-Nunmber Job ID Job Pay Field-Hours Job Pay Field-Amount Used for Reimbursement Transaction Period Transaction Number
- Under the Options tab, verify the location of the file you are exporting.
- This should match the file name that you want to import into SHOP.
- The default file name is "PAYROLL.CSV."
- Click Save to create a template called "Shop System Payroll Journal," which can be used each time you run payroll.
- Click OK for Sage 50 USA to begin exporting the information.
- Exit Sage 50 USA.
Importing from Sage 50 USA to JobBOSS2
System Location: Data Entry > AP > Check Writing
- In the Check Writing area, click Import from the bar of action buttons.
- Click Upload File to search for your .csv file from Sage 50 USA.
- Select the Bank Code for the account associated with payroll.

- Click OK to begin the import.
- JobBOSS2 will begin importing "manual" miscellaneous paychecks into the accounting database. These checks will appear in the Check Writing area of AP.
- Journal entries, found under GL, will also be created for any non-cash transaction, such as employer matches on social security.