MYOB Sync; Synchronize;
Configuration and Features of the MYOB™ Online Interface
The MYOB Interface allows you to automatically synchronize information between JobBOSS2 and the selected MYOB Company for the purpose of creating AR and AP invoices in MYOB.
This topic provides information on how to configure the various components required to use the MYOB Interface and assumes the user has an active MYOB account and credentials.
Before using the interface, verify the following settings in each program to ensure information will synchronize correctly.
Configuration
Settings and Preferences
- In the Navigation Sidebar, click the Settings button.

- Open the System drop down menu.
- Select Company Maintenance.
- Click Edit and then click Defaults.
- Go to the Interfaces Section.
- Select the MYOB Interface radio button. The MYOB Sync Options section appears:

- Selecting this option also limits GL Codes in JobBOSS2 to 12 characters. Spaces and special characters (@, #, %, *, etc.) must be included in the count when considering character limits for fields in both JobBOSS2 and MYOB.
- Use the check boxes provided to determine the following interface behaviors:
- Update MYOB Online After Each Edit: This option determines the default setting on existing records that interface with your MYOB company.
- When this option is selected, the Save to MYOB? check box located on existing records that sync with MYOB is automatically selected.
- When this option is left unchecked, the Save to MYOB? check box on existing records that sync with MYOB is automatically left blank.
- The ‘Save to MYOB?’ option is always selected by default when creating new records that sync with your MYOB company regardless of this maintenance setting.
- If the 'Save to MYOB?' option is selected, any changes you make to a record will automatically sync and update within your MYOB company.
- Mark Customer Billing As Paid In JobBOSS2 After Exporting To MYOB: When selected, the interface automatically marks exported AR Invoices as 'Paid' in JobBOSS2.
- Mark Vendor Invoices As Paid In JobBOSS2 After Exporting To MYOB :When selected, the interface automatically marks exported AP Invoices as 'Paid' in JobBOSS2.
- If either of these options is left blank, the respective list of unpaid invoices will continuously grow since they will never be paid within JobBOSS2.
- Check Current Connection button: This option validates the connection between JobBOSS2 and the MYOB company.
- Click Cancel to return to Company Maintenance.
- Settings are not saved until you completely exit Company Maintenance.
Setting References
The values listed in this portion of the MYOB Sync section are displayed for reference purposes only and will likely be blank the first time you select the MYOB Online Sync Interface. These values are entered / edited when you connect to your MYOB company.
If you need to change these settings click Disconnect from MYOB and make the appropriate changes. Once completed, connect back to the same MYOB company.
- Open the Base Tables dropdown menu under the Settings option in the Navigation Sidebar.
- Select GL Accounts.
- Select the appropriate GL Account and then click the Edit button.
- If applicable, click the Active check box.
- Select the applicable MYOB Account mapping from the dropdown menu.
- Click the Save button.
- Edit the remainging GL Accounts and assign the appropriate MYOB Account mapping.
- Each Currency code used in MYOB needs to be present in JobBOSS2 with the same 3-character code.
- Each Tax code used in MYOB needs to be present in JobBOSS2 with the same 3-character code.
- Open the Base Tables dropdown menu under the Settings option in the Navigation Sidebar.
- Select Customers.
- Select a Customer and click the Edit button.
- If applicable, click the Active check box.
- Select the applicable MYOB Customer mapping from the dropdown menu.
- Click the Save button.
- Edit remaining Customers and assign the appropriate MYOB Customer mapping.
- Open the Base Tables dropdown menu under the Settings option in the Navigation Sidebar.
- Select Vendors.
- Select a Vendor and click the Edit button.
- If applicable, click the Active check box.
- Select the applicable MYOB Vendor mapping from the dropdown menu.
- Click the Save button.
- Edit remaining Vendors and assign the appropriate MYOB Vendor mapping.
Both manufactured and purchased parts should be present in MYOB for billing and inventory valuation purposes.
The items listed here represent the minimum settings used for the MYOB Sync to function properly and should not be considered as sufficient information for costing purposes in JobBOSS2 itself.
- Go to Data Entry > Inventory > Inventory Items.
- For purposes of this review, all parts can be edited within Inventory Items, including manufactured parts (which would typically be edited under Estimating.)
- Select a part that is / will be included in MYOB and click Edit.
- In the General Section, verify the following:
- Part Number
- This needs to match the Item Name/Number field in MYOB.
- Description
- This information is used to populate the Description on Purchase Transactions field of the part created in MYOB.
- Product Code (OPTIONAL)
- The assigned Product Code provides the Income Account on any new part added to MYOB through the interface.
- The interface looks to the Product Code for this information regardless of how the Customer Billing GL Coding Driven By setting is configured in Company Maintenance.
- If Product Code is not present, the interface will assign the default part income account specified in the company maintenance instead.
- In the Purchasing Section, verify the following:
- Purchasing GL Code (OPTIONAL)
- If Purchasing GL Code is not present, the interface assigns the default part expense account specified in company maintenance instead.
- Go to Settings > System > Company Maintenance.
- Select the company and then click Edit
- Click Default and then go to MYOB Sync Options section.
- Click the Check Current Connection button. The Financial Integration screen opens:
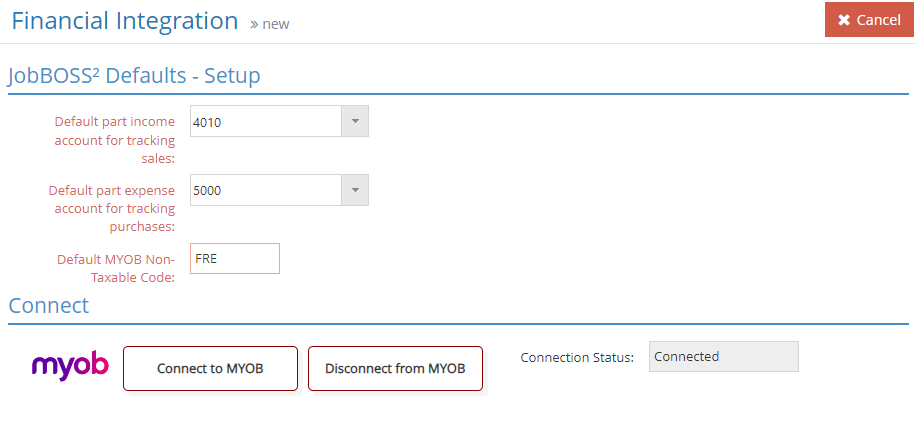
-
Select the Default part income and expense GL account from the dropdown. JobBOSS2 uses these GL Accounts when syncing a part if the Income or Expense GL account is not specified on the part. Enter the 3-character Tax Code from MYOB to be used as the Default Non-Taxable Code.
- To sync to MYOB, click the Connect to MYOB button to establish a connection to MYOB Online. If connected and there are no changes, click the Cancel button to exit from this screen.
- Click the Disconnect from MYOB to disable the connection to MYOB Online interface. After clicking, you are returned to Company Maintenance.
Note:You cannot use this option to detach from one MYOB company and re-establish connection with another MYOB company. There may only be one MYOB company per JobBOSS2 Company.
Save To MYOB?
Once MYOB Online is selected as the interface in Company Maintenance, a Save To MYOB? check box appears throughout the system on various records. When checked, the Save To MYOB? feature automatically syncs the record to MYOB anytime a change is saved in JobBOSS2.
- The default setting is found in Company Maintenance Defaults under the MYOB Sync Options.
- The default setting is called Update MYOB Online After Each Edit.