Wizard
Create Hot Spots (Using The Query Wizard)
System Location: Settings > System > User Maintenance
This example shows how to create a Hot Spot using the Query Wizard.
- It is beyond the scope of this example to provide details related to "manual" SQL Statement creation, editing, and syntax. For assistance in creating basic statements using the Query Wizard, see 'Create A New Hot Spot From Scratch' below. For information regarding the creation of specific SQL Statements, contact Support to determine potential costs.
For purposes of this topic, it is assumed the actions detailed are performed within the User Maintenance area of JobBOSS2, however it is possible for a User with security rights to User Maintenance to create Hot Spots by clicking the Hot Spot button in the Quick Access Toolbar as well.
Select The User
- In the Navigation Sidebar, click the Settings button.

- Open the System dropdown menu.
- Select 'User Maintenance.'
- In the User Maintenance Navigator, select the User to whom the new Hot Spot will be assigned.
- Click 'Edit.'
- Click 'Hot Spots' (located in the User Maintenance Header.)

- Click 'Edit Hot Spots.'
- Click 'New Hot Spot.'
- The Query Wizard opens to the Field Selection screen.
This topic is not intended to provide in-depth instruction regarding the creation or editing of SQL statements; however there are some "structural" considerations that will greatly improve the chances of successfully using the Wizard provided to do so.
- What exactly should the SQL statement do?
Be aware of how specific the results should be. For example, if you want to see information related to Purchase Orders, should the results include ALL Purchase Orders, or should it only include 'Open' ones? What about 'Pending' ones? Should the results be limited to a specific Vendor, or should they display Purchase Orders from every Vendor? Careful consideration of this question can save a lot of wasted time, effort, and frustration AND help answer the next question.
- What tables and fields need to be included?
Understanding exactly what the SQL statement is supposed to do will help with the selection of tables and fields when using the Wizard. If the statement is supposed to provide information related to Purchase Orders, then the PO table (and other related tables) is where the focus needs to be. It may take some extra time - especially if you have never used the Wizard before and are not familiar with the table structure of JobBOSS2 - but looking through the various tables and all their related fields in the Wizard will help in the long run.
When looking at the tables, it's important to understand that many areas of JobBOSS2 have a "header - detail" relationship that results in multiple tables that relate to the same record. Going back to that Purchase Order example, there is a table simply called 'PO' that includes fields that are "universal" for the entire Purchase Order, such as the Vendor Code, Terms Code, Shipping Code, etc.; however some values are included in the line item details (GL Account, Job Number, and Part Number to name a few) and are associated with a specific item as opposed to the entire record. Fields such as these are included in related tables that are often identified with "DET" in their title - PODet, OrderDet, QuoteDet, and so forth. That said, some related tables may not be quite so obvious. For example, the 'Contacts' table is related to many other tables, such as 'Vendor Codes', 'Customer Codes', 'Orders', etc. The Wizard will help point out these tables by displaying them in the 'Related Tables' box, so pay attention to them and make sure to consider whether they include information needed for the statement or not.
- What does it mean to "Join" tables?
When two (or more) tables are used in the creation of a SQL statement, they need to be joined by a common field in order to be able to "see" each other and provide the desired information. This is an important consideration, because a SQL statement may be correctly written from a syntax standpoint, but if the tables are not joined correctly, it will not provide any results. That Purchase Order provides another good example of this.
To create a query that displays the Vendor Code and PO Number of every PO created for a certain part, the PO table would be used to get the Vendor Code (NOT the Vendor Code table) and Purchase Order Number while PODet table would be used to get information about the part. The PO and PODet tables can be joined by a common field - Purchase Order Number - where the Vendor Code table could not. (In the SQL statement, this connection is noted as an 'INNERJOIN.')
Bottom line, when multiple tables are used in a query, they MUST be joined by a common field in order for it to work correctly.
- Avoid the use of double quotes (")!
Due to syntax considerations, double quotes (") should never be used as a part of a "searched for value" within a SQL statement.
This would be most commonly seen in Part Numbers where this special character is often used to indicate inches as a measurement. (Example: 1/4" Steel) Alternatives in this scenario would be to spell out inch or abbreviate it as "in" (Example: 1/4 in Steel) or use two "single quotes" instead (Example: 1/4'' Steel). While this last example looks the same as the first, it is different as far as the computer is concerned because it is two individual characters (that is ' and ' used immediately after each other) as opposed to one special character that is used in formulas and query syntax.
For additional information related to the creation and use of SQL statements, log on to the Shoptech Success Community and search for 'Crystal Manual.' While this document is geared toward the use of Crystal Reports, it provides lots of useful information related to SQL statements and creating Hot Spots.
Select Tables And Fields
This example will create a Hot Spot (SQL statement) that will display all the Purchase Orders associated with a selected Part Number; however the logic remains the same regardless the Tables and Fields selected.
- Click 'New Hot Spot.'
- The Query Wizard opens to the 'Field Selection' screen.
- Open the 'Available Tables' dropdown menu.
- This menu displays the various tables that are associated with the selected system area / record that can be used by the Wizard.
- Select the table to include in the SQL statement.
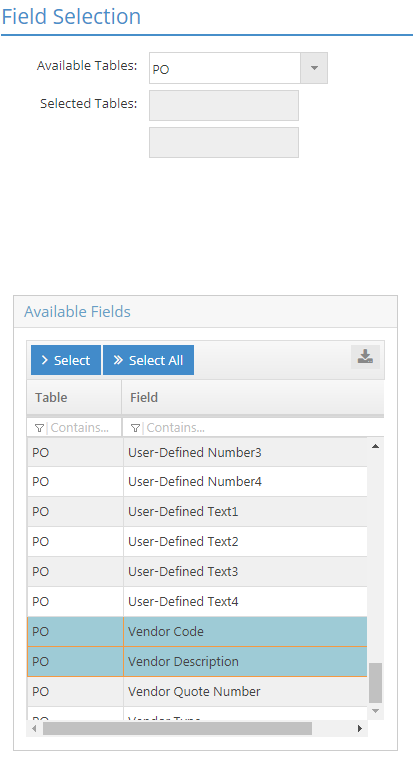
- The Wizard now displays a list of 'Available Fields' associated with the selected table.
- In this example, 'PO' is the selected table.
 Using Related Tables
When a table is selected from the 'Available Tables' dropdown menu, the Wizard will display information in the 'Related Tables' box as a "heads up" with regards to other tables that contain related information that could be successfully "Joined" with each other. In this example, selecting 'PO' causes the Wizard to display 'PODet' (which contains PO Details) and 'POReleases' as Related Tables.
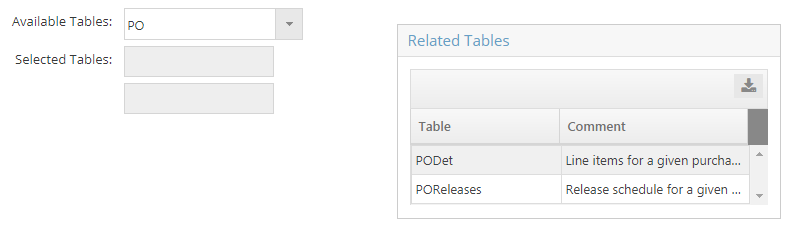
Selecting a Related Table will make it the 'Available Table' selection and cause the 'Available Fields' to update accordingly. Related Tables can also be selected initially from the Available Tables menu.
- The Wizard now displays a list of 'Available Fields' associated with the selected table.
- Select one or more fields to include.
- This represents the specific fields the that will be included in the SQL statement created.
- In this example, the following fields will be selected:
- Purchase Order Number
- Purchase Order Total
- Vendor Code
- Vendor Description
- In this example, the following fields will be selected:
- This represents the specific fields the that will be included in the SQL statement created.
- Click 'Select' to add the field(s) to the Selected Fields grid.
- Clicking 'Select All' would place all the Available Fields in the Selected Fields grid at one time.
- (OPTIONAL) Select another table and additional fields.
- Once fields have been selected from the first table chosen, a second table can be selected from the grid to add to the SQL statement.
- In this example, 'PODet' will be selected from the Related Tables box (or selected in the Available Table dropdown menu) and 'Part Number' added to the Selected Fields grid.
- A maximum of 2 (two) tables can be selected for use in the Wizard.
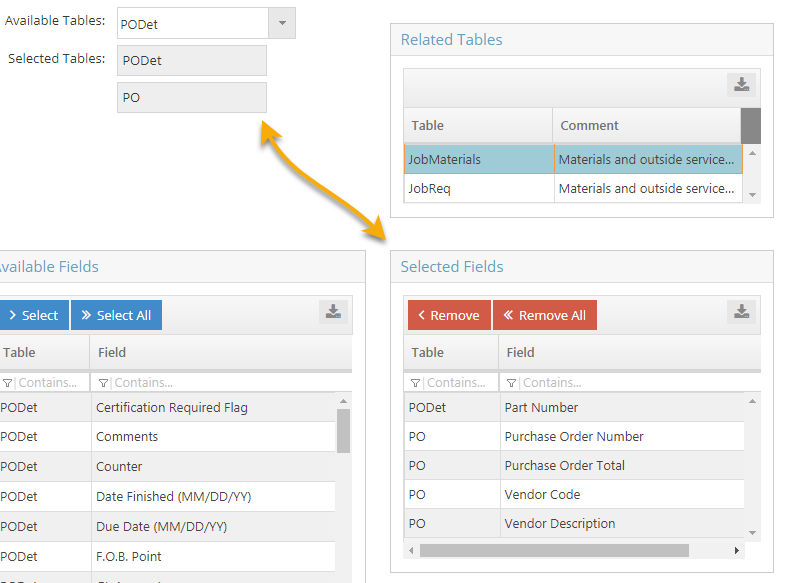
- Once fields have been selected from the first table chosen, a second table can be selected from the grid to add to the SQL statement.
- Click 'Next.'
- If 2 tables were selected, the Wizard next displays the 'Join Tables' screen.
Join Tables (CONDITIONAL)
- (CONDITIONAL) Select the fields to use to 'Join Tables.'
- By default the Wizard selects a field from each table as the "join" criteria, but these can be edited.
- In this example, 'Purchase Order Number' is the common field used and will remain that way.
- The tables MUST be joined by a field that is present in both of them in order for the query to successfully return information.
- By default the Wizard selects a field from each table as the "join" criteria, but these can be edited.
- (CONDITIONAL) Click 'Next.'
- The 'Search Criteria' screen displays.
- If only 1 (one) table was selected on the 'Field Selection' screen, the Wizard would skip the 'Join Tables' screen and go directly to 'Search Criteria.'
Select Search Criteria
- Open the 'Field' dropdown menu and select the first value to use.
- Only the 'Selected Fields' are displayed.
- In this example, 'POdet.Part Number' will be selected.
- Only the 'Selected Fields' are displayed.
- Open the 'Criteria' dropdown menu and select the criteria to apply to the selected field.
- Though they may vary based on the field selected, options will include items such as 'Equal To', 'Greater Than', 'Less Than', etc.
- This example will use 'Equal To.'
- Though they may vary based on the field selected, options will include items such as 'Equal To', 'Greater Than', 'Less Than', etc.
- Select the desired 'Value' option.
- Select 'Search for specific value' if the Hot Spot should always use a specified value, eliminating the need for user input.
- Select 'Prompt the user for a search value' if the user should be required to provide information for the Hot Spot.
- This example will use the 'Prompt' option to allow the user the ability to specify what part to see information for.
- The action required for this step depends on what option was selected for the 'Value' radio button (Step 12.)
- 'Search For Value'' - Select the appropriate value from the dropdown menu.
- The values will vary based on the Field selected.
- When entering values manually, make sure they match EXACTLY to ensure the query returns the desired results.
- Due to syntax issues, double quotes (") should NEVER be used in fields that may be used in queries.
- The values will vary based on the Field selected.
- 'Prompt User' - Enter the message that should appear in the prompt provided and click 'OK.'
- The Wizard will provide a message by default, such as 'Enter Part Number' (since that is the Field that was selected.)
- This option would not be practical for use on Triggers.
- This example will use the default message.
- 'Search For Value'' - Select the appropriate value from the dropdown menu.
- Click 'Add Criteria.'
- This must be done to add the criteria to the query.
- (OPTIONAL) Add more criteria to the query by repeating steps 10 - 14.
- This can be done to either expand the list of values to look for or to narrow the possible instances of getting a result.
- When additional criteria are added, the 'Apply Criteria As' radio button becomes required.
- Selecting 'And' causes the resulting SQL statement to return results only if both / all criteria are met.
- Selecting 'Or' causes the resulting SQL statement to return results so long as either / any of the criteria are met.
- For example, if 'PO.Vendor Code' was selected as an additional (Equal To) Criteria :
- Selecting 'And' would result in a query that returned results only if BOTH Part Number AND Vendor Code matched the provided values. (Results narrowed.)
- Selecting 'Or' would result in a query that returned results so long as EITHER Part Number OR Vendor Code matched the provided values. (Results expanded.)
- This example will only use 'PODet.PartNumber' as the Criteria.
- Click 'Next.'
Select Sort Option For Results
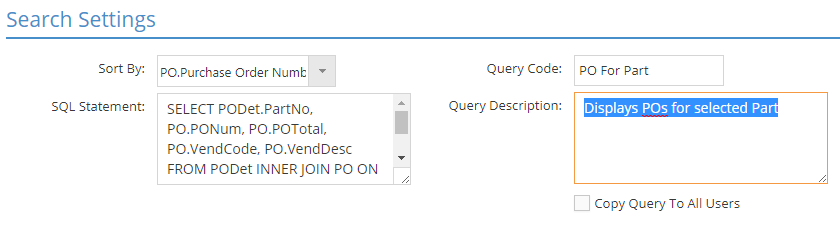
- Open the 'Sort By' dropdown menu and select how the Trigger will sort the information displayed if an action occurs that meets the stated criteria.
- This example will use 'PO.PurchaseOrderNumber.'
- Enter a value for *'Query Code' in order to identify the Hot Spot.
- Enter a 'Query Description' to help clarify exactly what the Hot Spot will display.
- Determine whether the Hot Spot will be added to all Users by default.
- Selecting the 'Copy Query To All Users' option automatically adds the Hot Spot to ALL Users, including the default Touch Screen User.
- Leaving this option blank means the Hot Spot will only be available for the User that was listed on the Hot Spot Screen when the Query Wizard was launched.
- Hot Spots can be added to / removed from Users in the future as needed.
- Click 'Finish.'
- The result of the selections made displays in the 'SQL Statement' field on the Hot Spot Maintenance Screen.
- Click 'Test' to check the validity of the SQL statement.
- When finished, click 'OK' to save the changes and exit Hot Spot Maintenance.
- The Hot Spots are assigned to the User at this point.
- Click 'Close' to exit the 'Hot Spots' screen.
- Click 'Save' to close User Maintenance.
- The newly assigned Hot Spot will be available for the User to run the next time they log in to JobBOSS2.