Global Use; Features > Documents
Using the Repository Manager
System Location: User Options (Welcome) Dropdown > Repository Manager
The Repository Manager is a virtual directory where files are located for the purpose of being associated with records in JobBOSS2 as either documents or images. Access to these files is determined by a combination of Document Groups and security settings within the Repository Manager.
The first step in using the Repository Manager to associate files with records is to determine how users should be grouped together for the purpose of assigning access levels.
The system comes with two permanent groups already provided:
- Administrators: This group is designed for system admins and would typically have full security rights to all groups created, but would not have to.
- The Supervisor user is automatically a member of this group
- Other users must be manually added to this group
- Users: This group is the default group that all users belong to and is intended to provide easy access to files that any user is allowed to have access to.
- All users are automatically added to this group
- Users cannot be removed from the group
- Deleting a user removes them from this group
Neither the Administrators nor Users Group can be deleted.
If there are files that some users should be able to access but not others, additional Document Groups can be created.
Create and Populate a Document Group
System Location: Settings > System > Document Groups
Users must have access to User Maintenance in order to access Document Groups.
- Click the Settings button.

- Open the System dropdown menu.
- Select Document Groups.
- Click New (located at the top of the page.)
Provide Values
Provide information for the fields listed below at a minimum to take advantage of JobBOSS2's reporting and analysis tools in addition to benefiting from its ability to pass information along from one part of the software to another.
An asterisk [*] indicates a required field.
- Provide information for the following fields:
- *Group Name: Identifies the group that users will be assigned to
- Description: Provides additional information about the group to help identify which users should be members
- Click Add.

- Select one or more Users.
- Click OK.
- To remove a User from a group, select the User and click Remove.

- Click Save to close and save the Document Group.
- Use the Save dropdown menu if you want to create a new record or print a report upon saving.
Users can be added to the User Group after it is created as needed.
Back to Top
Even though the Repository Manager is a virtual directory, it still needs to have one or more directory folders created before it can be used.
When you open the Repository Manager, the virtual directory folders are expanded, but there is not a selected folder open. The file grid will remain empty until you select a folder.
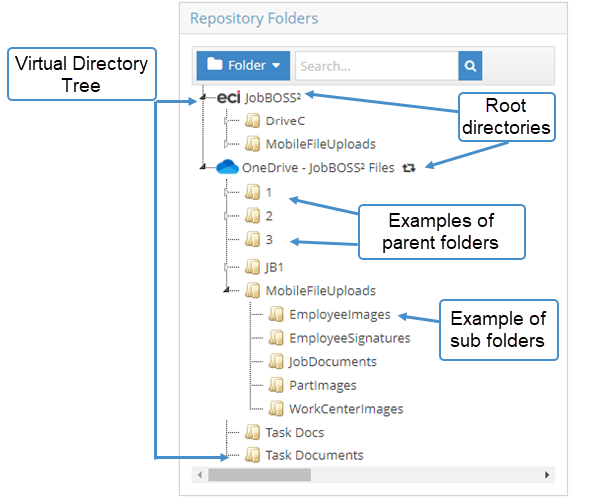
It is possible (but not certain) for one or more directory folders to be created during a data conversion, if one was performed. If this is not the case, at least one directory folder must be created before documents and images can be attached to records in JobBOSS2.
Any JobBOSS2 User can access the Repository Manager and create a directory folder. The ability for users to access directory folders that already exist and what they are able to do with them depends on the security rights granted to the Document Groups they belong to.
 Why a Virtual Directory?
To ensure that files that need to be associated as a document or an image in JobBOSS2 are available to all authorized users, they are stored in a single directory that is created when the system is loaded on a local web server or is maintained in a cloud environment if the system is hosted by ECI Software Solutions, Inc.. This eliminates the need for everyone to have the same drive mappings and allows users from multiple locations to easily access the files. The ability to create folders and sub-folders within this virtual directory allows users to organize files into logical groupings even though they are not really moved from the original, centralized location.
For additional information on designating where files are stored when installing on a local web server, refer to the installation instructions provided or contact Support and speak to one of our Hardware Technicians.
Create a Directory Folder
- Open the User Options (Welcome) dropdown menu.

- Click Repository Manager.
- Select the Root Directory (JobBOSS2 icon) in the Repository Directories window.
- Click New.
- Enter the name of the new directory folder.
- It is recommended to avoid blank spaces in directory names.
- Click OK.
- The new folder displays as a Parent Folder (i.e. the folder is directly under the Root Directory)
- To create a Sub Folder, select a Parent Folder instead of the Root Directory before clicking New
- Repeat steps 3 - 6 for as many folders / sub folders as desired.
- Click OK to close the Repository Manager and save the changes made in the virtual directory tree.
It only takes one folder to be able to use the Repository Manager; however it may be useful to create additional folders (and possibly sub folders) to make it easier for users to find the files they need, especially if there are multiple Document Groups involved.
Editing Existing Folders
Once folders are created, they can be moved between the parent and sub levels, renamed  or deleted
  as needed so long as the user has adequate security rights to do so.
Search In Folders
The search bar above the virtual directory tree allows you to search within all of the repository folders at once. The results will populate so that they are organized by folder.
Editing Files
Files are edited using the action buttons above the Files grid.
- Add Files allows you to add a file to the folder you have selected.
- Replace File allows you to replace the file you selected with a new file. This function will delete the file you are replacing when it adds the new one.
- Get Files allows you either View or Download the selected file.
- Move Files allows you to move files from one folder to another.
- Delete Files allows you to delete a file from the Repository Manager.

Back to Top
Each folder and sub folder in the Repository Manager can be assigned its own security settings for each Document Group created. This is particularly useful in situations where the level of access to files that get associated to records is not the same for all users based on their business role.
If access to files needs to be limited for some users, it is recommended that at least one additional Document Group be created since no one can be removed from the default Users Document Group and membership to the default Administrators Document Group is typically very limited.
Assign Security Rights for Document Groups to a Directory Folder
- Open the User Options (Welcome) dropdown menu.
- Click Repository Manager.
- Select the a folder in the Repository Directories window.
- Security rights cannot be assigned to the Root Directory.
- Click Security.
- Designate the security rights for each Document Group listed. Options include the following:
- View
- Edit
- None (Both options blank)
For more information see Repository Manager, Documents, and Images.
- Click OK.
- Repeat steps 3 - 6 for as many folders / sub folders as desired.
- Click OK to close the Repository Manager and save the changes made to the security settings.
The level of security provided impacts what members of the Document Group are able to see / do in the Repository Manager as accessed here or as accessed when associating a file with a record.
Back to Top
Files can be associated with records throughout JobBOSS2 as either a Document or an image.
For more information see Repository Manager, Documents, and Images.
Associate a File as a Document
- Open an area that allows for documents to be attached.
- Inventory Items / Estimates are common record types that use this feature
- Select a record and click Edit.
- Click Documents.

- The Documents screen opens
- From here the user can attach, remove, and download files
- Click Attach.
- The Repository Manager opens
- In the Repository Directories window, select the directory folder that contains the file to associate with the record being edited.
- The folders available to the user depends on the following:
- The Document Group the user belongs to
- The security granted to the Group
- In the Directory Files grid, select the files to associate with the record being edited.
- If the file is not listed the user may be able to add it to the grid depending on the security granted to their Document Group
- Click OK.
- If the file is being associated with an Inventory Item or Estimate record, the user can also select whether to have it print with one or more of the listed reports
- Only PDF files will print with a report
- Click OK to exit the Documents form.
- Click OK to save and close the selected record.
Associate a File as an Image
- Open an area that allows for images to be attached.
- Select a record and click Edit.
- Navigate to the Image section of the record.
- Click Attach Image.

- The Repository Manager opens
- In the Repository Directories window, select the directory folder that contains the image file to associate with the record being edited.
- The folders available to the user depends on the following:
- The Document Group the user belongs to
- The security granted to the Group
- In the Directory Files grid, select the image file to associate with the record being edited.
- If the file is not listed the may be able to add it to the grid depending on the security granted to their Document Group
- Click OK.
- Any image type can be selected, but .jpg files are recommended
- Click OK to exit the Documents form.
- Click OK to save and close the selected record.
Back to Top