Configuring JobBOSS2 to use UPS for Shipping Codes by On-Premise Customers
JobBOSS2 uses the third-party library 4D Payment to integrate with UPS. To use this integration, users must set up an OAuth2 authentication to access the UPS APIs.
On-premises customers require an additional step to create API Client ID and Client Secret via the UPS website.
For more information on how to set-up JobBOSS2 to integrate with UPS, view training on UPS OAuth Enhancement or UPS OAuth Enhancement for the Cloud.
Customers who are On-Premises are required to create and register an API App on the UPS Developer site. They are also required to modify the E2Shop.Web.dll.configweb file by inserting the new Client ID and Client Secret and restarting JobBOSS2. It is advised to create the UPS API app and get the Client ID and Client Secret before starting the upgrade to this version.
-
Navigate to https://developer.ups.com/apps and log in using your UPS credentials.
-
Click the Add Apps link.
-
Follow the UPS setup process to obtain the necessary keys for configuration.
-
On the Credentials page, copy and record both the Client ID and Client Secret. Store in a safe location.
For more information on this process, please visit the Getting Started with UPS APIs page.
How To Get Access Key and Account Number
We offer an interface option UPS online. However users need to go to UPS.com for instructions on receiving an Access Key. The access key can only be provided by UPS and is what allows for the interface to communicate.
The e2Shop.Web.dll.config file requires editing before the UPS integration can be enabled. When the edits are complete, recycle the services to load the new settings. (All users will be logged off of JobBOSS2.)
Follow the steps below to set up JobBOSS2 On-Premises for the UPS integration:
- On the Local Disk (C:), go to inetpub > wwwroot > JobBoss2.
- Search for the file named E2Shop.Web.dll.config and click on the name.
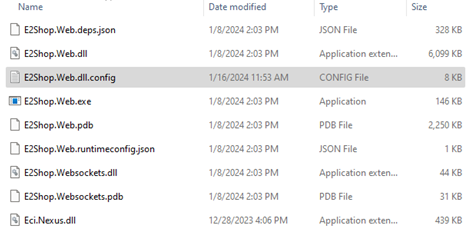
- Right click on the file name and open in a text editor.
- Validate the key values below. (Though they should deploy in the correct state from the previous build, these values should be confirmed.)

- Insert the UPS Client ID and Client Secret created in the step above into the two keys highlighted below:
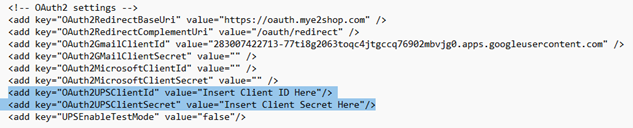
- Save the changes in the text file and close.
- Restart the system to make changes and to edit Shipping Codes.
-
In JobBOSS2, go to Settings > Base Tables > Shipping Codes.
-
Click on UPS, and then click Edit. 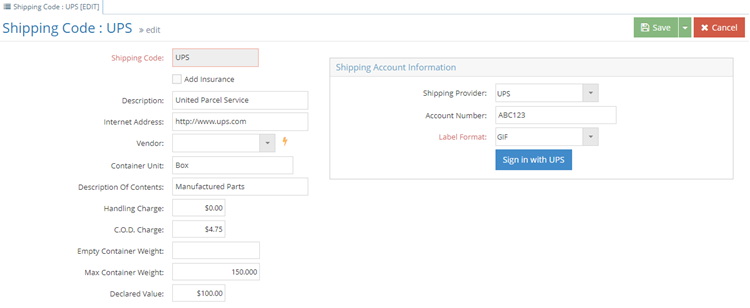
-
Enter the UPS Account Number.
-
Select the Label Format.
-
Click the Sign in with UPS button.
-
The UPS authentication screen opens. Enter the UPS user name and password. User is returned to JobBOSS2.
-
Button changes to Disconnect from UPS.
-
Click Save. UPS integration is ready for use.
 Required UPS Updates for the JobBOSS2 One-Premises Configuration