How to Use NET1 for Credit Card and ACH Processing
In order to use JobBOSS2's integration with NET1, the site on which JobBOSS2 is installed must be secured (https). Hosted users are automatically on a secure site; however, On-Premise users are responsible for
To set up credit card processing or Automated Clearing House (ACH) in NET1, email your NET1 Payment Consultant or call 1-817-662-3601. Note, even if you have already set up for credit card processing in NET1, you must contact your payment consultant to use ACH also.
Initializing NET1 for Credit Card and ACH Processing
JobBOSS2integrates with NET1, an ECI Software Solutions, Inc. payment processing application, for credit card transactions. In order for this integration to work, you must create an account in NET1 and record the Location ID for the account.
-
Create a NET1 account and record your Location ID.
-
Go to the Settings tab, open the System dropdown menu, and click on Company Maintenance.
-
Select your company, click Edit and then, Default.
-
Click the NET1 tab.
-
Enter your Location ID and then click the Validate NET1 Credentials button.
-
Click OK in the validation pop-up box and then click OK to exit the screen. Or, click the Forget Current Connection button to disconnect from NET1.
Using ACH Processing
- Go to the blue Data Entry tab, open the AR dropdown menu, and select Cash Receipts
- Click New.
- Select NET1 ACH as the Receipt Type:
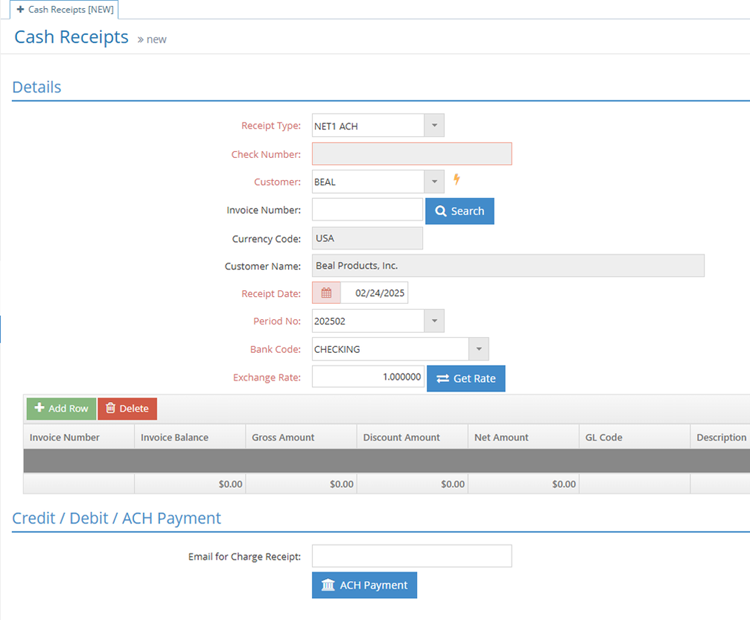 The Check Number field is now grayed out.
- Select the Customer from the dropdown menu.
- Select an Invoice Number (if applicable).
- Affirm that the proper information automatically populated in the Receipt Date, Period No, Bank Code, and Exchange Rate fields.
- Add line items to the grid as necessary.
- Credit Card processing does not occur with a quantity of $0 or negative amounts.
- Under the Credit/Debit/ACH Payment section, enter and email in the Email for Charge Receipt field and then click the ACH Payment button.
- The ECI NET1 Payment screen opens:
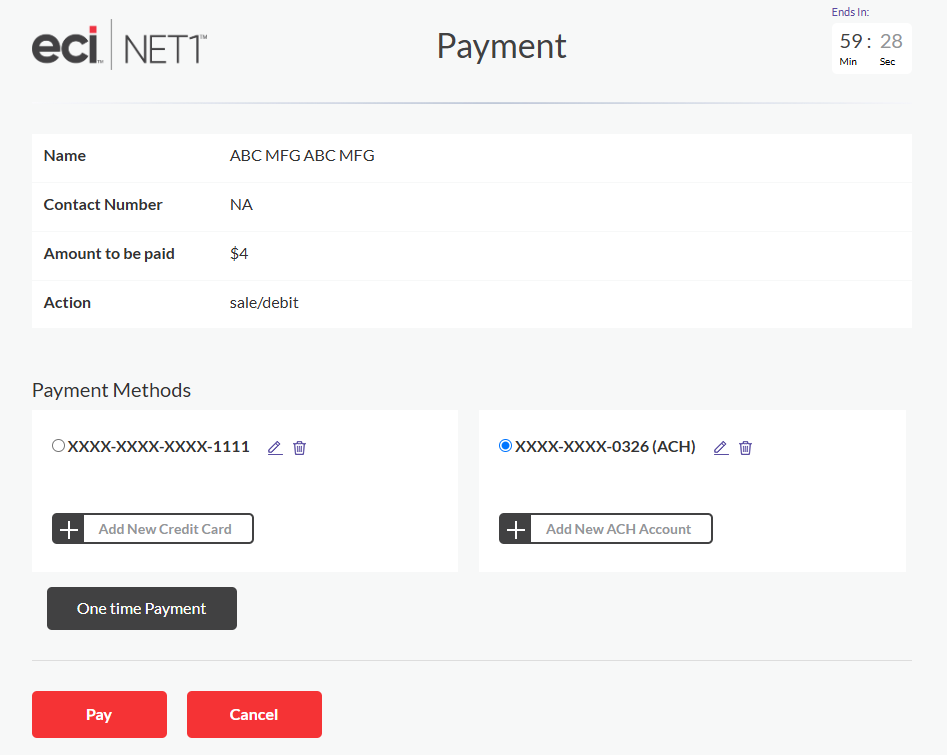
- If no payment information is available, click the Add New ACH Account button and enter the required information. (If payment information is available, select the ACH account and then click the Pay button. Skip to Step #13.)
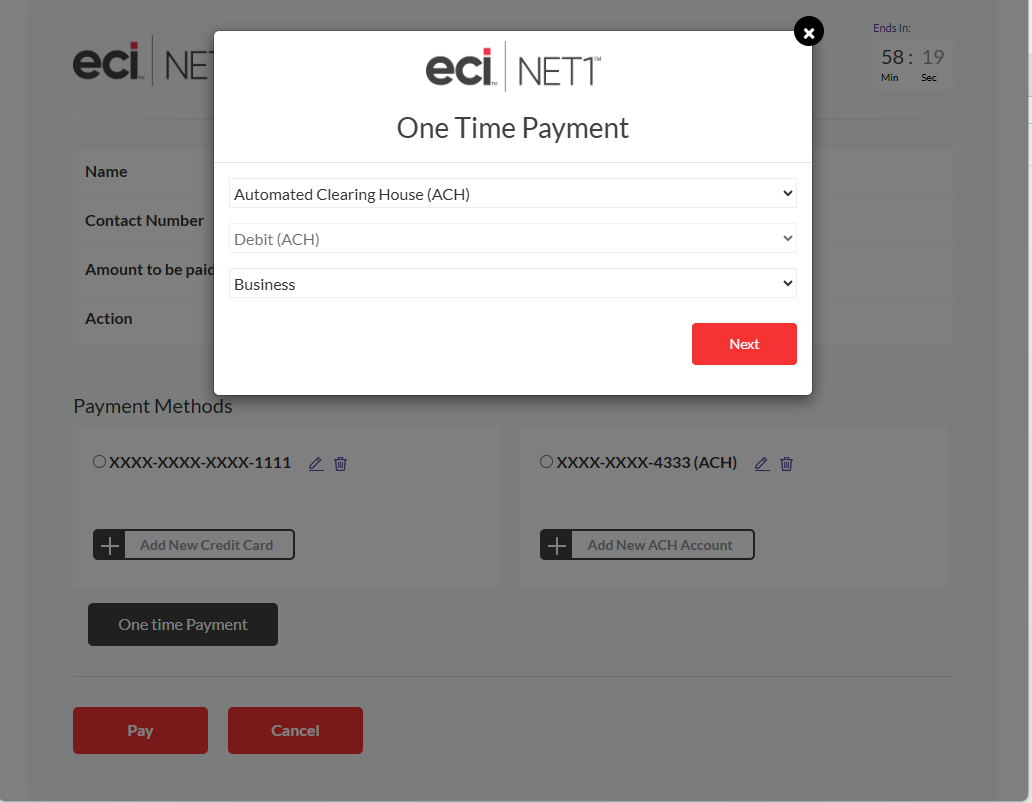
- Click the One-time Payment button, if applicable, and selected Automated Clearing House (ACH) and either Business or Personal from the dropdown menus:
- Enter the ACH account information, including the Routing and Account numbers and then click Submit:
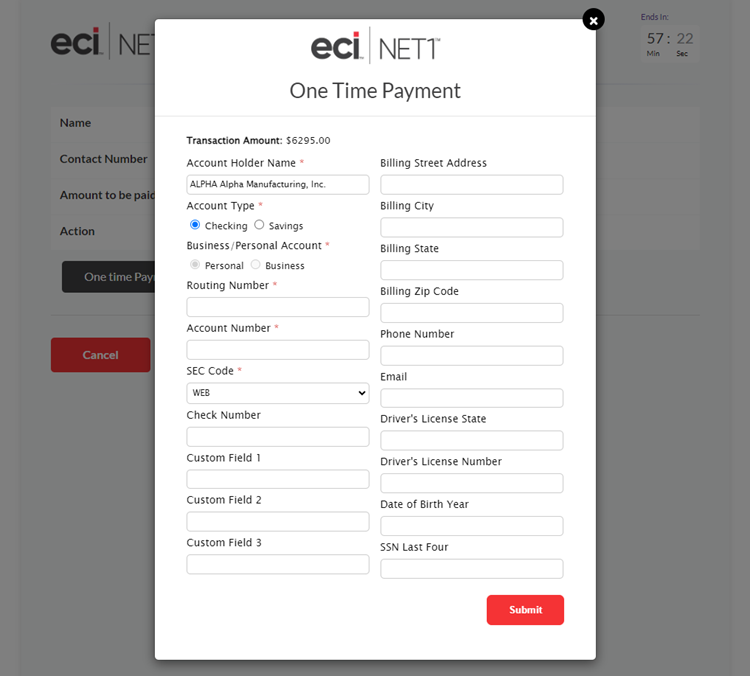
- Click the Submit button. A Payment window opens with the entered information:
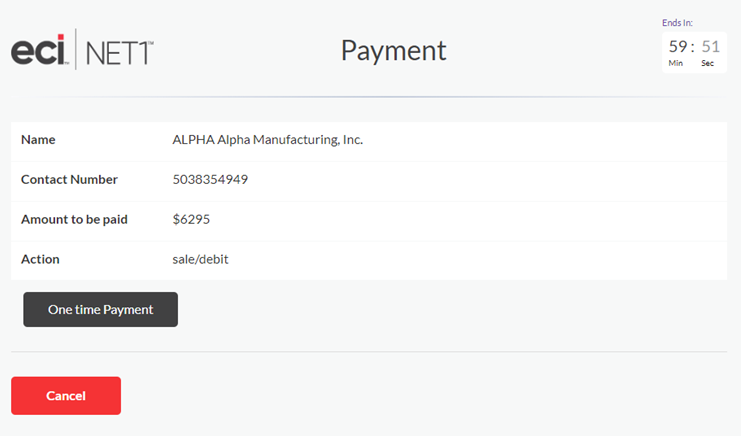
- Click the One-time Payment button.
- The Transaction Successful message is shown.
- The Cash Receipts window in JobBOSS2 re-opens. Click the Process button.
- After processing, users are returned to the Cash Receipts Navigator screen.
ACH Refunds
Currently, refund functionality is not supported for NET1 ACH transactions in JobBOSS2. To process a refund, please submit it through the affiliated Paya account.
Using Credit Card Processing

- Go to the blue Data Entry tab, open the AR dropdown menu, and select Cash Receipts.
- Click New.
- Select NET1 Credit Card as the Receipt Type. The Check Number field is now grayed out.
- Select the Customer from the dropdown menu.
- Select an Invoice Number (if applicable).
- Affirm that the proper information automatically populated in the Receipt Date, Period No, Bank Code, and Exchange Rate fields.
- Add line items to the grid as necessary.
- Credit Card processing does not occur with a quantity of $0 or negative amounts.
- Go to the Credit / Debit Payment section.
- Enter the Email Address of your customer contact. If no email address is entered the customer email on the NET1 portal will be updated to none@ecisolutions.com.
- Click the One Time Card Payment button. A Net1 Payment box opens.
- Click One Time Payment.
- Enter the following information:
- Account older Name
- Credit Card Number
- Expiration Month
- Expiration Year
- CVV
- Billing Street Address
- Billing ZIP Code
- Click Submit and then click Save.
Credit Card Refunds
- Go to the blue Data Entry tab, open the AR dropdown menu, and select Cash Receipts.
- Edit the cash receipt record that you want to refund.
- Click Issue Refund from the upper right row of action buttons.
- Refunds can only be issued in full amounts.
Your refund can be seen in the Cash Receipts navigator as a negative amount.