Select whether the utility will look at Due Date, Invoice Date, or Date (Invoice) Entered when looking for eligible invoices.
Select the Begin Date.
This represents the earliest date the utility will consider when looking for eligible invoices.
Blank by default, but can be changed.
When left blank, the utility looks at all invoices with a date prior to the current date.
Select the End Date.
This represents the latest date the utility will consider when looking for eligible invoices.
Defaults to the current date, but can be changed.
This would typically be set to the next date (or a few days beyond) that checks are expected to be created.
Determine the following settings:
Apply ALL Available Discounts In Date Range: When selected, the utility displays any invoices that would lose their eligible discount if not paid within the selected time frame, even if they fall outside the selected 'End Date' range in terms of the Date Type selected.
'Begin Date' is left blank and 'End Date' is set at 15 days from the current date / date of the check run.
“Invoice A” is created the same date as the check run and has the following:
An eligible discount of 1% if paid within 10 days
Invoices list this last day of eligibility as the 'Discount Date.'
A Due Date of 30 days
Utility Behavior
If the option to 'Apply ALL Available Discounts' is selected, the utility will include "Invoice A" because its 'Discount Date' falls within the date range even though its 'Due Date' does not.
If the option to 'Apply ALL Available Discounts' is not selected, the utility will not include "Invoice A" because its 'Due Date' falls outside the selected date range and 'Discount Date' is not taken into consideration.
Select Vendor Invoices In This Currency ONLY: When selected, the utility will only include invoices with the same Currency Code listed in the 'Generate Checks' Box.
Click Preview (located in Utility Toolbar at the top of the screen.)
This populates the Vendors and Invoices Grids with values that meet the selected criteria.
Once the list of invoices has been finalized, the user can create the checks based on some additional selections.
Generate Checks Box
Select the Bank Code.
This required field will be used as the Bank Code for each check created by the utility.
It also provides the Currency Code to associate with the utility and all the checks it creates once processed and the 'First Check Number' (listed below.)
Select the Check Date.
This required field will be used as the date for each check created by the utility.
Designate the First Check Number.
This required numeric value represents the number assigned to the first check created by the utility.
The value will be increased by an increment of 1 for each additional check created.
Each Check Number generated must be unique.
(OPTIONAL) Review list of invoices to be paid prior to processing.
The report displays a list of invoices and amounts that will be included on the checks that will be created by the utility.
Click Close.
The utility prompts whether the current selections should be saved so the user can "continue automatic check writing at a later date."
Click Yes on the prompt.
The utility displays the same selections that were present when closed the next time it is used.
If the prompt is answered 'No' the utility resets to the default settings as indicated above and the user would have to click 'Preview' to get items to display.
Click Process.
The utility prompts whether the user wishes to continue with the check creation process.
Click Yes on the prompt.
The selected Vendors and related Invoices are removed from the utility.
Clicking 'No' returns the user to the utility without creating any checks.
(OPTIONAL) Print the checks just created.
Click Print Checks.
This option is not available until the utility has been processed.
In the check print spool, select the checks to print and generate them accordingly.
It is suggested to clear the print spool prior to processing if the checks will be printed immediately after creation to avoid accidentally re-printing checks that may have been edited previously.
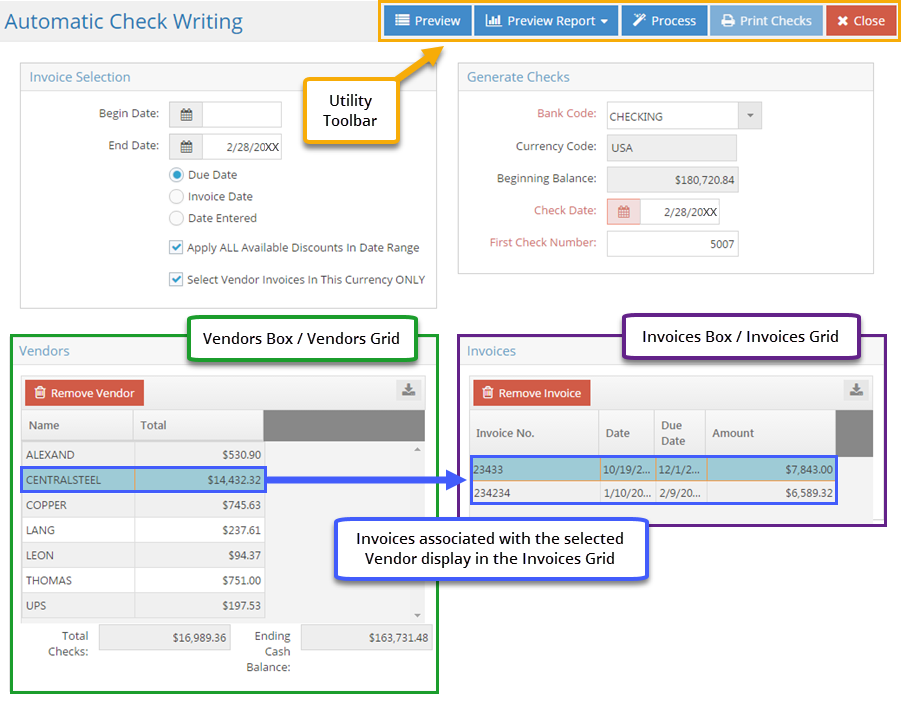
 Select Invoices to Create Checks For