Connecting to JobBOSS2 Public API for On-Premise Customers
The following information about connecting to the JobBOSS2public API is for on-premise customers. Hosted customers should contact their account manager for information about API connectivity.
API General Documentation / Swagger UI
To find the application programming interface (API) documentation locally, look at the URL of the hosted site. For example, if the URL reads http://jb2.example.com, then the URL for the API documentation would be: http://jb2.example.com/0qmztosk6o/swagger/index.html
The documentation can also be found online at: https://integrations.ecimanufacturing.com/
This page shows the general syntax required to form requests to the API and lists the endpoints available with the kind of requests the endpoints support.
Swagger JSON
Also available from the Swagger UI page is a JSON file that contains the same information in a machine-readable format that is suitable for use with programs like Postman or NSwagStudio. In Postman, import the JSON to create a collection that works as a starting point for manually testing or experimenting with the API. With NSwagStudio, generate C# or TypeScript automatically from the JSON file.
Prerequisites (API Key, User)
Once you have established how you are going to connect to the API (whether using Postman for testing or ad hoc requests, using a tool like NSwagStudio to generate code, or hand-writing API client code from scratch), you must follow the same process to register, login, and make requests to the API.
The first step is to register the client with the API. This step requires knowing the API key for your company, and having a user set up in the JobBOSS2 system that you want to use to interact with the API.
To find the API Key for your company, navigate from the JobBOSS2 web site main home page to Settings via the gear icon in the upper left corner. Under settings click on Company Maintenance:
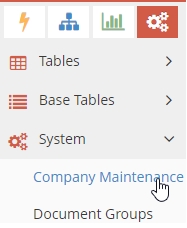
From the Company Maintenance Navigator page, you can see the API key for each company on your system. To copy the API Key to your clipboard, double-click on the company row in the grid. Then from the Company Maintenance page click in the API Key text box to select the API Key and use Ctrl-C or right-click on the selected text to choose the Copy option from the context menu.
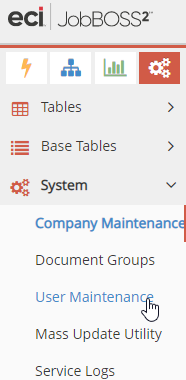
Next, navigate to User Maintenance and create a new View Only user with a name, like APIUSER:
Having a specific account dedicated to the API will make it so that records created or modified by the API will be tracked as having been created by that user account. If you use an existing user, you will not be able to tell which actions were done by that user through the web site UI and which were done by the API.
Register the Client
Once you have the API and user credentials ready, you need to use those pieces of information to register your API client (whether it’s Postman or a custom application) with the API.
To register, create a POST request to a URL in the form:
{{BaseAPI}}/api/v1/Register?apiKey={{ApiKey}}&username={{LocalUser}}&password={{LocalPassword}}
BaseAPI is the base URL of your JobBOSS2 installation. If your users open the JobBOSS2 UI at https://jb2.example.com, then that is what you put in for BaseAPI. ApiKey is the API Key from the previous section. LocalUser is the user name of the account you created for API use. LocalPassword is the password of the account you create for API use. Once you submit the POST request to that URL, you should get a response that looks like:
{
"result": "10000000CDF0A97284EDC41F645A6A604D7FD60486EF83323B9709DA7DFBEF6C97C6FAFA",
"errorMessage": null
}
The result value is your hashed password. Save this value for use with the Login endpoint.
Login
Once you have registered with the API and obtained the hashed password, you are then able to login to the API and receive an access token to pass with all other API requests. The call to login is an HTTP POST request.
URL:
{base_url}/v1/Login
BODY:
{
apiKey: <company_API_key>,
userName: <company_API_userID>,
password: <encryptedPassword>,
}
If the login request parameters are correct the response will be the following JSON object:
{
errorMessage: null,
result: <token>
}
API Requests and Bearer Token
As mentioned above, every API request must have a valid Authorization HTTP Header.
In Postman you would add a header to your request with the Key = “Authorization” and a value like:
“Bearer 6fc29ab9a60f1590fded0ddc3c2337294f76d515e2d69a9303e7d5d100b47794adee115ffa914bd1d7a48ff293ccdbc30e8a97b5ad8ba95b5f27450d3c4e951b7b631afe728b872b0621a7a527affcb45ed623599bcc511cc594164e5d87b710”
If you are using custom or autogenerated code, you will need to ensure that your HTTP requests get this header by adding code that injects the header before submitting the request.